
Homemade Tofu: A Taste of Simplicity
The clatter of metal ladles against steaming vats, the sweet, nutty aroma of freshly ground soybeans, and the quiet murmur of my friend’s father as he worked – these are the sensory memories etched in my mind from countless early mornings spent in a small, unassuming tofu shop on the outskirts of Tokyo. The tofu he crafted was unlike anything I’ve tasted since – silken, subtly sweet, and imbued with a freshness that store-bought varieties simply can’t replicate. It wasn’t just food; it was a daily ritual, a testament to simple ingredients transformed by skillful hands. That memory has been a guiding star in my own tofu-making journey, a quest to recapture that elusive flavor and texture.
Recipe Overview
- Prep Time: 12 hours 15 minutes
- Cook Time: 45 minutes
- Total Time: 13 hours
- Servings: Variable
- Yield: 1 block of tofu (size depends on mold)
- Dietary Type: Vegan, Gluten-Free, Dairy-Free
Ingredients
- 1 3⁄4 cups whole dried soybeans
- 6 cups water, for soaking beans
- 7 1⁄2 cups water
- 4 cups warm water, divided
- 2 1⁄2 teaspoons nigari, crystal form (coagulant)
- 1 cup water
Equipment Needed
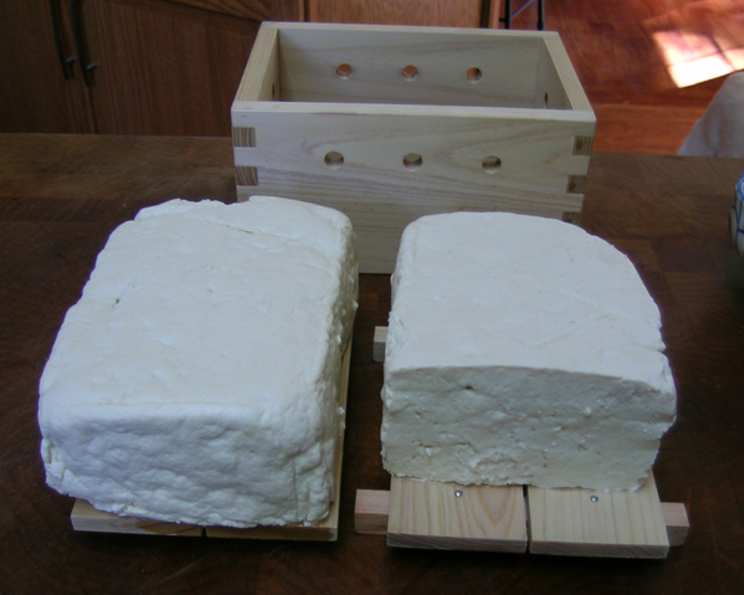
- Traditional wooden mold for tofu (or approximately 6-inch round colander)
- 2 pieces of at least 12 x 12″ cotton cloth or heavy-weight cheesecloth
- Large non-stick pot
- Blender
- Colander or strainer
- Large bowls or pots
- Mesh spoon
- Large basin
Instructions
- Begin by preparing your equipment. Have your traditional wooden mold for tofu (available online) or a roughly 6-inch round colander ready. Prepare two pieces of cotton cloth (at least 12 x 12 inches each) or heavy-weight cheesecloth.
- Soak the soybeans: Place the 1 3/4 cups of whole dried soybeans in a bowl and cover with 6 cups of water. Let them soak overnight, or for at least 12 hours. This allows the beans to fully hydrate, which is crucial for extracting the maximum amount of soy milk.
- Drain and divide: After soaking, thoroughly drain the soybeans. Divide the drained beans into two equal portions.
- Heat the water: In a large non-stick pot, heat 7 1/2 cups of water over medium-high heat.
- Prepare the coagulant: In a separate small bowl, combine 2 1/2 teaspoons of nigari crystals with 1 cup of water. Stir until the nigari is completely dissolved. Set this mixture aside. This is your coagulant, essential for transforming the soy milk into tofu.
- First Blend: Take one portion of the soaked and drained soybeans and combine it in a blender with 2 cups of warm water.
- Puree: Puree the mixture at high speed for 1 1/2 to 2 minutes, until it forms a very smooth, creamy consistency.
- Add to Pot: Add this blended mixture to the 7 1/2 cups of water that is heating in the non-stick pot. Once the water comes to a boil, immediately turn off the heat and cover the pot with a lid.
- Second Blend: Take the remaining soybeans and combine it in a blender with the other 2 cups of warm water.
- Puree: Puree the mixture at high speed for 1 1/2 to 2 minutes, until it forms a very smooth, creamy consistency.
- Add to Pot: Add this blended mixture to the pot with the initial soybean mixture. Increase the heat until it comes to a full boil, then immediately turn off the heat.
- Strain: Place a colander or strainer over a large bowl or pot. I usually use two bowls going for this part. Line the colander or strainer with the cheesecloth or cotton straining bag. Carefully pour the contents of the pot into the straining bag or cheesecloth.
- Extract the Soy Milk: Twist the bag or cheesecloth closed securely. Using a glass jar or another utensil with a flat bottom, press the sack against the colander to extract as much soy milk as possible. Be careful to avoid getting any okara (soybean pulp) into the milk. Rinse out the non-stick pot; you will need it again for heating the soy milk.
- Remove the Okara: Open the bag or cheesecloth and remove the remaining solids (okara). Store the okara in the refrigerator for future use in other recipes (it’s excellent in veggie burgers or as a fiber-rich addition to baked goods).
- Boil the Soy Milk: Pour the strained soy milk into the large non-stick pot. Boil the soy milk over high heat, and as soon as it reaches a full boil, reduce the heat to a simmer. Simmer for 7 minutes, stirring occasionally to prevent scorching.
- Coagulation – First Addition: Remove the pot from the burner. Using a wooden spoon, stir the soy milk back and forth vigorously 5 or 6 times. While continuously stirring, pour in 1/3 cup of the nigari solution (the mixture you prepared earlier).
- Coagulation – Second Addition: Stir 5 or 6 times more, making sure to reach the bottom and sides of the pot. Do not overbeat the mixture; overbeating will result in small curds. Small curds are ideal for firm tofu, but not for regular or soft tofu. Stop stirring and wait until the liquid movement ceases. Lift the spoon out of the pot. Sprinkle another 1/3 cup of the nigari solution evenly over the surface of the soy milk. Cover the pot and wait 4-5 minutes, allowing the curds to form slowly from the bottom up.
- Coagulation – Final Addition: Uncover the pot. While very slowly stirring the upper 1/2 inch layer of the curdling soy milk, sprinkle the remaining nigari solution a little at a time over any remaining milky areas. Cover the pot again and wait another 4-5 minutes. You should now see large, delicate curds floating like white clouds in pale yellow whey.
- Prepare the Mold: Drape a clean piece of cheesecloth (or cotton cloth) over the wooden tofu mold. If you’re using a small round colander, drape the cheesecloth over the colander in the same manner.
- Transfer the Curds: Gently ladle all the curds into the wooden tofu mold or colander using a mesh spoon. Try to distribute the curds evenly.
- Drain the Tofu: Fold the edges of the cloth or cheesecloth neatly over the curds. Place the wooden lid (if using a tofu mold) or a plate (if using a colander) on top of the folded cloth. Let the liquid (whey) drain out for 2-3 minutes.
- Submerge in Cold Water: Fill a large basin with cold water. Carefully remove the lid or plate, and submerge the tofu-filled container (or cheesecloth containing the tofu) in the cold water.
- Unwrap and Firm: Gently unwrap the tofu under the water, and leave it submerged for 3 to 5 minutes, allowing it to firm up slightly. This final step helps to set the tofu’s texture.
- Enjoy: To best appreciate the flavor, serve the homemade tofu immediately. If you plan to serve the tofu later in the day, refrigerate it on a plate covered with plastic wrap. For longer storage (up to 5 to 7 days), refrigerate the tofu immersed in water, changing the water daily.
Expert Tips & Tricks
- Soybean Quality: The quality of your soybeans greatly impacts the final taste of the tofu. Look for high-quality, non-GMO soybeans from a trusted source.
- Temperature Control: Precise temperature control is crucial, especially during the coagulation process. Avoid overheating the soy milk, as this can result in a grainy texture.
- Nigari Alternatives: While nigari is the traditional coagulant, you can experiment with other options like food-grade calcium sulfate (gypsum) or Epsom salts. However, nigari tends to yield the best flavor.
- Okara Uses: Don’t discard the okara! It’s a versatile ingredient. Try adding it to smoothies, muffins, or even using it as a thickening agent in soups.
- Tofu Firmness: The amount of nigari and the draining time will affect the firmness of your tofu. Use less nigari for softer tofu and drain for a shorter time. For firmer tofu, use slightly more nigari and drain for a longer time, or gently weigh down the lid during draining.
- Equipment Substitutions: If you don’t have a specialized tofu mold, a simple colander lined with cheesecloth works perfectly well.
- Flavor Enhancements: Experiment with adding seasonings to the soy milk before coagulation. A pinch of salt or a touch of ginger can add depth to the flavor.
Serving & Storage Suggestions
Freshly made tofu is delicious enjoyed simply, with a drizzle of soy sauce and a sprinkle of scallions. It can also be used in a wide variety of dishes, from stir-fries and salads to soups and stews. For optimal flavor and texture, consume the tofu within 2-3 days. Store leftover tofu in the refrigerator, submerged in water in an airtight container. Change the water daily to maintain freshness. While freezing tofu is possible, it will alter the texture, making it more porous and absorbent. Frozen tofu is best used in dishes where the texture change is not a concern, such as in marinades or blended into sauces.
Nutritional Information
| Nutrient | Amount per Serving | % Daily Value* |
|---|---|---|
| Calories | ~350 kcal | ~18% |
| Total Fat | ~20g | ~31% |
| Saturated Fat | ~3g | ~15% |
| Cholesterol | 0mg | 0% |
| Sodium | ~50mg | ~2% |
| Total Carbohydrate | ~15g | ~5% |
| Dietary Fiber | ~8g | ~32% |
| Sugars | ~3g | – |
| Protein | ~30g | ~60% |
| *Percent Daily Values are based on a 2,000 calorie diet. Your daily values may be higher or lower depending on your calorie needs. Estimated values will vary based on yield and preparation methods. |
Variations & Substitutions
- Flavored Tofu: Infuse the soy milk with flavors before coagulation. Add herbs like rosemary or thyme, spices like chili flakes or ginger, or even a touch of seaweed for a subtle umami flavor.
- Silken Tofu: For silken tofu, use less nigari and skip the pressing step. Simply allow the curds to set undisturbed.
- Firm Tofu (Chinese Style): For a firmer, more pressed tofu (like Chinese-style tofu), you can add weight (like a heavy book) on top of the mold during the draining process.
- Soy Milk Alternatives: While traditionally made with soy milk, you can experiment with other plant-based milks like almond milk or oat milk. Keep in mind that the flavor and texture will differ from traditional soy-based tofu.
- Vegan Cheese: With adjustment of the coagulant, you can also try to make Vegan cheese.
FAQs (Frequently Asked Questions)
Q: Why is my tofu crumbly?
A: Crumbly tofu is often caused by over-stirring during the coagulation process or using too much coagulant. Be gentle when stirring and carefully measure the nigari.
Q: How can I prevent the soy milk from scorching?
A: Use a heavy-bottomed, non-stick pot and stir the soy milk frequently, especially during the simmering stage.
Q: My tofu is too soft. What did I do wrong?
A: If your tofu is too soft, you may not have used enough coagulant, or you might not have drained it for long enough. Try increasing the amount of nigari slightly and allowing for a longer draining time.
Q: Can I use store-bought soy milk to make tofu?
A: While you can use store-bought soy milk, the results may vary. Store-bought soy milk often contains additives that can affect the texture of the tofu. Homemade soy milk generally yields the best results.
Q: How long does homemade tofu last?
A: Homemade tofu will last for up to 5-7 days in the refrigerator if stored properly, submerged in water that is changed daily.
Final Thoughts
Making tofu from scratch might seem daunting at first, but it’s a rewarding culinary adventure that connects you to the origins of this versatile ingredient. The subtle sweetness and delicate texture of homemade tofu are a world apart from the blandness of most store-bought varieties. So, gather your ingredients, embrace the process, and prepare to experience the simple pleasure of freshly made tofu. Don’t be afraid to experiment with different flavors and textures to create your signature tofu. And most importantly, share your creations with friends and family and relive those cherished childhood memories as you enjoy the delights of homemade tofu.