
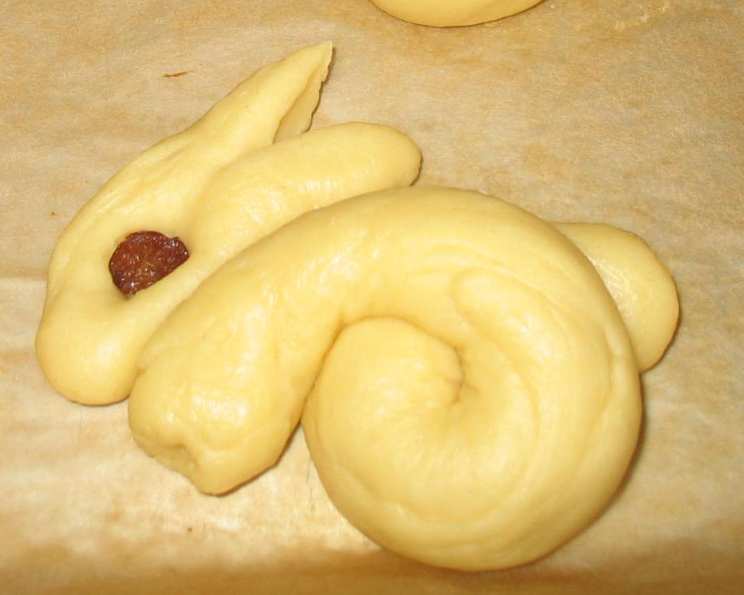
Honey Bunnies: A Sweet Treat for Any Occasion
The scent of warm, yeasty dough filled my grandmother’s kitchen every Easter. She’d gather all the grandkids around her massive wooden table, each of us eager to help shape the doughy bunnies. Flour dust would fly, giggles would erupt, and the air would be thick with the promise of sweet, honey-glazed goodness. Those Honey Bunnies weren’t just a treat; they were edible memories, a symbol of family and springtime joy. I’ve carried that tradition forward, adapting her recipe slightly, but always keeping the heart of it—the love and laughter—intact.
Recipe Overview
- Prep Time: 45 minutes
- Cook Time: 12-15 minutes
- Total Time: 2 hours 15 minutes to 26 hours (includes refrigeration and rising time)
- Yields: 15-16 rolls
- Serves: 15-16
- Dietary Type: Not specified. Contains dairy and eggs.
Ingredients
- 4 1/2 cups all-purpose flour, plus more for dusting
- 1/2 ounce active dry yeast or fast-rising yeast (about 1 1/2 teaspoons)
- 1 teaspoon salt
- 2/3 cup evaporated milk
- 1/2 cup water
- 1/2 cup honey
- 1/2 cup butter or margarine, cut into pieces
- 2 eggs
- 30 raisins
- Honey Glaze:
- 1/4 cup honey
- 1/8 cup butter
Equipment Needed
- Large mixing bowl
- Electric mixer
- Plastic wrap
- Greased bowl
- Floured surface
- 2 Large greased baking sheets
- Wire racks
- Small saucepan
Instructions
- In a large bowl, combine 1 1/2 cups flour, undissolved yeast, and salt. This ensures the yeast is evenly distributed throughout the initial mixture.
- In a separate saucepan or microwave-safe bowl, heat the evaporated milk, water, honey, and butter until the mixture is warm (105° to 115°F). A candy thermometer is helpful for accuracy, ensuring the yeast activates properly without being scalded. If you don’t have one, the mixture should feel warm to the touch, but not hot.
- Gradually add the warm liquid mixture to the dry ingredients in the large bowl. Beat with an electric mixer for 2 minutes at medium speed, scraping the bowl occasionally to ensure all ingredients are incorporated.
- Add the eggs and 1/2 cup flour to the mixture. Beat for 2 minutes at high speed. This incorporates air into the dough, contributing to a lighter texture.
- Using a spoon, stir in enough of the remaining flour to form a soft dough. You may need a little extra flour depending on the humidity and other factors. The dough should be slightly sticky but manageable.
- Place the dough in a greased bowl, greasing the top of the dough as well. Cover the bowl tightly with plastic wrap. Refrigerate for 2 to 24 hours. This slow fermentation process develops flavor and allows the gluten to relax, resulting in a more tender roll.
- Remove the dough from the refrigerator and punch it down to release any built-up gases. Transfer the dough to a lightly floured surface.
- Divide the dough into 15-16 equal pieces. Aim for consistency in size to ensure even baking.
- Roll each piece into a 20-inch rope. This long rope will be used to form the bunny shape.
- Divide each rope into 1 (12-inch) strip, 1 (5-inch) strip, and 3 (1-inch) strips.
- Coil the 12-inch strip to make the bunny’s body. Coil the 5-inch strip to make the head.
- Attach the head to the body, pinching to seal. Moisten the dough slightly with water to help the pieces adhere.
- Shape the remaining 3 strips into ears and a tail, and attach them to the body and head. Get creative with the ear shapes!
- Place the shaped bunnies on 2 large greased baking sheets, leaving some space between each roll for expansion.
- Cover the baking sheets and let the bunnies rise in a warm place until doubled in size, about 20 to 40 minutes. This final proofing is crucial for a light and airy texture.
- Preheat your oven to 375°F (190°C).
- Bake the bunnies at 375°F for 12 to 15 minutes, or until golden brown. Keep a close eye on them, as baking times may vary depending on your oven.
- Remove the baking sheets from the oven and transfer the bunnies to wire racks to cool slightly.
- While the bunnies are still warm, brush them with the Honey Glaze. To make the glaze, combine 1/4 cup honey and 1/8 cup butter in a small saucepan. Cook over low heat until the butter melts, stirring occasionally until smooth.
- Insert raisins for the eyes.
- If desired, brush the bunnies again with glaze before serving for extra shine and sweetness.
Expert Tips & Tricks
- For a richer flavor, use brown butter in the glaze. Simply cook the butter in a saucepan over medium heat until it turns golden brown and has a nutty aroma. Strain the butter to remove any solids before adding the honey.
- If your kitchen is cold, create a warm environment for rising by placing the dough in an oven that’s been preheated to 200°F (93°C) and then turned off. The residual heat will help the dough rise more quickly.
- To prevent the raisins from burning during baking, you can insert them after the bunnies have been baked and brushed with the glaze.
- If the tops of the bunnies are browning too quickly, tent them loosely with foil during the last few minutes of baking.
- For a more even bake, rotate the baking sheets halfway through the baking time.
Serving & Storage Suggestions
Serve these Honey Bunnies warm for the best flavor and texture. They are delightful on their own, with a cup of coffee or tea, or as a sweet accompaniment to a savory meal.
Store leftover Honey Bunnies in an airtight container at room temperature for up to 2 days, or in the refrigerator for up to 5 days. To freeze, wrap the bunnies individually in plastic wrap and then place them in a freezer bag. They can be frozen for up to 2 months.
To reheat, wrap the bunnies in foil and bake in a preheated oven at 350°F (175°C) for 5-10 minutes, or until warmed through. You can also microwave them for a few seconds, but be careful not to overheat them, as they can become tough.
Nutritional Information
| Nutrient | Amount per Serving | % Daily Value |
|---|---|---|
| Calories | 269 kcal | N/A |
| Total Fat | 9g | 13% |
| Saturated Fat | 5.3g | 26% |
| Cholesterol | 45.4mg | 15% |
| Sodium | 230.8mg | 9% |
| Total Carbohydrate | 42.2g | 14% |
| Dietary Fiber | 1.3g | 5% |
| Sugars | 13.8g | N/A |
| Protein | 5.6g | 11% |
Note: Nutritional information is an estimate and may vary based on specific ingredients and portion sizes.
Variations & Substitutions
- Vegan Honey Bunnies: Substitute the evaporated milk with a plant-based milk alternative like almond or soy milk. Use vegan butter or margarine, and replace the eggs with applesauce (1/4 cup applesauce per egg). For the honey, you can use agave nectar or maple syrup, although the flavor will be slightly different.
- Gluten-Free Honey Bunnies: Use a gluten-free all-purpose flour blend. You may need to add a binder like xanthan gum to help hold the dough together.
- Spiced Honey Bunnies: Add a pinch of ground cinnamon, nutmeg, or cardamom to the dry ingredients for a warm, spiced flavor.
- Citrus Honey Bunnies: Add the zest of one lemon or orange to the dough for a bright, citrusy note.
FAQs (Frequently Asked Questions)
Q: Can I use fast-rising yeast instead of active dry yeast?
A: Yes, you can use fast-rising yeast. The rising time may be slightly shorter, so keep an eye on the dough.
Q: What if I don’t have evaporated milk?
A: You can substitute regular milk, but the texture of the rolls may be slightly different.
Q: Can I make the dough ahead of time?
A: Absolutely! The dough can be refrigerated for up to 24 hours, which actually enhances the flavor.
Q: Why are my Honey Bunnies dense instead of light and airy?
A: Over-mixing the dough or not allowing it to rise sufficiently can result in dense rolls. Ensure you follow the recipe instructions carefully and allow the dough ample time to rise.
Q: Can I freeze the baked Honey Bunnies?
A: Yes, you can freeze the baked Honey Bunnies for up to 2 months. Wrap them individually in plastic wrap and then place them in a freezer bag.
Final Thoughts
These Honey Bunnies are more than just a recipe; they’re a reminder of warmth, tradition, and the joy of baking. Whether you’re making them for Easter, a special occasion, or simply to brighten someone’s day, I encourage you to give them a try. Gather your loved ones, dust off your aprons, and create some edible memories together. And don’t forget to share your creations and feedback – I’d love to hear how they turn out! Consider pairing these sweet rolls with a simple ham dinner or a comforting cup of chamomile tea. Happy baking!