
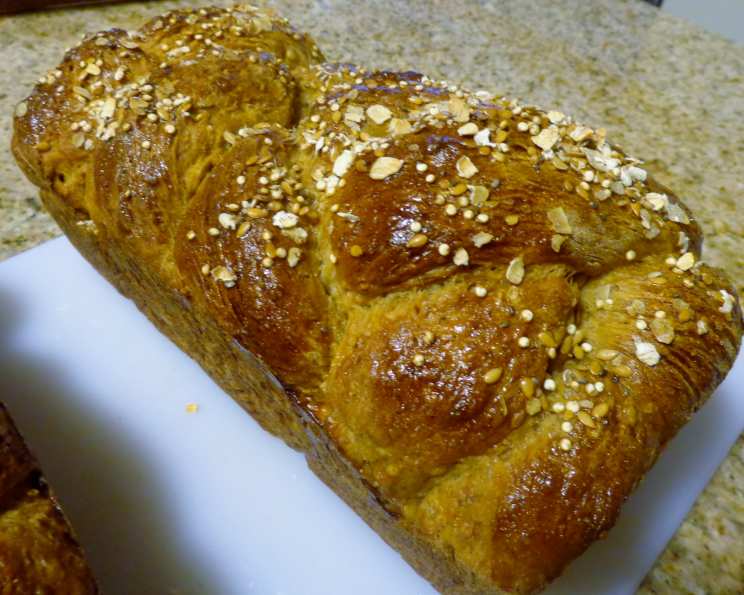
Honey Quinoa Bread – Pan De Quinoa Y Miel
The aroma of freshly baked bread has always been one of my favorite scents, instantly transporting me back to my grandmother’s kitchen. She had this magical touch, coaxing the most incredible flavors from simple ingredients. I remember once, she experimented with a grain I’d never seen before – tiny, round beads that she called “keen-wah.” The resulting bread, subtly sweet with honey and boasting a delightfully chewy texture, was unlike anything I’d ever tasted. It was a revelation, and a taste of home I’ve cherished ever since. Now, I’m excited to share with you my take on that very special bread.
Recipe Overview
- Prep Time: 4 hours 45 minutes (includes rise time)
- Cook Time: 45 minutes
- Total Time: 5 hours 30 minutes
- Yield: 1 large loaf or 2 9×5 loaves
- Dietary Type: Vegetarian
Ingredients
- 1 cup raw quinoa
- 2 cups water
- 1/4 cup oatmeal
- 1/4 cup water
- 1/4 cup milk (dairy or non-dairy)
- 2 teaspoons yeast (active dry)
- 3/4 cup warm water (105-115°F)
- 1/3 cup honey
- 1/4 cup vegetable oil (or other neutral oil)
- 3 tablespoons powdered milk
- 2 tablespoons sourdough starter (optional)
- 2 1/2 – 3 cups bread flour
- 1 – 2 teaspoon salt (to taste)
- 1 cup whole wheat flour
- 2 tablespoons raw quinoa (for sprinkling on top of loaf)
Equipment Needed
- Large bowl or stand mixer with dough hook
- Measuring cups and spoons
- Large loaf pan (11×6 inches) or two 9×5 inch loaf pans
- Saran wrap or clean kitchen towel
Instructions
-
Begin by preparing the quinoa. In a medium saucepan, combine the 1 cup of raw quinoa with 2 cups of water. Bring to a boil over medium-high heat, then reduce heat to low, cover, and simmer for 10-15 minutes, or until all the water is absorbed. Once cooked, remove from heat and allow the quinoa to cool completely to room temperature.
-
Next, cook the oatmeal. In a separate small saucepan, combine the 1/4 cup of oatmeal, 1/4 cup of water, and 1/4 cup of milk. Cook over medium heat, stirring frequently, until the liquid is completely absorbed and the oatmeal is softened. Set aside to cool as well.
-
In a large bowl, or the bowl of your stand mixer, activate the yeast. Combine the 3/4 cup of warm water with 2 teaspoons of yeast. Let this mixture rest for 5 minutes, allowing the yeast to bloom and become foamy. This step ensures the yeast is active and will properly leaven the bread.
-
To the yeast mixture, add the 1/3 cup of honey, 1/4 cup of vegetable oil, 3 tablespoons of powdered milk, and the 2 tablespoons of sourdough starter (if using). Stir well to combine using a wooden spoon or, if using a stand mixer, mix on low speed with the dough hook attachment.
-
Add 1 cup of the bread flour and the salt (start with 1 teaspoon and adjust to taste). Stir or mix on low speed until well combined, creating a smooth slurry.
-
Now, incorporate the cooked quinoa and oatmeal into the batter. Mix thoroughly until evenly distributed. The mixture will be quite thick at this stage.
-
Add the 1 cup of whole wheat flour and another 1 cup of the bread flour. Stir or mix on low speed until a shaggy dough begins to form.
-
If using a stand mixer, continue to knead the dough with the dough hook on medium-low speed. If kneading by hand, turn the dough out onto a lightly floured surface. Knead the dough, gradually adding the remaining bread flour as needed, until it becomes smooth and elastic. This process should take approximately 5 minutes with a mixer or 10-15 minutes by hand.
-
The dough should feel slightly sticky but manageable. It should form a ball that holds its shape without being wet and slack. Don’t be tempted to add too much flour, as this can result in a dry, dense bread.
-
Lightly oil a large bowl with vegetable oil. Place the dough in the bowl, turning it to coat lightly with the oil. This will prevent the dough from sticking to the bowl as it rises.
-
Cover the bowl loosely with saran wrap or a clean kitchen towel. Place the bowl in a warm, draft-free spot and allow the dough to rise until it has doubled in size, which should take approximately 2 hours.
-
While the dough is rising, prepare your loaf pan(s). Grease the large loaf pan (11×6 inches) or two 9×5 inch loaf pans with vegetable oil.
-
Once the dough has doubled, gently punch it down to release the air. Shape the dough into a ball.
-
Pat and flatten the dough into an oval shape, roughly the length of your loaf pan. Fold the long sides of the oval towards the center, and then tuck them underneath as you place the bread into the pan. This will create a smooth, seam-free top surface for your loaf.
-
Lightly brush the top of the loaf with water and sprinkle with the 2 tablespoons of raw quinoa.
-
Let the shaped loaf rise again in a warm place until it has almost doubled in size. This second rise is crucial for a light and airy texture.
-
Preheat your oven to 400°F (200°C).
-
When the oven is preheated and the bread has almost doubled, place the loaf pan in the center of the oven. For a beautiful crust, throw a handful of ice cubes into the bottom of the oven to create steam.
-
Bake for 30 minutes. If the top of the bread is browning too quickly, loosely cover it with foil and bake for an additional 15 minutes.
-
The bread is done when it sounds hollow when tapped on the bottom.
-
Let the bread cool in the pan for 15 minutes before removing it and allowing it to cool completely on a wire rack. This prevents the bread from becoming soggy.
Expert Tips & Tricks
- Temperature is key: Ensure your water for activating the yeast is between 105-115°F. Too hot, and you’ll kill the yeast; too cold, and it won’t activate properly.
- Don’t over-knead: Over-kneading can lead to a tough bread. Aim for a smooth, elastic dough.
- The steam trick: Adding ice cubes to the oven creates steam, which helps the bread rise higher and develop a crispier crust. If you don’t want to use ice, you can pour a cup of hot water into a preheated pan on the lower rack of the oven.
- Adjust flour as needed: Humidity can affect the amount of flour needed. Add flour gradually until the dough reaches the desired consistency.
Serving & Storage Suggestions
This Honey Quinoa Bread is delicious served warm with a smear of butter or a drizzle of honey. It also makes excellent sandwiches or toast. To store, keep the bread in an airtight container at room temperature for up to 3 days, or in the refrigerator for up to a week. For longer storage, slice the bread and freeze it for up to 2 months. Reheat frozen slices in a toaster or oven.
Nutritional Information
| Nutrient | Amount per Serving | % Daily Value |
|---|---|---|
| Calories | 333 kcal | N/A |
| Total Fat | 8.3g | 13% |
| Saturated Fat | 1.5g | 8% |
| Cholesterol | 3.2mg | 1% |
| Sodium | 249mg | 10% |
| Total Carbohydrate | 56.9g | 19% |
| Dietary Fiber | 3.9g | 16% |
| Sugars | 10.4g | N/A |
| Protein | 9.0g | 18% |
Nutritional information is an estimate and may vary based on specific ingredients and portion sizes.
Variations & Substitutions
- Gluten-Free: While this recipe uses wheat flour, you can experiment with gluten-free flour blends. Keep in mind that gluten-free bread may require additional binders like xanthan gum.
- Vegan: Substitute the honey with agave nectar or maple syrup. Use a plant-based milk alternative such as almond, soy, or oat milk and ensure your vegetable oil is vegan-friendly.
- Nutty Twist: Add 1/2 cup of chopped nuts, such as walnuts or pecans, to the dough for added flavor and texture.
- Spiced Up: Incorporate 1 teaspoon of ground cinnamon or cardamom for a warm, aromatic twist.
FAQs (Frequently Asked Questions)
Q: Can I use a different type of flour?
A: While bread flour is recommended for its high gluten content, which contributes to a chewy texture, you can experiment with other types of flour. All-purpose flour will work, but the bread may be slightly less chewy.
Q: Why is my bread dense and not rising properly?
A: This could be due to several factors, including inactive yeast, not enough kneading, or not allowing the dough to rise in a warm enough environment.
Q: Can I make this bread without a stand mixer?
A: Absolutely! Kneading by hand is perfectly fine. Just be prepared to knead for a longer period, around 10-15 minutes, to develop the gluten.
Q: How do I know when the bread is fully baked?
A: The best way to check for doneness is to insert a wooden skewer or toothpick into the center of the bread. If it comes out clean, the bread is done. You can also tap the bottom of the loaf; if it sounds hollow, it’s ready.
Q: Can I freeze the dough instead of baking it right away?
A: Yes, you can freeze the dough after the first rise. Punch it down, shape it, and wrap it tightly in plastic wrap before freezing. When ready to bake, thaw the dough in the refrigerator overnight and then allow it to rise again before baking.
Final Thoughts
I hope this Honey Quinoa Bread recipe brings as much joy to your kitchen as it has to mine. Don’t be intimidated by the slightly longer prep time – the result is well worth the effort. The unique combination of flavors and textures, the subtle sweetness of honey, and the delightful chewiness of quinoa will make this a bread you’ll want to bake again and again. Feel free to experiment with variations and let me know what you think! Enjoy!