
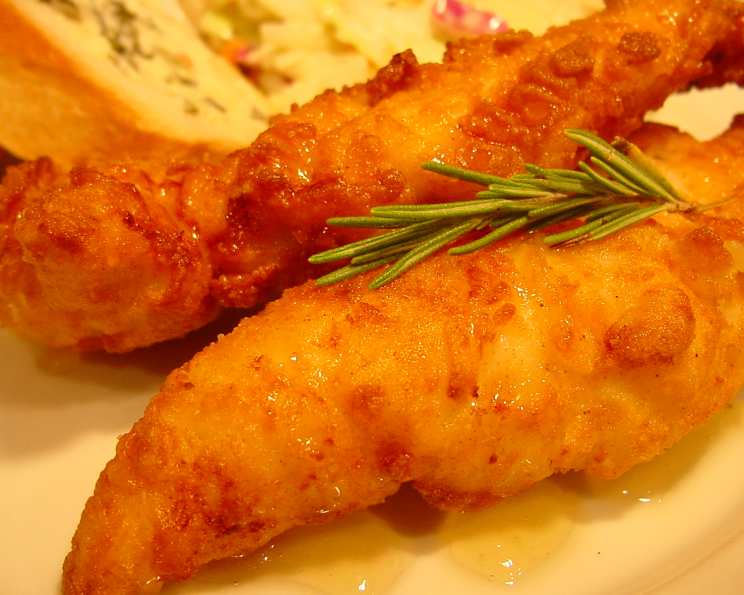
Honey & Rosemary Fried Chicken: A Culinary Symphony
I can still remember the humid summer evenings on my grandmother’s porch, the air thick with the scent of honeysuckle and something else… something undeniably delicious. It was the aroma of her legendary fried chicken, but not just any fried chicken. This was imbued with the sweet perfume of honey and the woodsy whisper of rosemary from her garden. Each bite was a perfect dance between crispy, savory, and subtly sweet – a flavor memory I’ve chased ever since, leading me to create this very recipe.
Recipe Overview
- Prep Time: 20 minutes
- Cook Time: 24 minutes
- Total Time: 44 minutes
- Servings: 6-8
- Yield: About 8-10 pieces of chicken
- Dietary Type: Not specified
Ingredients
- 1 (3-4 lb) chicken, cut into 8 to 10 pieces or 3 lbs chicken pieces
- 1 – 1 1/2 cup all-purpose flour
- 1 tablespoon garlic powder
- 1 tablespoon salt (or less!)
- 1 tablespoon white pepper
- 1 cup buttermilk
- Peanut oil (for frying)
For Honey-Rosemary Glaze:
- 3/4 cup honey
- 1 tablespoon butter
- 1 sprig rosemary, chopped
Equipment Needed
- Large skillet
- Wire rack
- Small saucepan
Instructions
-
Begin by washing the chicken pieces thoroughly under cold running water. Pat them completely dry with paper towels. This is crucial for achieving a crispy skin, as excess moisture will hinder browning.
-
In a shallow dish or large zip-top bag, combine the flour, garlic powder, salt, and white pepper. Mix these dry ingredients together thoroughly to ensure even distribution of flavor. Taste a tiny pinch of the flour mixture to check the seasoning – adjust the salt if needed.
-
Now comes the crucial coating process. Dip each piece of chicken into the seasoned flour, ensuring it’s fully coated on all sides. Then, immerse it in the buttermilk, letting the excess drip off. Finally, dredge the chicken once more in the seasoned flour, pressing gently to help the coating adhere. Place the coated chicken pieces on a plate or baking sheet, ensuring they don’t overlap. This allows the coating to set slightly.
-
In a large, heavy-bottomed skillet (cast iron is ideal), pour in enough peanut oil to reach a depth of about 1 inch. Heat the oil over medium-high heat until it reaches a temperature of 325°F (160°C). Use a deep-fry thermometer to monitor the oil temperature accurately. Maintaining a consistent temperature is essential for even cooking and preventing the chicken from becoming greasy.
-
Carefully place the chicken pieces in the hot oil, skin-side down, starting with the dark meat (thighs and drumsticks). Avoid overcrowding the skillet, as this will lower the oil temperature and result in soggy chicken. Work in batches if necessary.
-
Cover the skillet and cook the chicken for 5 to 6 minutes on each side. Covering the skillet helps to trap heat and cook the chicken through evenly. After the initial 10-12 minutes, remove the lid and continue cooking for another 5 to 6 minutes on each side, uncovered, until the chicken is golden brown and crispy. The total cooking time should be around 20 to 24 minutes, depending on the size and thickness of the chicken pieces.
-
To ensure the chicken is cooked through, insert a meat thermometer into the thickest part of the chicken, avoiding the bone. The internal temperature should reach 165°F (74°C).
-
Remove the cooked chicken from the skillet and place it on a wire rack to drain excess oil. This helps the chicken maintain its crispiness. Avoid placing the chicken directly on paper towels, as this can cause the bottom to become soggy.
-
While the chicken rests, prepare the Honey Rosemary Glaze: In a small saucepan, combine the honey, butter, and chopped rosemary. Cook over low heat, stirring occasionally, until the butter has melted and the ingredients are fully combined. Be careful not to boil the honey, as this can alter its flavor and texture. You want to just warm it through.
-
To serve, drizzle the Honey Rosemary Glaze over the fried chicken. The glaze adds a touch of sweetness and herbal aroma that complements the savory fried chicken perfectly.
Expert Tips & Tricks
- Brining: For even juicier chicken, consider brining it for a few hours before frying. A simple brine can be made with salt, sugar, and water.
- Double Dredge: For an extra-crispy crust, try double-dredging the chicken in the flour mixture.
- Temperature Control: Maintaining the oil temperature is crucial. If the oil is too hot, the chicken will burn on the outside before it’s cooked through. If the oil is too cool, the chicken will be greasy.
- Don’t Overcrowd: Frying in batches ensures the oil temperature remains consistent and the chicken cooks evenly.
- Resting: Allowing the chicken to rest on a wire rack after frying is essential for maintaining its crispiness.
Serving & Storage Suggestions
Serve the Honey & Rosemary Fried Chicken immediately while it’s hot and crispy. It pairs well with classic Southern sides like mashed potatoes, coleslaw, green beans, or corn on the cob. For a lighter meal, serve it with a simple salad.
Leftover fried chicken can be stored in an airtight container in the refrigerator for up to 3-4 days. To reheat, preheat your oven to 350°F (175°C) and place the chicken on a baking sheet. Bake for 10-15 minutes, or until heated through. For best results, avoid microwaving, as this can make the chicken soggy. You can also re-crisp the chicken by frying it briefly in hot oil.
Nutritional Information
| Nutrient | Amount per Serving | % Daily Value |
|---|---|---|
| Calories | 542.8 kcal | N/A |
| Calories from Fat | 209 g | 39% |
| Total Fat | 23.3 g | 35% |
| Saturated Fat | 7.4 g | 37% |
| Cholesterol | 110.2 mg | 36% |
| Sodium | 1318.4 mg | 54% |
| Total Carbohydrate | 54.6 g | 18% |
| Dietary Fiber | 1.1 g | 4% |
| Sugars | 37.1 g | 148% |
| Protein | 29.7 g | 59% |
Note: Nutritional information is an estimate and may vary based on specific ingredients and portion sizes.
Variations & Substitutions
- Gluten-Free: Use a gluten-free flour blend instead of all-purpose flour.
- Herb Variations: Experiment with other herbs like thyme, sage, or oregano in the glaze.
- Spice It Up: Add a pinch of cayenne pepper to the flour mixture for a touch of heat.
- Honey Alternatives: Maple syrup or agave nectar can be used as alternatives to honey in the glaze.
- Chicken Cuts: Use boneless, skinless chicken breasts or thighs for a quicker cooking time. Adjust cooking time accordingly.
FAQs (Frequently Asked Questions)
Q: Can I use olive oil instead of peanut oil for frying?
A: While you can use olive oil, peanut oil is preferred for its higher smoke point, which allows for crispier results without the oil burning.
Q: How do I prevent the chicken from sticking to the skillet?
A: Make sure the oil is hot enough before adding the chicken, and avoid overcrowding the skillet. A well-seasoned cast iron skillet also helps prevent sticking.
Q: Can I make the Honey Rosemary Glaze ahead of time?
A: Yes, the glaze can be made ahead of time and stored in an airtight container in the refrigerator. Reheat gently before serving.
Q: My chicken is browning too quickly. What should I do?
A: Lower the heat slightly to prevent the chicken from burning before it’s cooked through.
Q: How can I tell if the chicken is cooked through without a thermometer?
A: Cut into the thickest part of the chicken near the bone. If the juices run clear and the meat is no longer pink, it’s likely cooked through. However, using a thermometer is the most accurate way to ensure doneness.
Final Thoughts
This Honey & Rosemary Fried Chicken is more than just a recipe; it’s an invitation to create your own cherished food memories. The blend of savory, sweet, and herbal notes is truly irresistible, and the crispy texture is simply divine. I encourage you to try this recipe and share it with your loved ones. Experiment with different herbs and spices to make it your own signature dish. And don’t forget to let me know what you think! Bon appétit!