
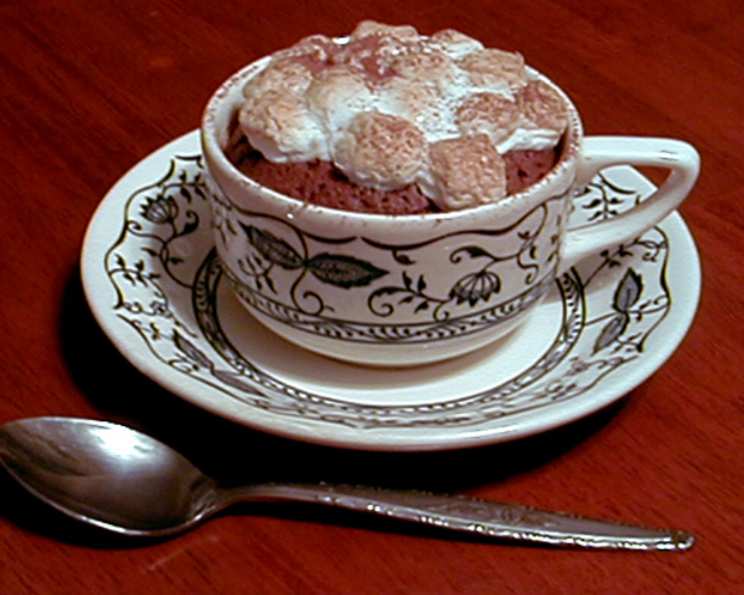
Hot Chocolate Cake With Marshmallows: A Mugful of Memories
The aroma of chocolate is a time machine, isn’t it? One whiff, and I’m instantly transported back to blustery winter evenings, huddled around the fireplace with my grandmother. She always had a pot of hot chocolate simmering, a mountain of marshmallows at the ready. This hot chocolate cake captures that same comforting essence, but in a delightfully individual portion. Each bite is a warm hug, a reminder of cozy moments and shared laughter, all wrapped up in a decadent chocolate dream.
Recipe Overview
- Prep Time: 20 minutes
- Cook Time: 20 minutes
- Total Time: 40 minutes
- Servings: 8
- Yield: 8 mug cakes
- Dietary Type: Not specified
Ingredients
- 8 tablespoons unsalted butter, plus extra unsalted butter, for coating
- 3 tablespoons flour, plus extra flour, for coating
- 1/2 cup sugar, plus extra sugar, for coating
- 10 ounces semisweet chocolate, coarsely chopped
- 4 large eggs
- 1 large egg yolk
- 1 teaspoon vanilla extract
- 1/4 teaspoon salt
- 1/2 cup mini marshmallows
- 2 tablespoons unsweetened cocoa powder
Equipment Needed
- Eight 6-ounce coffee cups or mugs made of ovenproof stoneware (or ramekins)
- Mixing bowls
- Double boiler or saucepan and heat-safe bowl
- Electric mixer
- Sifter
Instructions
-
Begin by preheating your oven to 375°F (190°C). This is crucial for ensuring the cakes bake evenly and achieve the desired molten center.
-
Next, prepare your baking vessels. Thoroughly butter, flour, and sugar eight 6-ounce coffee cups or mugs that are ovenproof. Ramekins can also be used as a substitute. The butter prevents sticking, the flour helps the cakes release cleanly, and the sugar adds a slight caramelized edge.
-
It’s important to pay attention to the details. Take the time to wipe the rims clean of any excess butter, flour, or sugar. This ensures the cakes rise neatly and look presentable.
-
Now, for the chocolatey heart of the cake! Place the 8 tablespoons of butter and the chopped chocolate in a bowl set over a pan of simmering water (or in a double boiler). The indirect heat gently melts the chocolate and butter without scorching.
-
Stir occasionally as the chocolate and butter melt, ensuring everything is evenly incorporated. Continue stirring until the mixture is completely combined and smooth. A silky, glossy texture is what we’re after.
-
Once melted and smooth, remove the chocolate mixture from the heat and let it cool for 5 minutes. This step is important because adding the eggs while the chocolate is too hot can cook them and ruin the batter.
-
While the chocolate cools, prepare the egg mixture. In a separate bowl, beat the eggs, egg yolk, vanilla extract, salt, and 1/2 cup sugar at the highest speed using an electric mixer.
-
Continue beating until the volume doubles and the mixture becomes foamy, approximately 5 minutes. This aeration is what gives the cakes their light and airy texture. The mixture should be pale and thick.
-
Once the chocolate mixture has cooled slightly, stir the 3 tablespoons of flour into the chocolate. This helps to bind the batter and prevent it from being too liquid.
-
Gradually add the chocolate mixture to the egg mixture, beating on low speed until it is fully combined. Be careful not to overmix, as this can develop the gluten in the flour and result in a tougher cake.
-
Now, it’s time to fill the mugs. Spoon the batter into each cup until it is about 3/4 inch from the rim. This allows room for the cakes to puff up during baking without overflowing.
-
Bake the cakes in the preheated oven until they puff up and begin to crack, but the centers are still a bit runny, approximately 13 to 17 minutes. This is the key to the molten center we’re looking for. Keep a close eye on them, as baking times can vary depending on your oven. A toothpick inserted into the side of the cake should come out clean, while the center will still be slightly gooey.
-
Remove from the oven.
-
Sprinkle with mini marshmallows.
-
Return to the oven for 2 to 4 minutes, or until the marshmallows begin to crisp and toast. Keep a close watch to prevent burning!
-
Remove from the oven.
-
Allow to cool about 5 minutes before serving. This allows the cakes to set slightly and makes them easier to handle.
-
Before serving, sift cocoa powder on top for a touch of elegance and a hint of bitterness that complements the sweetness of the cake and marshmallows.
Expert Tips & Tricks
- For an even richer flavor: Use high-quality dark chocolate with a cocoa content of 70% or higher.
- If you don’t have a double boiler: Simply place a heat-safe bowl over a pot of simmering water, ensuring the bottom of the bowl doesn’t touch the water.
- To prevent sticking: Make sure to generously butter, flour, and sugar the mugs. Pay special attention to the bottom corners.
- Make-ahead tip: The batter can be prepared ahead of time and stored in the refrigerator for up to 24 hours. Let it come to room temperature before baking.
- If the marshmallows brown too quickly: Tent the tops of the mugs with foil during the last few minutes of baking.
Serving & Storage Suggestions
Serve these decadent mug cakes warm, straight from the oven. The contrasting temperatures and textures – the warm, molten cake, the gooey marshmallows, and the dusting of cocoa powder – create a truly irresistible experience. They are best enjoyed immediately.
If you happen to have any leftovers (which is unlikely!), store them in the refrigerator for up to 2 days. Reheat gently in the microwave for about 30 seconds, or until warmed through. Note that the molten center will solidify upon refrigeration, but the cake will still be delicious.
Freezing is not recommended, as the texture of the cake may change upon thawing.
Nutritional Information
| Nutrient | Amount per Serving | % Daily Value |
|---|---|---|
| Calories | 396.5 kcal | N/A |
| Calories from Fat | 299 g | 76% |
| Total Fat | 33.3 g | 51% |
| Saturated Fat | 19.9 g | 99% |
| Cholesterol | 162.5 mg | 54% |
| Sodium | 121.7 mg | 5% |
| Total Carbohydrate | 28.9 g | 9% |
| Dietary Fiber | 6.4 g | 25% |
| Sugars | 14.9 g | 59% |
| Protein | 8.8 g | 17% |
Variations & Substitutions
- Dairy-free option: Substitute the butter with a plant-based butter alternative.
- Gluten-free option: Use a gluten-free flour blend in place of all-purpose flour.
- Espresso kick: Add a teaspoon of instant espresso powder to the chocolate mixture for a mocha flavor.
- Spice it up: Add a pinch of cinnamon or cayenne pepper to the batter for a warm, spicy note.
- Nutty addition: Stir in chopped walnuts or pecans for added texture and flavor.
FAQs (Frequently Asked Questions)
Q: Can I use a different type of chocolate?
A: Absolutely! Milk chocolate will result in a sweeter cake, while bittersweet chocolate will provide a more intense chocolate flavor. Adjust the sugar accordingly to your preference.
Q: My cakes didn’t puff up as much as I expected. What could be the reason?
A: Make sure your baking powder is fresh and active. Also, avoid overmixing the batter, as this can develop the gluten in the flour and prevent the cakes from rising properly.
Q: Can I make these cakes in advance?
A: While the batter can be prepared ahead of time, these cakes are best enjoyed fresh from the oven. Baking them in advance and reheating will result in a less molten center.
Q: How do I know when the cakes are done?
A: The cakes are done when they have puffed up and the edges are set, but the centers are still slightly soft and gooey. A toothpick inserted into the side of the cake should come out clean, while the center will still have moist crumbs attached.
Q: What if I don’t have ovenproof mugs?
A: Ramekins are a great substitute for ovenproof mugs. You can also use small, oven-safe bowls.
Final Thoughts
This Hot Chocolate Cake with Marshmallows is more than just a dessert; it’s an experience. It’s a chance to slow down, savor the moment, and reconnect with those comforting flavors of childhood. Whether you’re baking it for a special occasion or simply treating yourself to a cozy night in, I encourage you to give this recipe a try. Don’t be afraid to experiment with variations and make it your own. And, most importantly, share it with someone you love – because the best desserts are always the ones shared with good company. Happy baking!