
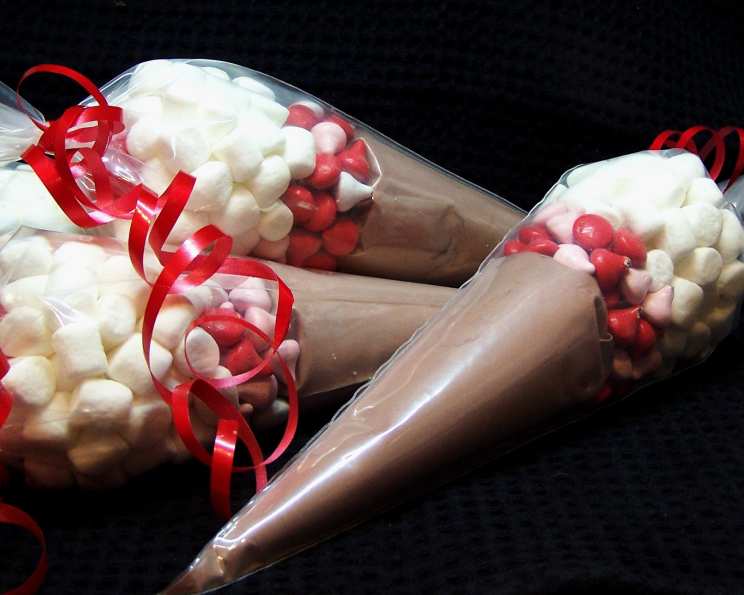
Hot Chocolate Cones: A Sweet Holiday Treat
The aroma of hot cocoa always transports me back to snowy afternoons spent building snow forts as a child. We’d trudge inside, rosy-cheeked and shivering, and my grandmother would be waiting with steaming mugs topped with a mountain of marshmallows. The sheer joy on our faces as we stirred and sipped the warm, chocolatey goodness is a memory I cherish. These Hot Chocolate Cones capture that same magic, transforming a simple drink into a delightful and visually appealing gift, perfect for spreading cheer during the colder months.
Recipe Overview
- Prep Time: 15 minutes
- Cook Time: 0 minutes (Assembly only)
- Total Time: 15 minutes
- Servings: 2
- Yield: 2 cones
- Dietary Type: Vegetarian
Ingredients
- 3/4 cup hot cocoa mix
- 1/4 cup mini chocolate chips (optional)
- 1/4 cup red and white M&M’s plain chocolate candy (optional)
- 3/4 cup mini marshmallows
- 1 large red gumdrop
- 2 (6 x 12) clear cone bags
- 2 clear rubber bands
Equipment Needed
- 2 (6 x 12) clear cone bags
- 2 clear rubber bands
- Scissors
- Measuring cups
Instructions
- Begin by pouring the hot cocoa mix into a 6 x 12 clear cone bag.
- Securely seal the bag with a clear rubber band.
- Trim the excess bag material approximately 1 inch above the rubber band for a neater presentation.
- Carefully place the filled bag into a second cone bag, ensuring the top of the inner bag is flattened to create a stable base for layering. This double bagging provides extra protection.
- Now, begin layering the optional treats. Start with either the chocolate chips or the M&M’s candies. Distribute them evenly over the flattened cocoa mix layer.
- Next, add the mini marshmallows, creating a fluffy, white layer on top of the chocolate candies.
- Complete the cone by placing the red gumdrop on top of the marshmallows. This adds a festive touch and a burst of chewy sweetness.
- Secure the outer bag with the second rubber band, ensuring all ingredients are snugly contained within the cone.
- Finally, create a tag with instructions on how to make the hot chocolate. A simple instruction would be to divide the cocoa mix into thirds, place each third in a mug, and fill with 3/4 cup boiling water. Stir well to dissolve the mix.
- Top each mug with equal amounts of the remaining chocolate chips and marshmallows from the cone.
Expert Tips & Tricks
- Layering Matters: Consider the order of ingredients for both aesthetics and practicality. Heavier items like the chocolate chips should go closer to the bottom to prevent the cone from becoming top-heavy and unstable.
- Marshmallow Management: Marshmallows can sometimes stick together. Try tossing them lightly in powdered sugar before layering to keep them separate and prevent clumping.
- Bag Security: Ensure the rubber bands are tight enough to prevent ingredients from spilling, but not so tight that they tear the bag. Double-bagging helps avoid catastrophes!
- Customization Station: Get creative! Experiment with different types of chocolate chips (dark, white, peanut butter), flavored marshmallows, or other candies like crushed peppermint or sprinkles.
- Cone Presentation: Tie a ribbon around the rubber band for a more polished and gift-worthy look. You can also attach a small spoon or whisk for added convenience.
Serving & Storage Suggestions
These Hot Chocolate Cones are best enjoyed immediately after the hot chocolate is prepared. The individual ingredients do not require refrigeration before being mixed into the hot water. However, avoid prolonged exposure to direct sunlight or high temperatures, as the chocolate and marshmallows may melt. Once assembled, the cones can be stored at room temperature in a cool, dry place for up to 2-3 weeks. If you want to store them for longer, consider placing them in an airtight container to prevent the marshmallows from becoming stale. Do not refrigerate the cones, as the condensation can affect the texture of the ingredients.
Nutritional Information
Note: Nutritional information is an estimate and may vary based on specific ingredient brands and quantities used.
| Nutrient | Amount per Serving | % Daily Value |
|---|---|---|
| Calories | 765 kcal | 38% |
| Total Fat | 6.9g | 11% |
| Saturated Fat | 4.1g | 21% |
| Cholesterol | 1.7mg | 1% |
| Sodium | 881.2mg | 37% |
| Total Carbohydrate | 164.5g | 55% |
| Dietary Fiber | 6.2g | 25% |
| Sugars | 138.1g | 552% |
| Protein | 11.8g | 24% |
Variations & Substitutions
- Vegan Option: Use vegan hot cocoa mix, vegan marshmallows, and dairy-free chocolate chips and M&M’s.
- Spiced Chocolate: Add a pinch of cinnamon, nutmeg, or chili powder to the hot cocoa mix for a warming, spiced variation.
- Peppermint Delight: Incorporate crushed peppermint candies or peppermint extract for a festive holiday flavor.
- Caramel Swirl: Add a layer of caramel bits or a drizzle of caramel sauce to the cone.
- Mocha Madness: Include instant coffee granules in the hot cocoa mix for a mocha-flavored treat.
FAQs (Frequently Asked Questions)
Q: Can I use different sized cone bags?
A: Yes, you can adjust the size of the cone bags, but you may need to adjust the ingredient quantities accordingly to ensure a good balance of flavors and textures.
Q: Can I make these ahead of time?
A: Yes, these cones can be made several weeks in advance and stored in a cool, dry place. Just be sure to seal them tightly to prevent the marshmallows from becoming stale.
Q: What is the best way to heat the water for the hot chocolate?
A: You can heat the water in a kettle, microwave, or on the stovetop. Ensure the water is boiling for the best results.
Q: Can I add other toppings besides chocolate chips and marshmallows?
A: Absolutely! Feel free to customize the cones with your favorite toppings, such as crushed cookies, sprinkles, or chopped nuts.
Q: How do I prevent the cone bag from tearing?
A: Use a good quality cone bag and avoid overfilling it. Double-bagging provides extra protection.
Final Thoughts
These Hot Chocolate Cones are more than just a tasty treat; they’re a delightful way to spread joy and warmth during the holiday season. Whether you’re gifting them to coworkers, teachers, or loved ones, they’re sure to bring a smile to anyone’s face. I encourage you to try this recipe, get creative with your toppings, and share the sweetness with those around you. And perhaps, while you’re at it, brew yourself a mug too and reminisce about happy memories, creating new ones in the process.