
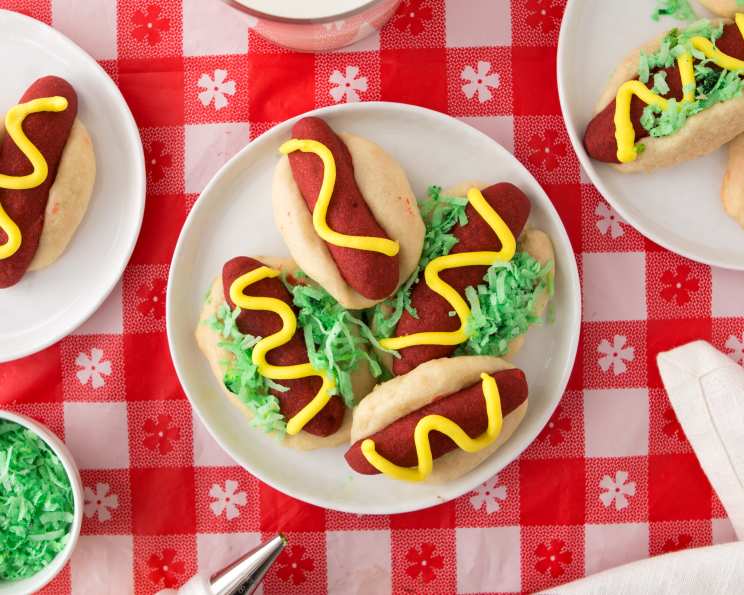
Hot Dog Cookies with Relish and Mustard: A Novel Treat
I can still recall the school bake sales, where every child, including myself, would bring their homemade goodies. While most opted for classic chocolate chip cookies or fudgy brownies, I always tried to create something whimsical, something unexpected. One year, inspired by my love for both baking and summer barbecues, I crafted these hot dog cookies. They were an instant hit, a delightful surprise amidst the usual sweets. The looks of amusement and delight on everyone’s faces made all the effort absolutely worthwhile. These aren’t just cookies; they’re a conversation starter and a guaranteed smile-inducer!
Recipe Overview
- Prep Time: 1 hour 45 minutes (includes chilling)
- Cook Time: 12-15 minutes
- Total Time: 1 hour 57-60 minutes
- Yields: 16 hotdog cookies
- Dietary Type: Vegetarian (can be made vegan with substitutions)
Ingredients
- 1 cup butter, softened
- 1/2 cup confectioners’ sugar
- 2 cups all-purpose flour
- 1 teaspoon vanilla extract
- Red food coloring
- Green food coloring
- 3 teaspoons flaked coconut
- Yellow decorator’s frosting
Equipment Needed
- Mixing Bowls
- Electric Mixer
- Measuring Cups and Spoons
- Plastic Bag
- Baking Sheet
- Piping Bag or Ziplock Bag
- Cooling Rack
Instructions
- In a large mixing bowl, cream together the softened butter and confectioners’ sugar until light and fluffy. This is best achieved with an electric mixer, but a sturdy whisk and some elbow grease will also do the trick.
- Beat in the all-purpose flour and vanilla extract. Mix until just combined. Avoid overmixing, as this can lead to tough cookies.
- Remove 1 cup of the dough and set it aside in a separate bowl.
- To the 1 cup of dough, add red food coloring and knead until the color is evenly distributed throughout. The intensity of the red color can be adjusted by adding more or less food coloring, depending on your preference.
- Cover both the red-colored dough and the remaining plain dough with plastic wrap and chill them in the refrigerator for 1 hour. This chilling period is crucial as it helps the dough firm up, making it easier to shape and preventing the cookies from spreading too much during baking.
- After chilling, prepare the hot dog shapes. Divide the red dough into 16 equal portions.
- Shape each portion into a 2 1/2 inch hotdog shape, rounding the ends to resemble a miniature hot dog. Set the shaped hot dogs aside on a plate or parchment paper.
- Now, prepare the bun shapes. Divide the plain dough into 16 equal portions.
- Shape each portion into a 3-inch bun shape. To do this, flatten the dough into a small oval and then gently curve it.
- Make a very deep lengthwise groove in the center of each bun. This is where the hot dog will sit.
- Smooth the edges of the buns to give them a rounded, more realistic appearance.
- Place the shaped buns 3 inches apart on an ungreased baking sheet. Giving the cookies enough space allows them to bake evenly and prevents them from sticking together.
- Place a red hot dog shape into the groove of each bun. Gently press down to secure the hot dog in place.
- Bake the cookies in a preheated oven at 350 degrees Fahrenheit for 12 to 15 minutes, or until the edges are lightly browned. Keep a close eye on them, as baking times can vary depending on your oven.
- Cool the cookies on the baking sheet for a few minutes before transferring them to a cooling rack to cool completely.
- While the cookies are cooling, prepare the pickle relish. Place the flaked coconut into a plastic bag.
- Add a few drops of green food coloring to the bag.
- Shake the bag well to distribute the food coloring evenly and color the coconut to create a vibrant green “relish.”
- Once the cookies are completely cool, sprinkle the green coconut “relish” around the hotdogs in the buns.
- For the mustard, pipe a curvy stripe of yellow frosting down the middle of each hotdog. If you don’t have a piping bag, you can use a Ziplock bag with a small corner snipped off.
Expert Tips & Tricks
- Achieve uniform hot dog shapes: Use a small kitchen scale to ensure each red dough portion is the same weight, leading to identically sized “hot dogs”.
- Prevent spreading: Chilling the dough is key, but you can also chill the shaped cookies for an additional 15 minutes before baking for extra insurance against spreading.
- Even baking: Rotate the baking sheet halfway through the baking time for more even browning.
- Vegan Variation: Substitute the butter with a vegan butter alternative, ensuring it’s suitable for baking.
- Dairy-Free Frosting: Look for dairy-free yellow frosting, or make your own using a base of powdered sugar and plant-based milk.
- Customize the “Relish”: For added flavor, consider adding a touch of pickle juice to the green-tinted coconut. Be careful with the amount; you want the flavor, not soggy coconut.
Serving & Storage Suggestions
Serve these hot dog cookies at room temperature. They are best enjoyed within 2-3 days of baking. To store, keep them in an airtight container at room temperature. While refrigeration isn’t necessary, it can extend their shelf life by a few days, but may slightly affect the texture of the cookies and frosting. Avoid freezing, as the frosting may not thaw well. Arrange them on a platter for a party or pack them in individual bags for a fun snack.
Nutritional Information
| Nutrient | Amount per Serving | % Daily Value |
|---|---|---|
| Calories | 175.5 kcal | N/A |
| Calories from Fat | 105 kcal | 60% |
| Total Fat | 11.8 g | 18% |
| Saturated Fat | 7.4 g | 37% |
| Cholesterol | 30.5 mg | 10% |
| Sodium | 102.7 mg | 4% |
| Total Carbohydrate | 15.9 g | 5% |
| Dietary Fiber | 0.5 g | 1% |
| Sugars | 3.9 g | 15% |
| Protein | 1.8 g | 3% |
Note: Nutritional information is an estimate and may vary based on specific ingredients used.
Variations & Substitutions
- Gluten-Free: Replace the all-purpose flour with a gluten-free all-purpose baking flour blend. Be sure to add a binder like xanthan gum if your blend doesn’t already contain it.
- Different “Relish”: Finely chopped dried cranberries can be used for a festive red “relish,” perfect for the holidays.
- Spiced “Mustard”: Add a pinch of turmeric or a tiny dash of cayenne pepper to the yellow frosting for a subtle spiced mustard flavor.
- Sesame Seed Buns: Before baking, brush the buns with a little egg wash (or plant-based milk) and sprinkle with sesame seeds for a more authentic look.
- Chocolate “Hot Dogs”: Use chocolate dough instead of red-colored dough for chocolate hot dogs.
FAQs (Frequently Asked Questions)
Q: Can I make the dough ahead of time?
A: Yes! The dough can be made up to 2 days in advance and stored in the refrigerator. Just be sure to let it soften slightly before shaping.
Q: My cookies spread too much. What did I do wrong?
A: The most common cause of spreading is dough that is not cold enough. Ensure both doughs are well-chilled before shaping and baking.
Q: Can I use gel food coloring instead of liquid?
A: Yes, gel food coloring is often preferred as it’s more concentrated and requires less to achieve the desired color. Start with a small amount and add more until you reach the desired shade.
Q: How do I prevent the “mustard” frosting from running?
A: Make sure the cookies are completely cool before piping the frosting. You can also use a thicker frosting or chill the frosted cookies briefly to set the frosting.
Q: Can I use a different type of extract instead of vanilla?
A: Absolutely! Almond extract would complement the sweetness of the cookies nicely, or even a touch of lemon extract for a bright, citrusy flavor.
Final Thoughts
These Hot Dog Cookies are more than just a dessert; they’re a delightful expression of creativity and a celebration of fun. I encourage you to embrace the playful spirit of this recipe and let your imagination run wild. Don’t be afraid to experiment with different colors, flavors, and decorations to create your own unique spin on this whimsical treat. Whether you’re baking for a party, a school event, or simply a fun afternoon at home, these cookies are guaranteed to bring smiles and spark conversations. So gather your ingredients, preheat your oven, and get ready to create some unforgettable memories! And of course, I’d love to hear how they turn out – don’t hesitate to share your creations and any creative twists you added!