
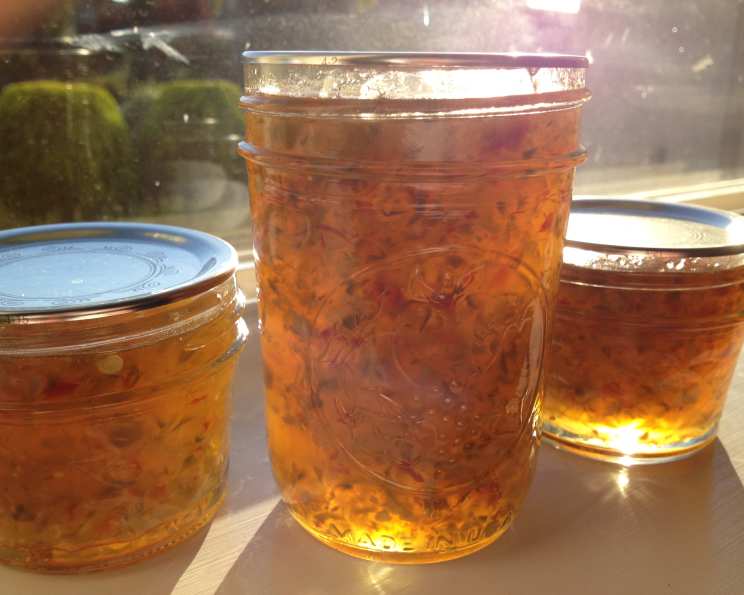
Hot Pepper Garlic Jelly: A Fiery Condiment to Ignite Your Taste Buds
I remember the first time I tasted hot pepper jelly. It was at a small-town craft fair, and a vendor offered me a sample on a cream cheese-slathered cracker. The sweet, fruity heat was unexpected, intriguing, and utterly addictive. From that moment on, I was hooked, and I began experimenting with my own versions, always striving for the perfect balance of sweet, spicy, and savory. This recipe is the culmination of those experiments, a vibrant jelly bursting with the flavors of fresh peppers and fragrant garlic – ready to elevate everything from appetizers to main courses.
Recipe Overview
- Prep Time: 20 minutes
- Cook Time: 15 minutes
- Total Time: 35 minutes
- Servings: About 6 half-pint jars
- Yield: 6-7 half-pints
- Dietary Type: Gluten-Free
Ingredients
- 1 cup hot pepper, chopped (a mixture of habaneros, Thai chilis, tabasco peppers, and jalapenos)
- 1 red bell pepper (or 1 green bell pepper), chopped
- 1/4 – 1/2 cup chopped garlic, to taste
- 1 1/2 cups white vinegar
- 6 cups sugar
- 1-2 packets liquid Certo (or other liquid pectin)
Equipment Needed
- Large pot
- Canning jars (half-pint)
- Jar lids and rings
- Jar lifter
- Ladle
- Damp cloth
- Large pot for sterilizing jars
- Towel
Instructions
- Begin by sterilizing your canning jars and rings. Place them in a large pot of water on the stove and bring to a low boil. Let them simmer gently while you prepare the jelly, ensuring they’re hot and ready when needed. This prevents the jars from cracking when filled with the hot jelly. Keep the water at a low boil until you are ready to use the jars.
- Have your jar lids (flats) ready on the counter, along with a clean, damp cloth to wipe the rims of your jars after filling. It’s crucial to have everything prepped and organized for a smooth canning process.
- In a large, heavy-bottomed pot, combine the chopped hot peppers, bell pepper, garlic, white vinegar, and sugar. Mix well to ensure the sugar begins to dissolve.
- Place the pot over medium-high heat and bring the mixture to a rolling boil, stirring frequently to prevent scorching and ensure the sugar dissolves completely.
- Once boiling, continue to boil vigorously for 5-6 minutes, stirring constantly. This allows the pectin to activate properly and helps the jelly to thicken. Don’t be tempted to reduce the boiling time; a full 5-6 minutes is essential for the right consistency.
- Remove the pot from the heat. Immediately add the liquid Certo (or other liquid pectin) and stir thoroughly to incorporate it completely. Be careful when adding the pectin, as it can sometimes cause splattering.
- Using a jar lifter, carefully remove a sterilized jar from the boiling water, emptying any water inside the jar back into the pot. Place the jar on a towel-lined surface to prevent slipping.
- Using a ladle, carefully pour the hot pepper jelly into the prepared jars, leaving about 1/4 inch of headspace at the top. This headspace is important for proper sealing.
- As soon as you fill a jar, wipe the rim clean with a damp cloth to remove any jelly residue. Place a lid (flat) on the jar, followed by a ring, and tighten the ring finger-tight – not too tight, as air needs to escape during the sealing process.
- Immediately invert the filled jar onto a clean cloth towel. The heat from the jar, ring, and jelly should create a vacuum seal.
- Repeat steps 7-10 with the remaining jars and jelly.
- Leave the inverted jars on the counter for several hours, or preferably overnight, to finish sealing. If you notice the peppers settling in the jars, gently shake them every once in a while during the cooling process to redistribute the peppers evenly.
- After the jars have cooled completely and sealed (you will know they are sealed when you cannot push down on the lid without it popping), turn them right-side up and tighten the rings again.
- Check the seals of all jars. If any jars did not seal properly (the lid pops when pressed), refrigerate that jar immediately and use the jelly within a few weeks.
NOTE FROM CHEF: Using one packet of liquid Certo will result in a “looser” jelly, which some people, including myself, may prefer. Two packets will give you a firmer set.
Expert Tips & Tricks
- Safety First: Always wear rubber gloves when handling hot peppers, even after washing them. The oils can linger on your skin and cause burning sensations.
- Heat Control: Adjust the type and amount of hot peppers to control the heat level of your jelly. For a milder jelly, use fewer habaneros and more jalapenos, or remove the seeds and membranes from the peppers.
- Color Palette: Use a variety of colored bell peppers (red, yellow, orange) for a visually stunning jelly.
- Prevent Crystallization: Ensure all the sugar is fully dissolved before bringing the mixture to a boil. Undissolved sugar can lead to crystallization in the finished jelly. Adding a tablespoon of lemon juice can also help prevent this.
- Testing for Doneness: If you are unsure if the jelly has reached the proper consistency during boiling, place a small spoonful on a chilled plate. If it gels up quickly, it’s ready.
Serving & Storage Suggestions
Hot Pepper Garlic Jelly is incredibly versatile. Serve it:
- Over cream cheese or brie with crackers for an elegant appetizer.
- As a glaze for grilled chicken, pork, or salmon.
- With roasted vegetables for a sweet and spicy kick.
- As an accompaniment to grilled cheese sandwiches.
- Even on celery with peanut butter for a surprisingly delicious combination!
Store sealed jars of Hot Pepper Garlic Jelly in a cool, dark place for up to a year. Once opened, refrigerate and use within a few weeks. The jelly does not typically freeze well as it can alter the texture.
Nutritional Information
Note: Nutritional information is an estimate and may vary based on specific ingredients used.
| Nutrient | Amount per Serving (approx. 2 tbsp) | % Daily Value |
|---|---|---|
| Calories | 85 kcal | 4% |
| Total Fat | 0g | 0% |
| Saturated Fat | 0g | 0% |
| Cholesterol | 0mg | 0% |
| Sodium | 4mg | 0% |
| Total Carbohydrate | 22g | 7% |
| Dietary Fiber | 0g | 0% |
| Sugars | 21g | 42% |
| Protein | 0g | 0% |
Variations & Substitutions
- Spicier Version: For intense heat, use ghost peppers or scotch bonnets in addition to the habaneros and jalapenos. Handle with extreme caution!
- Milder Version: Remove the seeds and membranes from all the peppers to reduce the heat. You can also substitute some of the hot peppers with more bell peppers.
- Fruitier Version: Add a cup of chopped pineapple, mango, or peaches to the pepper mixture for a tropical twist.
- Maple Syrup Version: Substitute part of the granulated sugar with maple syrup.
- Garlic Lovers Version: Add roasted garlic cloves.
FAQs (Frequently Asked Questions)
Q: Why is my jelly not setting?
A: There are several reasons why your jelly might not set. Make sure you are using the correct amount of pectin, boiling the mixture for the recommended time, and using the proper ratio of sugar to liquid. Sometimes the pectin expires as well so check the date.
Q: Can I use a different type of vinegar?
A: While white vinegar is the standard choice for jelly making, you can experiment with other vinegars like apple cider vinegar or rice vinegar. Just be mindful of their flavor profiles, as they will affect the taste of the finished jelly.
Q: How long does hot pepper jelly last?
A: Properly sealed jars of hot pepper jelly can last for up to a year in a cool, dark place. Once opened, refrigerate and use within a few weeks.
Q: Can I freeze hot pepper jelly?
A: While it’s not recommended, you can freeze hot pepper jelly, but the texture may change slightly. It may become a bit softer or weep when thawed.
Q: What can I do if my jelly is too spicy?
A: If your jelly is too spicy, try serving it with a cooling element like cream cheese or yogurt. The dairy will help to balance the heat.
Final Thoughts
This Hot Pepper Garlic Jelly is more than just a condiment; it’s an experience. It’s a burst of flavor that awakens your taste buds and adds a touch of excitement to any dish. Don’t be afraid to experiment with different peppers and flavors to create your own signature blend. And most importantly, enjoy the process of creating something delicious and unique. I encourage you to try this recipe, share your creations, and let me know what you think! I am confident that you will enjoy it.