
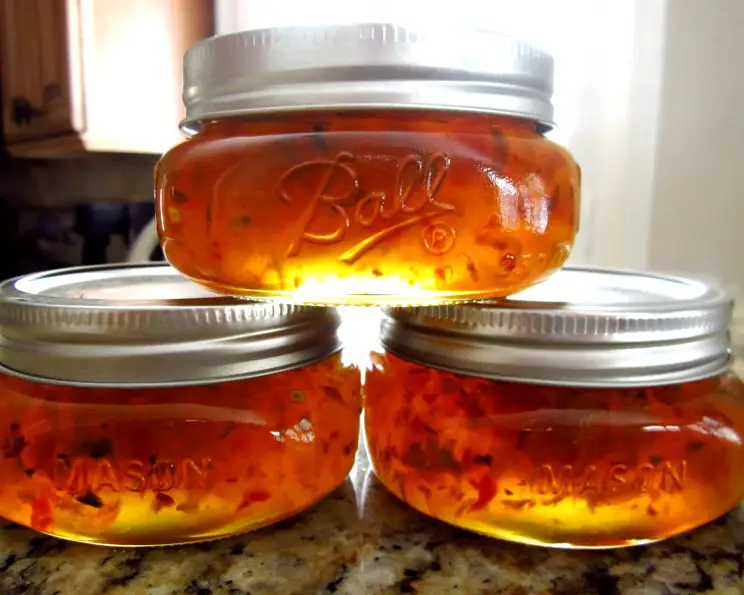
Fiery Sweet: Crafting the Perfect Homemade Hot Pepper Jelly
I remember one Thanksgiving when my Aunt Carol brought a small, unassuming jar of shimmering red jelly. It sat next to the cranberry sauce, almost overlooked. But once someone dared to spread it on a cracker with cream cheese, it vanished. The combination of creamy richness, subtle sweetness, and that exhilarating kick of heat became the star of the appetizer spread. That was my first introduction to hot pepper jelly, and I’ve been chasing that perfect balance of sweet and spicy ever since. This recipe captures that memory, delivering a fiery sweetness that’s utterly irresistible.
Recipe Overview
- Prep Time: 20 minutes
- Cook Time: 30 minutes
- Total Time: 50 minutes
- Yields: About 4 pints
- Dietary Type: Vegetarian
Ingredients
- 1 cup green sweet pepper (seeded and ground)
- 1/4 cup hot pepper (seeded and ground) – use caution when handling hot peppers!
- 1 1/2 cups cider vinegar
- 6 1/2 cups sugar
- 2 (3 ounce) packets liquid pectin (like Certo)
Equipment Needed
- Food processor
- Large saucepan (at least 6-quart capacity)
- Measuring cups and spoons
- Sterilized canning jars and lids (pint or half-pint)
- Canning funnel (optional but helpful)
- Ladle
- Candy thermometer (optional, but useful)
Instructions
-
Prepare the Peppers: Start by carefully washing and seeding both the green sweet peppers and the hot peppers. Remember to wear gloves when handling hot peppers to avoid skin irritation. I find that 4-6 sweet peppers and 2-3 hot peppers usually yield the correct amount, but this can vary based on the size of the peppers.
-
Grind the Peppers: Using a food processor, grind the seeded peppers to a medium-fine consistency. You don’t want large chunks, as they won’t soften properly during cooking. The peppers will shrink slightly as they cook, so aim for a size that’s smaller than you think you need.
-
Combine and Boil: In a large, heavy-bottomed saucepan, combine the ground green sweet peppers, hot peppers, cider vinegar, and sugar. Stir well to ensure the sugar is dissolved.
-
Bring to a Rolling Boil: Place the saucepan over medium-high heat and bring the mixture to a full rolling boil. A rolling boil is when the mixture continues to boil vigorously even while you are stirring.
-
Resting Period: Once the mixture reaches a rolling boil, remove the pan from the heat and let it stand for 20 minutes. This allows the flavors to meld and the peppers to soften.
-
Second Boil: After the resting period, return the saucepan to the heat and bring the mixture back to a rolling boil. This time, boil for exactly 3 minutes, stirring constantly to prevent scorching. It’s crucial to stir continuously during this step, as the high sugar content can cause the jelly to burn easily.
-
Add Pectin: Remove the saucepan from the heat once more. Immediately add the two packets of liquid pectin to the hot mixture.
-
Stir Vigorously: Stir the mixture vigorously for 7 minutes. This thorough stirring is essential for the pectin to properly activate and create a good gel. Don’t skip this step!
-
Fill Jars: Carefully ladle the hot pepper jelly into sterilized canning jars, leaving about 1/4 inch of headspace at the top of each jar. Use a canning funnel to minimize spills and keep the jar rims clean.
-
Seal Jars: Wipe the rims of the jars with a clean, damp cloth to remove any spills or drips. Place the sterilized lids on the jars and screw on the bands until they are fingertip tight. Do not overtighten the bands, as this can prevent the jars from sealing properly.
-
Process in a Boiling Water Bath (Optional but Recommended for Long-Term Storage): For long-term storage, process the filled jars in a boiling water bath for 10 minutes. This ensures a proper seal and prevents spoilage. If you are not familiar with water bath canning, please consult a reliable resource for detailed instructions on safe canning practices.
-
Alternative Sealing Method (If Not Water Bath Canning): If you choose not to water bath can, you can seal the jars with paraffin wax. Pour a thin layer of melted paraffin wax over the top of the jelly in each jar, allowing it to cool and harden. Note that paraffin wax sealing is not as reliable as water bath canning for long-term storage.
-
Cool and Check Seals: Let the jars cool completely on a wire rack. As the jars cool, you should hear a “pop” sound as the lids seal. After the jars are completely cool, check the seals by pressing down on the center of each lid. If the lid is firm and doesn’t flex, the jar is properly sealed. If the lid flexes, the jar is not sealed and should be refrigerated and used within a few weeks, or reprocessed with a new lid.
Expert Tips & Tricks
- Heat Control: The amount and type of hot peppers you use directly control the heat level of the jelly. For a milder jelly, use fewer hot peppers or choose a milder variety like jalapeños. For a spicier jelly, use more hot peppers or a hotter variety like habaneros or Scotch bonnets. Remember to taste as you go, but be cautious when sampling the raw pepper mixture!
- Peel or No Peel: Some chefs prefer to peel their peppers before grinding for a smoother texture. This is optional, but if you have a high-powered food processor, it’s usually not necessary.
- Jelly Test: If you’re unsure whether the jelly has reached the proper consistency, perform a jelly test. Place a small spoonful of the hot jelly onto a chilled plate and let it sit for a minute. If it wrinkles when you push it with your finger, it’s ready. If not, continue to boil for another minute or two and test again.
- Foam Removal: After adding the pectin, you might notice some foam forming on the surface of the jelly. Skim off any foam with a spoon before ladling the jelly into the jars for a clearer final product.
Serving & Storage Suggestions
Hot pepper jelly is incredibly versatile. It’s fantastic served with cream cheese and crackers as an appetizer. It also makes a wonderful glaze for grilled meats, especially pork and chicken. Try it as a condiment for sandwiches or burgers, or as a unique addition to a cheese board.
Properly sealed jars of hot pepper jelly can be stored at room temperature for up to a year. Once opened, refrigerate the jelly and use it within a few weeks. If you used the paraffin wax method instead of boiling water bath canning, it is best to refrigerate and use the jelly within 2-3 months to ensure quality and safety.
Nutritional Information
Note: Nutritional information is an estimate and can vary based on specific ingredients used.
| Nutrient | Amount per Serving | % Daily Value |
|---|---|---|
| Calories | 450 kcal | 23% |
| Total Fat | 0g | 0% |
| Saturated Fat | 0g | 0% |
| Cholesterol | 0mg | 0% |
| Sodium | 10mg | 0% |
| Total Carbohydrate | 115g | 38% |
| Dietary Fiber | 1g | 4% |
| Sugars | 110g | N/A |
| Protein | 0g | 0% |
Variations & Substitutions
- Different Peppers: Experiment with different types of hot peppers to create unique flavor profiles. Try jalapeños, serranos, habaneros, or even a mix of several varieties.
- Fruit Additions: Add a cup of finely chopped fruit, such as mango or pineapple, to the mixture along with the peppers for a tropical twist.
- Wine Vinegar: Substitute red or white wine vinegar for the cider vinegar for a slightly different flavor.
- Lower Sugar: While sugar is essential for the gelling process, you can reduce the amount slightly (by up to 1 cup) if you prefer a less sweet jelly. Be aware that this may affect the set. You can also look into using a sugar substitute designed for canning, but follow the manufacturer’s instructions carefully.
FAQs (Frequently Asked Questions)
Q: Why is my hot pepper jelly not setting?
A: There are several reasons why your jelly might not set. The most common culprits are not boiling the mixture long enough, using too little sugar, or using expired pectin. Be sure to follow the recipe instructions carefully and use fresh pectin.
Q: Can I use powdered pectin instead of liquid pectin?
A: While you can use powdered pectin, the recipe needs to be adjusted. Liquid and powdered pectins activate differently. It’s recommended to stick to liquid pectin for this recipe unless you have specific instructions for converting it.
Q: How do I sterilize my canning jars?
A: You can sterilize your jars by boiling them in water for 10 minutes, running them through a hot cycle in the dishwasher, or baking them in the oven at 200°F (93°C) for 20 minutes.
Q: Can I freeze hot pepper jelly?
A: Freezing is not recommended, as it can affect the texture of the jelly. The jelly may become watery and lose its firm set upon thawing.
Q: How long does homemade hot pepper jelly last?
A: Properly sealed jars of hot pepper jelly can last for up to a year at room temperature. Once opened, refrigerate and use within a few weeks. If sealed with paraffin wax, refrigerate and consume within 2-3 months.
Final Thoughts
Crafting your own hot pepper jelly is a rewarding experience that brings a touch of homemade warmth (and a fiery kick!) to your table. Don’t be afraid to experiment with different peppers and flavor combinations to find your perfect balance of sweet and spicy. Once you’ve mastered the basics, you’ll be amazed at the endless possibilities. I encourage you to give this recipe a try – you might just create a new family favorite! And if you do, please let me know how it turns out! I’d love to hear about your unique twist on this delicious condiment. Perhaps you can pair your hot pepper jelly with a perfectly roasted chicken or even elevate a simple grilled cheese sandwich. The possibilities are endless!