
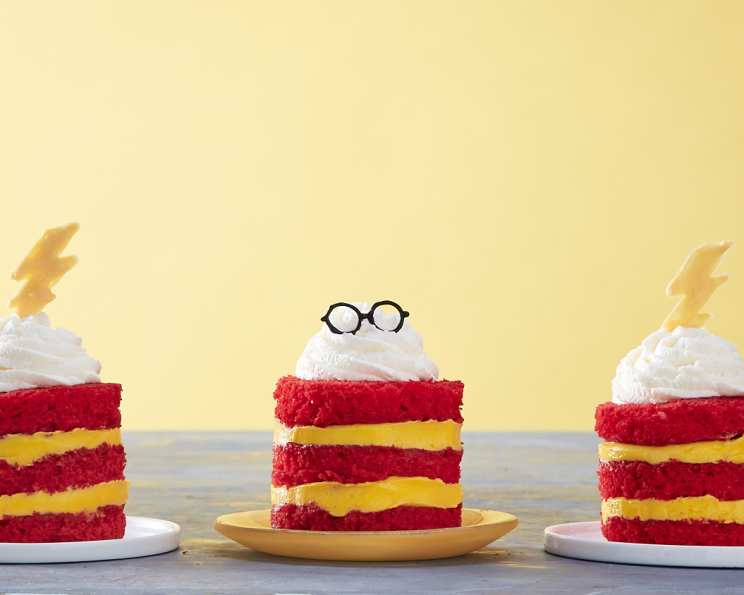
House Gryffindor Butterbeer Cakes
I’ll never forget the first time I tried butterbeer at the Wizarding World. The creamy, sweet, almost effervescent drink instantly transported me into the pages of my favorite childhood books. Recreating that magic in dessert form has become a bit of an obsession, and these mini Gryffindor cakes, bursting with butterscotch and topped with iconic symbols, are the delicious result. They’re a delightful treat for any Harry Potter fan, bringing a touch of wizarding wonder to your kitchen.
Recipe Overview
- Prep Time: 45 minutes
- Cook Time: 25 minutes
- Total Time: 1 hour 10 minutes
- Yields: 8 Cakes
- Dietary Type: Not specified
Ingredients
Butterbeer Cake
- Nonstick cooking spray
- White cake mix (plus required ingredients listed on the box, such as eggs, oil, and water)
- 1 1⁄4 teaspoons butterscotch extract
- 2 1⁄2 teaspoons christmas red gel food coloring
- Yellow candy melts
- Black candy melts
- 2 tablespoons butterscotch syrup
- Acetate cake collars
Frosting
- 4 ounces cream cheese, softened
- 1⁄3 cup sugar
- 1⁄2 teaspoon butterscotch extract
- 1⁄8 teaspoon salt
- 2 cups heavy whipping cream
- Lemon yellow gel food coloring
Equipment Needed
- Baking sheet
- Parchment paper
- Standing mixer (or electric hand mixer)
- Paddle attachment (for mixer)
- 3-inch round cookie cutter
- Microwave-safe bowl
- Piping bags
- 826 star tip
- 806 round tip
Instructions
-
Preheat your oven to 350°F (175°C). Line a baking sheet with parchment paper and spray it generously with nonstick cooking spray. This will ensure the cake releases easily.
-
In the bowl of a standing mixer fitted with the paddle attachment (or using a hand mixer in a large bowl), combine the white cake mix with the ingredients called for on the box (usually eggs, oil, and water). Beat on medium speed for 5 minutes until everything is thoroughly combined. The batter should be smooth and relatively thick.
-
Turn off the mixer. Add the butterscotch extract and red gel food coloring to the cake batter. Beat until the color is evenly distributed and you have a light reddish-brown hue, reminiscent of Gryffindor colors.
-
Pour the batter onto the prepared baking sheet, spreading it evenly to create a thin layer. Bake for 25 minutes, or until a toothpick inserted into the center of the cake comes out clean. Be careful not to overbake, as you want a moist cake.
-
Let the cake cool completely in the pan. This is crucial for clean cuts later. You can speed this up by placing it in the refrigerator for a short period.
-
Once cooled, use a 3-inch round cookie cutter to punch out 12 rounds of cake. These will form the layers of your mini cakes.
-
Carefully cut each round in half horizontally, so that you end up with 24 cake discs, each approximately ½ inch tall.
-
In a small bowl, whisk together the butterscotch syrup with 1 tablespoon of hot water. This creates a flavorful syrup to brush onto the cake layers.
-
Using a pastry brush, lightly brush the tops of each cake round with the butterscotch syrup mixture. This adds extra moisture and butterscotch flavor. Set the cake rounds aside.
-
Add the yellow candy melts to a microwave-safe bowl. Microwave in 30-second intervals, whisking in between each interval, until the candy melts are completely melted and smooth. Be careful not to overheat, as this can cause the candy to seize. Transfer the melted yellow candy to a piping bag.
-
Pipe out 4 lightning bolts onto a parchment-lined baking sheet. Use a template if needed for guidance.
-
Repeat the melting process with the black candy melts. Transfer the melted black candy to a piping bag.
-
Pipe out 4 pairs of eyeglasses onto a parchment-lined baking sheet, using a template if needed.
-
Place the baking sheet with the candy decorations in the fridge to set completely. This will take about 15-20 minutes.
-
Prepare the frosting. In the bowl of a standing mixer fitted with the whisk attachment (or using a hand mixer), add the softened cream cheese, sugar, butterscotch extract, and salt. Beat until the mixture is light and fluffy. Transfer this mixture to a large bowl.
-
Add the heavy whipping cream to the bowl of the standing mixer (make sure the bowl and whisk are clean). Whip the cream until stiff peaks form. This is important for a stable frosting.
-
Gently fold the whipped cream into the cream cheese mixture in 3 batches. This ensures that the frosting remains light and airy.
-
Transfer about a fourth of the frosting to a piping bag fitted with an 826 star tip. This will be used for the decorative swirl on top.
-
Add the yellow food coloring (about 1 teaspoon) to the remaining frosting and gently fold it in with a spatula to combine. The color should be a pale, buttery yellow. Transfer this yellow frosting to a piping bag fitted with an 806 round tip.
-
Position the acetate cake collars on a parchment-lined baking sheet. These collars will help create clean, even layers for the mini cakes.
-
Push a cake round into the bottom of each cake collar.
-
Pipe in a layer of the yellow frosting to cover the cake round, but do not smooth it over. Leaving it slightly textured helps create clean layers.
-
Add another cake round on top of the frosting layer, pressing it down gently.
-
Pipe another layer of the yellow frosting over the second cake round, again leaving it slightly textured.
-
Top it off with a final cake round in each collar.
-
Repeat this process with the remaining 7 cake collars, using the remaining cake rounds and yellow frosting.
-
Once all the cakes are assembled, carefully peel off the acetate cake collars.
-
Pipe a small swirl of the white frosting (using the piping bag with the 826 star tip) on top of each cake.
-
Gently place either a pair of the chocolate eyeglasses or a chocolate lightning bolt on top of the white frosting swirl to garnish each cake.
Expert Tips & Tricks
- For a more intense butterscotch flavor, you can add a butterscotch pudding mix to the cake batter. Just reduce the amount of liquid called for on the cake mix box accordingly.
- If you don’t have acetate cake collars, you can use strips of parchment paper to achieve a similar effect.
- Make sure your cream cheese is truly softened before making the frosting, or you’ll end up with lumps.
- To prevent the cake layers from drying out, store them in an airtight container after cutting them out.
- If you are in a warm climate or your frosting seems too soft, chill it in the refrigerator for 15-20 minutes before piping.
- For a festive touch, use gold sanding sugar to decorate the sides of the cakes.
Serving & Storage Suggestions
Serve these Gryffindor Butterbeer Cakes chilled or at room temperature. They are best enjoyed within 2-3 days of making them. Store leftover cakes in an airtight container in the refrigerator. The frosting may soften slightly after refrigeration, but the flavor will remain delicious. These cakes are not recommended for freezing, as the frosting can change texture.
Nutritional Information
Please note that these values are estimates and can vary based on specific ingredient brands and measurements.
| Nutrient | Amount per Serving | % Daily Value |
|---|---|---|
| Calories | 300 kcal | 15% |
| Total Fat | 18g | 28% |
| Saturated Fat | 11g | 55% |
| Cholesterol | 50mg | 17% |
| Sodium | 150mg | 7% |
| Total Carbohydrate | 35g | 12% |
| Dietary Fiber | 0g | 0% |
| Sugars | 25g | – |
| Protein | 2g | 4% |
Variations & Substitutions
- Gluten-Free: Use a gluten-free white cake mix and ensure all other ingredients are gluten-free as well.
- Dairy-Free: Substitute the cream cheese with a dairy-free cream cheese alternative, and use a dairy-free whipped topping. Note that this will alter the flavor and texture of the frosting.
- Butterscotch Extract Alternative: If you can’t find butterscotch extract, you can use vanilla extract with a touch of brown sugar for a similar flavor profile.
- House Colors: Adapt the cake and frosting colors to represent other Hogwarts houses. Use yellow and black for Hufflepuff, blue and bronze for Ravenclaw, and green and silver for Slytherin.
FAQs (Frequently Asked Questions)
Q: Can I make these cakes ahead of time?
A: Yes, you can bake the cake and make the frosting a day in advance. Store them separately and assemble the cakes just before serving.
Q: What if I don’t have acetate cake collars?
A: You can use strips of parchment paper or sturdy cardstock to create makeshift collars, securing them with tape.
Q: Can I use a different flavor of cake mix?
A: While white cake mix is recommended for the classic butterbeer flavor, you could experiment with vanilla or even butterscotch cake mix.
Q: The candy melts are seizing up when I microwave them. What am I doing wrong?
A: This usually happens when the candy is overheated or comes into contact with moisture. Microwave in shorter intervals and ensure your bowl and utensils are completely dry.
Q: My frosting is too soft. How can I fix it?
A: Chill the frosting in the refrigerator for about 15-20 minutes to firm it up. You can also add a tablespoon of powdered sugar at a time until you reach the desired consistency.
Final Thoughts
These House Gryffindor Butterbeer Cakes are more than just a dessert; they’re a whimsical culinary adventure into the heart of the wizarding world. I encourage you to gather your ingredients, dust off your favorite wand (or spatula), and create a little magic in your own kitchen. Don’t be afraid to experiment with different decorations and flavors to make them uniquely yours. And, most importantly, share your creations with friends and family – after all, food tastes best when enjoyed together! Let me know how your cakes turn out, and feel free to suggest any variations or pairings you think would enhance the experience. Happy baking!