
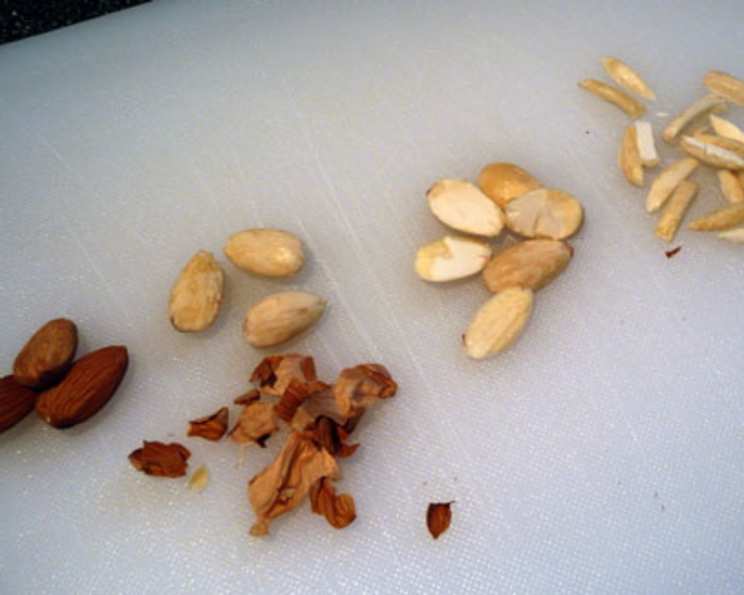
Mastering Almonds: Blanching, Splitting, and Slivering Like a Pro
There’s something truly magical about almonds. My grandmother always kept a small bowl of them on her kitchen counter, a subtle invitation to slow down and savor the simple things. I remember watching her deftly blanching and slivering them for her famous almond cake, her hands moving with a practiced grace that I now strive to emulate. The aroma of toasted almonds still evokes memories of her warm kitchen, filled with laughter and the comforting scent of baking. This recipe is more than just instructions; it’s a connection to those cherished moments.
Recipe Overview
- Prep Time: 5 minutes
- Cook Time: 2-5 minutes
- Total Time: 7-10 minutes
- Yields: 1 cup
- Serves: 1
- Dietary Type: Vegetarian, Vegan, Gluten-Free, Dairy-Free
Ingredients
- 1 cup almonds, with skin on
- 2 cups boiling water
Equipment Needed
- Small bowl
- Slotted spoon or strainer
- Fine-bladed knife (for splitting and slivering, if desired)
- Baking sheet (for drying slivers, if desired)
- Oven (for drying slivers, if desired)
Instructions
- Begin by bringing the water to a rolling boil.
- Place the almonds in a small bowl.
- Pour the boiling water over the almonds, ensuring they are fully submerged.
- Let the almonds sit in the hot water for 2-3 minutes. This softens the skin, making it easy to remove. For easier splitting you can soak longer.
- Drain the almonds using a slotted spoon or strainer.
- Once the almonds are cool enough to handle, gently squeeze each almond between your thumb and forefinger. The kernel should easily pop out of its skin. If the skin doesn’t come off easily, soak them in the hot water for another minute and try again.
- At this point, you can use the blanched almonds as they are.
- If you want to split the almonds, use a fine-bladed knife to carefully separate the two halves. Place the flat side of the almond on the cutting board. With a paring knife gently slice in between the 2 halves and then separate.
- For slivered almonds, if you want perfect slivers, start by soaking them a little longer during the blanching process to soften the kernel further. Soaking for too long will make them mushy. Experiment to find the perfect soak time for your almonds.
- With a paring knife or chef’s knife, slice the almond lengthwise into 3-4 slivers. Be careful to maintain even pressure for consistent slivers.
- If you are slivering, it is best to dry out the slivers. Preheat your oven to 300F/150C. Spread the almond slivers in a single layer on a baking sheet.
- Place the baking sheet in the preheated oven and dry the almond slivers for a few minutes, keeping a close eye on them to prevent burning. Depending on your oven, this may take anywhere from 2-5 minutes. The slivers are ready when they are dry to the touch.
- Remove the almond slivers from the oven and let them cool completely before using or storing.
Expert Tips & Tricks
- Blanching Time: The blanching time is crucial. Too short, and the skins won’t come off easily. Too long, and the almonds can become soft and mushy. Start with 2 minutes and adjust as needed based on the almond variety.
- Slivers Drying: You can also dry out the slivers by putting them in the oven on a low temperature (170F/75C) for an hour. This will give them a longer shelf life.
- Batch Blanching: If you’re working with a large quantity of almonds, blanch them in smaller batches to ensure the water temperature remains high enough to effectively loosen the skins.
- Toasting for Flavor: For an enhanced flavor, lightly toast the blanched, split, or slivered almonds in a dry skillet over medium heat for a few minutes, until golden brown and fragrant. Watch them carefully, as they can burn quickly.
- Don’t Discard the Almond Water: The almond-infused water leftover from blanching can be cooled and used to water plants. It contains trace minerals that can benefit plant growth.
Serving & Storage Suggestions
- Blanched, split, or slivered almonds can be used immediately in your favorite recipes, such as salads, desserts, or as a garnish for savory dishes.
- Store the almonds in an airtight container in a cool, dry place. Properly stored blanched almonds will last for about 1-2 weeks at room temperature.
- For longer storage, keep them in the refrigerator for up to 1-2 months, or freeze them for up to 6 months. Freezing is a great option if you’ve blanched a large batch and won’t be using them right away.
- If you’ve dried the slivered almonds, they will last longer. Stored in an airtight container at room temperature or in the refrigerator, the slivers will last for about 2-3 months.
- When thawing frozen almonds, let them sit at room temperature for about 30 minutes before using.
Nutritional Information
| Nutrient | Amount per Serving | % Daily Value |
|---|---|---|
| Calories | 164 kcal | 8% |
| Total Fat | 14.2g | 18% |
| Saturated Fat | 1.1g | 6% |
| Cholesterol | 0mg | 0% |
| Sodium | 0.7mg | 0% |
| Total Carbohydrate | 6.1g | 2% |
| Dietary Fiber | 3.5g | 14% |
| Sugars | 1.3g | 3% |
| Protein | 6g | 12% |
Nutritional information is an estimate and may vary based on specific ingredients and portion sizes.
Variations & Substitutions
- Flavor Infusions: While blanching, add a sprig of rosemary or a few lemon peels to the water to infuse the almonds with subtle flavors.
- Smoked Almonds: After blanching, toss the almonds with smoked paprika, salt, and a touch of olive oil, then roast them in the oven for a smoky, savory snack.
- Spice it Up: Toss the blanched, split, or slivered almonds with your favorite spices and roast for a flavorful snack or ingredient. Cayenne pepper and chili powder add heat, while cinnamon and nutmeg offer a warm, sweet twist.
- Honey Roasted: Drizzle the almonds with honey or maple syrup and roast them for a delicious sweet treat. A sprinkle of sea salt enhances the flavor.
FAQs (Frequently Asked Questions)
Q: Why do I need to blanch almonds before splitting or slivering them?
A: Blanching softens the skin and makes it easy to remove. This step is essential for achieving a smooth, clean texture and appearance.
Q: Can I skip the drying step for slivered almonds?
A: Yes, you can use them immediately. However, drying them extends their shelf life and prevents them from becoming soft or clumping together.
Q: How do I prevent the almonds from burning when drying them in the oven?
A: Keep a close eye on them and stir them occasionally. Lower the oven temperature slightly if they start to brown too quickly.
Q: What if the almond skins don’t come off easily after blanching?
A: Soak them in the hot water for another minute or two. Make sure the water is still very hot.
Q: Can I use a microwave instead of the oven to dry the slivered almonds?
A: Yes, you can microwave them in short intervals (about 30 seconds), stirring in between, until they are dry to the touch. Be careful not to overcook them.
Final Thoughts
Mastering the art of blanching, splitting, and slivering almonds is a rewarding skill that opens up a world of culinary possibilities. Whether you’re adding a delicate crunch to a salad, creating a stunning cake decoration, or simply enjoying a healthy snack, perfectly prepared almonds elevate any dish. So, gather your ingredients, follow these simple steps, and let your creativity soar. Don’t be afraid to experiment with flavors and textures, and most importantly, enjoy the process. And if you create a special almond creation, please share the love and tag me!