
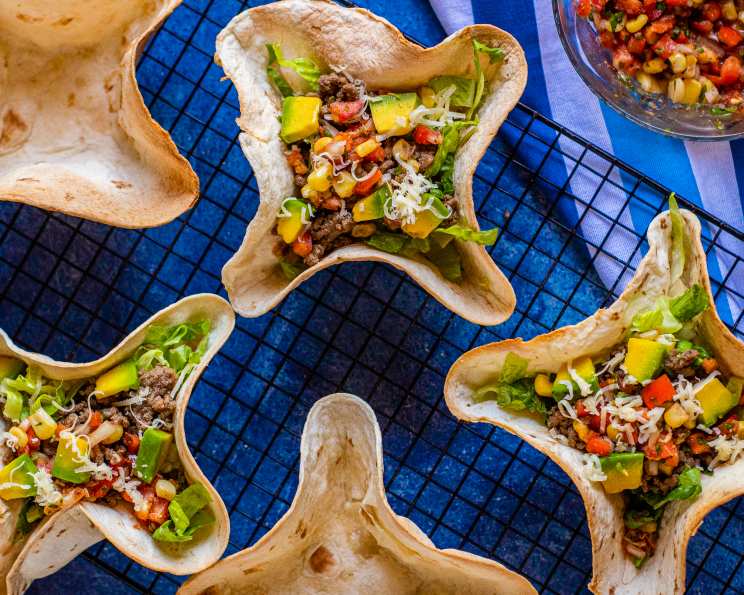
Baked Taco Salad Shell Bowls: A Culinary Canvas for Your Creations
The aroma of baking tortillas always takes me back to my college days. Late-night study sessions fueled by endless brainstorming and even more questionable dining hall food were occasionally punctuated by the glorious rebellion of homemade taco nights. We’d gather in our tiny dorm room kitchen, armed with mismatched bowls and a shared dream of culinary transcendence, attempting to craft these crispy shells in a toaster oven. They were never perfect, often burnt around the edges, but the laughter and shared experience made them taste like victory. Now, with a real oven and a few more years of kitchen wisdom, I can create beautifully shaped taco salad bowls ready to cradle any delicious filling you can dream up!
Recipe Overview
- Prep Time: 10 minutes
- Cook Time: 7-8 minutes
- Total Time: 17-18 minutes
- Servings: Varies, typically 4-6 depending on tortilla size
- Yield: 4-6 taco salad bowls
- Dietary Type: Vegetarian (easily adaptable to vegan)
Ingredients
- Flour tortillas (10-inch or 12-13 inch), one per bowl
- Aluminum foil (12-inch squares), one per bowl
- Warm water
- Olive oil (1/4 teaspoon per tortilla)
Equipment Needed
- Baking sheet
- Empty food cans (4-inches wide) – the number depends on tortilla size
- Deep-dish pizza pan (12 to 14-inch) or appropriately rimmed baking dish
- Aluminum foil
Instructions
- Prepare the baking sheet: If using 10-inch tortillas, place two empty food cans 3 to 4 inches apart on a baking sheet lined with aluminum foil. If using larger 12 or 13-inch tortillas, just use one can in the center of the baking sheet.
- Create foil supports: Drape a 12-inch square of aluminum foil over the top of each can, molding it slightly to create a rounded dome. This will form the base of your taco bowl.
- Prepare the water bath: Fill a deep-dish pizza pan (or similar rimmed container) with about 1/2 inch of warm water. Add 1/4 teaspoon of olive oil to the water. The oil helps prevent the tortilla from sticking.
- Hydrate the tortilla: Quickly immerse a flour tortilla into the warm water, ensuring it’s fully saturated. Immediately lift it out and allow the excess water to drain off for a few seconds. A wet tortilla is essential for pliability.
- Drape and shape: Gently drape the damp tortilla over the foil-covered can. If you position the tortilla slightly off-center, you’ll achieve a more dramatic, flared edge on the finished shell. This is optional, of course, but makes for a visually appealing presentation.
- Repeat: If you have room on the baking sheet, add another 1/4 teaspoon of olive oil to the water, dip another tortilla, and drape it over a separate can.
- First Bake (4-5 minutes): Bake the taco salad shells in a preheated oven at 450 degrees F (232 degrees C) until they’re lightly brown and have begun to firm up enough to hold their shape. This initial bake usually takes about 4 to 5 minutes. Keep a close eye, as ovens can vary.
- Invert and crisp: Using oven mitts, carefully lift the shells off the cans and place them cup-side-up directly on the baking sheet. If the edges of the larger tortillas begin to sag, loosely crumple small pieces of aluminum foil into 4-inch balls and use them to support the sagging areas. This will help the shell maintain its shape as it crisps.
- Second Bake (2-3 minutes): Return the shells to the oven and bake for an additional 2 to 3 minutes, or until they are crisp and golden brown. Watch carefully during this second bake to prevent burning. The exact timing will depend on the thickness and moisture content of your tortillas.
- Cooling: Remove the baked taco salad shells from the oven and let them cool completely on a wire rack. As they cool, they will continue to crisp up.
- Repeat: Continue repeating steps 3 through 10 until you have enough taco salad shell bowls for your meal.
- Enjoy! Fill your freshly baked taco bowls with your favorite taco fillings and serve immediately.
Expert Tips & Tricks
- Don’t oversoak: While it’s essential to get the tortillas wet, avoid soaking them for too long. Excess water can lead to soggy shells that don’t crisp properly. A quick dip is all you need.
- Even browning: For uniform color, rotate the baking sheet halfway through each baking phase.
- Customize the shape: Experiment with different can sizes or using ramekins instead of cans to create various bowl shapes.
- Prevent sticking: If your tortillas tend to stick, lightly spray the foil-covered cans with cooking spray before draping the tortillas.
- Adding flavor: For extra flavor, brush the tortillas with a mixture of melted butter, garlic powder, and chili powder before baking.
Serving & Storage Suggestions
Serve these taco salad bowls immediately after baking for the best texture and flavor. You can fill them with seasoned ground beef, shredded chicken, black beans, rice, lettuce, tomatoes, cheese, salsa, sour cream, guacamole, and any other desired toppings.
If you happen to have leftover shells (though that’s rare in my house!), store them in an airtight container at room temperature. They will remain crisp for up to 24 hours. However, they are best enjoyed fresh. They do not freeze well as the texture will change and become stale upon thawing.
Nutritional Information
(Estimated, per shell, without fillings)
| Nutrient | Amount per Serving | % Daily Value |
|---|---|---|
| Calories | 180 kcal | 9% |
| Total Fat | 7g | 11% |
| Saturated Fat | 1g | 5% |
| Cholesterol | 0mg | 0% |
| Sodium | 350mg | 15% |
| Total Carbohydrate | 25g | 8% |
| Dietary Fiber | 2g | 8% |
| Sugars | 1g | – |
| Protein | 5g | 10% |
Variations & Substitutions
- Gluten-Free: Use gluten-free tortillas for a gluten-free version. Note that the baking time may need to be adjusted, and the texture might be slightly different.
- Corn Tortillas: While flour tortillas are traditional for this recipe, you can try using corn tortillas. However, they are more prone to cracking, so handle them with extra care. They may also require a slightly longer soaking time.
- Spice It Up: Add a dash of cayenne pepper or chili flakes to the water bath for a subtle kick.
- Whole Wheat: Use whole wheat tortillas for a healthier option with added fiber.
- Seasoned Tortillas: Look for pre-seasoned tortillas (e.g., chili lime) to add extra flavor to your bowls.
FAQs (Frequently Asked Questions)
Q: Can I make these ahead of time?
A: Yes, you can bake the shells a few hours in advance and store them in an airtight container at room temperature. However, they are best enjoyed fresh for optimal crispness.
Q: My shells are burning before they get crispy. What am I doing wrong?
A: Your oven temperature may be too high, or the tortillas might be too thin. Try lowering the oven temperature by 25 degrees and reducing the baking time.
Q: Can I use a different kind of oil in the water?
A: Yes, you can substitute another neutral-flavored oil, such as vegetable or canola oil, for the olive oil.
Q: My shells are cracking when I try to drape them over the cans. What should I do?
A: This usually means the tortillas aren’t wet enough. Make sure to fully immerse them in the warm water before draping. If they are still cracking, try soaking them for a few seconds longer.
Q: Can I freeze these taco salad shells?
A: While you can technically freeze them, it’s not recommended. The texture tends to become stale and less crispy after thawing. It’s best to enjoy them fresh.
Final Thoughts
These baked taco salad shell bowls are more than just a vessel for your favorite fillings; they’re a canvas for culinary creativity! From perfecting the shape to experimenting with different flavors, this recipe offers endless possibilities. So, gather your ingredients, preheat your oven, and get ready to create a memorable meal. And don’t be afraid to share your own twists and variations – I’d love to hear about them! Perhaps a chilled margarita or a refreshing agua fresca would be just the thing to complete your taco fiesta. Enjoy!