
The Surprisingly Simple Secret to Beefy Seitan
I remember the first time I tried seitan. It was at a vegan food fair in Brooklyn, and I was immediately skeptical. “Wheat meat?” I thought. “How can that possibly taste good?” One bite of a seitan-based “steak” sandwich, dripping with savory gravy, completely changed my mind. The texture, the flavor – it was remarkably like beef! From that moment on, I was determined to master the art of homemade seitan. After countless experiments (and a few rubbery failures), I finally cracked the code. This recipe delivers that same satisfyingly beefy flavor and texture I first experienced, and it’s far simpler to make than you might think.
Recipe Overview
- Prep Time: 30 minutes
- Cook Time: 1 hour
- Total Time: 1 hour 30 minutes
- Servings: 6
- Dietary Type: Vegan
Ingredients
For the Dry Ingredients:
- 2 cups vital wheat gluten (Bob’s Red Mill)
- 2 tablespoons spelt flour
- 1/4 cup nutritional yeast
For the Wet Ingredients:
- 1 1/2 cups cold water
- 1/2 cup tamari, soy sauce (Bragg’s Amino Acids can be substituted)
- 1 tablespoon ketchup (or tomato paste)
- 1 tablespoon oil (olive oil recommended)
- 2 finely chopped garlic cloves
- 1 teaspoon lemon zest
For the Broth:
- 12 cups cold water
- 1/2 cup tamari (Bragg’s) or 1/2 cup soy sauce (Bragg’s)
Equipment Needed
- Stand mixer (or large mixing bowl and strong arms!)
- Paddle attachment (for stand mixer)
- Whisk
- Cutting board
- Large pot
Instructions
-
Combine the dry ingredients: In the bowl of a stand mixer, thoroughly combine 2 cups vital wheat gluten, 2 tablespoons spelt flour, and 1/4 cup nutritional yeast.
-
Slowly incorporate dry ingredients: Using the paddle attachment on the mixer, slowly combine the dry ingredients on low speed. This prevents the gluten from puffing out in a cloud.
-
Prepare the wet ingredients: In a smaller bowl, whisk together 1 1/2 cups cold water, 1/2 cup tamari (or soy sauce), 1 tablespoon ketchup (or tomato paste), 1 tablespoon oil, 2 finely chopped garlic cloves, and 1 teaspoon lemon zest. Ensure all ingredients are well combined.
-
Combine wet and dry: Stop the stand mixer and add all the wet ingredients to the dry ingredients at once. Slowly incorporate the wet into the dry on low speed until a dough begins to form.
-
Knead the dough: If the dough appears too wet, add 1 tablespoon of spelt flour at a time, up to 4 tablespoons total, until it reaches a workable consistency. Mix the dough for 5 minutes on medium speed. The dough should be elastic and slightly tacky.
-
Shape and rest: Turn the dough out onto a cutting board and form it into a loaf shape. Let it sit while you prepare the broth. This allows the gluten to relax slightly.
-
Prepare the broth: In a large pot, bring 12 cups of cold water and 1/2 cup of tamari (or soy sauce) to a boil over high heat. Once boiling, reduce the heat to low, so the broth is simmering.
-
Portion the dough: Cut the loaf into 6 equal pieces.
-
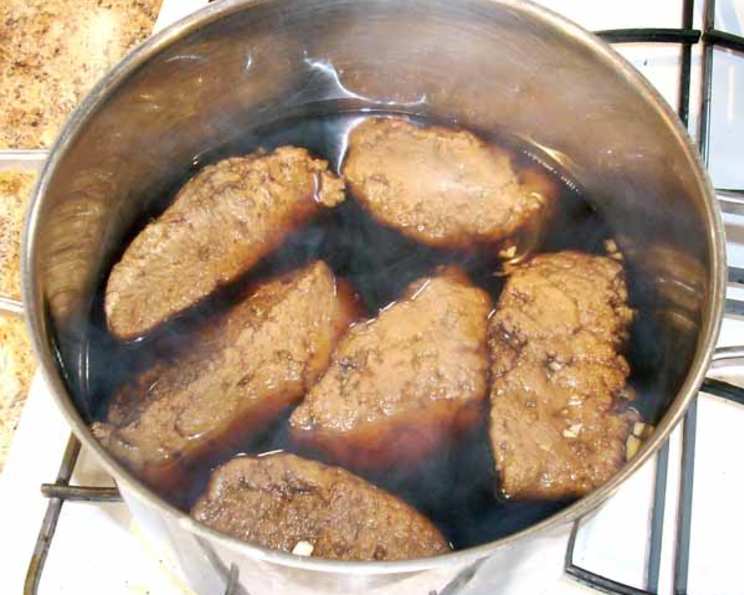
Simmer the seitan: Gently lower each piece of seitan dough into the simmering broth. Ensure the seitan is fully submerged. Cover the pot and let it simmer for 1 hour. Do NOT let the broth boil vigorously! A rapid boil will create air pockets and a spongy texture in the seitan. Maintain a gentle simmer throughout the cooking process.
-
Cool the seitan: After 1 hour, remove the seitan from the pot and place it on a dish to cool. The seitan will be very hot, so handle it carefully. For quicker cooling, place the dish in the refrigerator.
-
Thoroughly cool: Ensure the seitan is completely cooled before using it. This is crucial for the texture to firm up properly. It will be tempting to slice into it while warm, but resist!
-
Storage: The seitan can be used immediately. Alternatively, store it in its broth in the refrigerator for up to 5 days. For longer storage, place the cooled seitan in a zip-lock bag and freeze it.
-
Versatile Usage: The seitan can be used in place of any meat product. Grind it in a food processor for burgers, slice it for sandwiches, or cube it for stir-fries.
-
Fry or bake: Another delicious way to prepare the seitan is to dip slices in flour, then soy milk, then bread crumbs, and fry or bake until golden brown. Top with your favorite gravy for a hearty meal.
Expert Tips & Tricks
- Kneading is Key: Don’t skimp on the kneading time! Properly kneading the dough develops the gluten, resulting in a chewier, more satisfying texture.
- Simmer, Don’t Boil: I can’t stress this enough: a gentle simmer is essential. A rolling boil will result in a spongy, hole-ridden seitan that won’t hold its shape well.
- Broth Flavor Boost: Experiment with adding aromatics to the broth. A bay leaf, a few peppercorns, or some sliced ginger can add subtle but noticeable flavor nuances.
- Pressing for Texture: For a firmer, more “steak-like” texture, press the cooled seitan between two plates with a weight on top for a few hours to remove excess moisture.
- Flavor Infusion: Marinate the cooked seitan in your favorite sauce before cooking it further to infuse it with even more flavor. Teriyaki, barbecue, or even a simple garlic-herb marinade work wonderfully.
Serving & Storage Suggestions
Serve the seitan hot or cold, depending on your application. For a hearty meal, slice it and serve with mashed potatoes and gravy. For a lighter option, cube it and add it to a salad.
Store leftover seitan in an airtight container in the refrigerator, submerged in its broth, for up to 5 days. You can also freeze it for longer storage. Thaw it overnight in the refrigerator before using.
Reheat the seitan in a skillet with a little oil or in the microwave. If reheating from frozen, add a splash of water or broth to prevent it from drying out.
Nutritional Information
| Nutrient | Amount per Serving | % Daily Value |
|---|---|---|
| Calories | 280 kcal | 14% |
| Total Fat | 7g | 11% |
| Saturated Fat | 1g | 5% |
| Cholesterol | 0mg | 0% |
| Sodium | 1800mg | 75% |
| Total Carbohydrate | 15g | 5% |
| Dietary Fiber | 3g | 12% |
| Sugars | 3g | 6% |
| Protein | 40g | 80% |
Note: Nutritional information is an estimate and may vary based on specific ingredients and portion sizes.
Variations & Substitutions
- Gluten-Free Option: Unfortunately, the primary ingredient in seitan is vital wheat gluten, so this recipe is inherently not gluten-free.
- Spice it up: Add a pinch of cayenne pepper or some smoked paprika to the dry ingredients for a spicy kick.
- Herb it up: Mix in some dried herbs like thyme, rosemary, or oregano to the dry ingredients for an herby flavor.
- Different Oils: Feel free to use any oil you prefer, such as avocado oil, coconut oil, or even sesame oil for a different flavor profile.
- Soy-Free: If you are avoiding Soy, try using Coconut Aminos instead of Tamari or Soy Sauce.
FAQs (Frequently Asked Questions)
Q: Why is my seitan rubbery?
A: Over-kneading or boiling the seitan can cause it to become rubbery. Ensure you knead it for the recommended time and maintain a gentle simmer throughout the cooking process.
Q: Can I bake the seitan instead of simmering it?
A: Yes, you can bake the seitan. Wrap the loaf tightly in foil and bake at 350°F (175°C) for about 1 hour.
Q: How can I make the seitan taste more like beef?
A: Adding a teaspoon of beef-flavored bouillon powder (vegan if needed) to the wet ingredients can enhance the beefy flavor. Smoked paprika will also help.
Q: Can I add vegetables to the seitan dough?
A: Yes, finely chopped vegetables like onions, carrots, or mushrooms can be added to the dough for extra flavor and texture.
Q: How long does homemade seitan last?
A: Homemade seitan will last for up to 5 days in the refrigerator when stored in its broth. It can also be frozen for longer storage.
Final Thoughts
Making seitan at home might seem intimidating at first, but it’s a surprisingly simple and rewarding process. This recipe offers a fantastic base for countless vegan dishes. Don’t be afraid to experiment with different flavors and seasonings to create your signature seitan. Once you’ve mastered this technique, you’ll have a versatile and delicious plant-based protein source at your fingertips. I encourage you to give it a try and share your creations! Perhaps pair it with a hearty vegan stew or use it in your next stir-fry – the possibilities are endless!