
Unlock the Power of Sprouted Brown Rice: A Chef’s Guide
My grandmother, a woman deeply connected to the earth, always had a jar of something sprouting on her kitchen counter. It could be lentils, mung beans, or, most often, brown rice. As a child, I was fascinated by this seemingly magical process of coaxing life from a humble grain. She taught me that sprouting wasn’t just a quirky health fad; it was a way to unlock hidden nutrients and make food more digestible. The slightly sweet, nutty flavor of her sprouted rice dishes remains a vivid culinary memory, a testament to the simple yet profound power of nature’s transformations.
Recipe Overview
- Prep Time: 10 minutes
- Soak Time: 12 hours
- Sprout Time: 1-2 days
- Servings: 1 cup (cooked)
- Yields: 1 cup (raw)
- Dietary Type: Gluten-Free, Vegan
Ingredients
- 1 cup whole brown rice (can use short or long, or even sweet or sushi-type rice)
- 2 cups water (or enough to cover rice in jar)
Equipment Needed
- Sieve
- Glass jar or bowl
- Towel
Instructions
- Begin by thoroughly rinsing the brown rice in a sieve under cool running water. This helps remove any surface impurities and excess starch.
- Transfer the rinsed rice to a clean glass jar or bowl.
- Add double the volume of warm water to the jar, ensuring the rice is completely submerged. You may need slightly more than 2 cups depending on the size of your jar.
- Cover the jar loosely with a clean towel, securing it with a rubber band or string. This allows air circulation while keeping out dust and insects.
- Set the jar aside in a warm area of the kitchen for approximately 12 hours to soak. This initial soaking is crucial for initiating the sprouting process.
- After 12 hours, pour the rice back into the sieve and drain the soaking liquid. Don’t discard the liquid; it can be used to water plants!
- Rinse the rice well with fresh water to remove any lingering starch or debris. Shake off as much excess moisture as possible.
- Now, you have two options for the sprouting stage:
- Option 1 (Jar Method): Return the rinsed rice to the jar. Cover it back up with fresh water, and repeat the draining, rinsing, and soaking steps 2 to 3 times per day.
- Option 2 (Sieve Method): Leave the rice in the sieve over a bowl to catch any drips. Cover the sieve loosely with a towel. Repeat the rinsing and draining process 2 to 3 times per day. This method provides better air circulation and may result in faster sprouting.
- Continue this process for 1 to 2 days, depending on the ambient temperature and your desired sprout length.
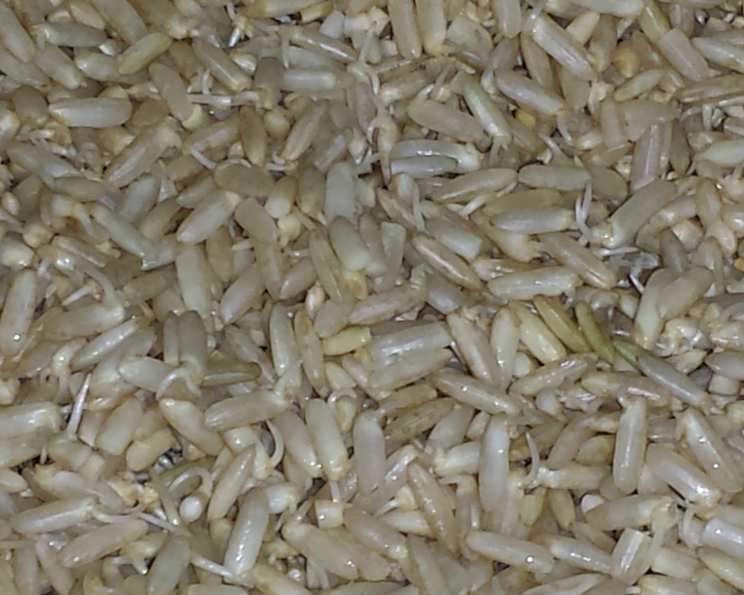
- Observe the rice closely. After 1 to 2 days, you should begin to see a very tiny sprout emerge from the end of each grain. This is the point at which you want to “harvest” your rice, meaning cease the sprouting process.
- It’s important to stop the sprouting process when the sprouts are very small. If the sprouting continues and the sprout grows too long, it can negatively affect the flavor and texture of the rice. Aim for sprouts that are just barely visible.
- Once sprouted, use the rice immediately. Alternatively, you can store it in the refrigerator for several days. Before refrigerating, allow the rice to drip dry thoroughly to prevent it from becoming soggy.
- When cooking sprouted rice, remember that it has already absorbed a significant amount of moisture during the sprouting process. Therefore, you will need less water than usual. The cooking time will also be shorter. Adjust the water and cooking time accordingly based on your preferred cooking method (stovetop, rice cooker, etc.).
Expert Tips & Tricks
- Water Quality: Use filtered water for soaking and rinsing, as chlorine and other chemicals in tap water can inhibit sprouting.
- Temperature Control: The ideal temperature for sprouting is between 70-75°F (21-24°C). If your kitchen is too cold, consider placing the jar or sieve in a slightly warmer location, such as near a pilot light or on top of the refrigerator.
- Even Sprouting: Gently stir the rice during each rinsing to ensure even moisture distribution and promote uniform sprouting.
- Preventing Mold: Good air circulation is key to preventing mold growth. Ensure the towel covering the rice is breathable and that the rice is not sitting in stagnant water. If you notice any mold, discard the batch immediately.
- Cooking Tip: Steaming is a gentle way to cook sprouted rice, preserving its delicate flavor and texture.
Serving & Storage Suggestions
Sprouted brown rice can be used in a wide variety of dishes, just like regular cooked brown rice. Serve it as a side dish with stir-fries, curries, or roasted vegetables. It’s also a delicious addition to salads, soups, and grain bowls.
For storage, sprouted rice should be refrigerated in an airtight container. Properly stored, it will last for up to 5 days in the refrigerator. It is not recommended to store sprouted rice at room temperature for extended periods due to the risk of bacterial growth. Freezing is not recommended, as it can negatively affect the texture.
Nutritional Information
| Nutrient | Amount per Serving | % Daily Value* |
|---|---|---|
| Calories | 216 kcal | 11% |
| Total Fat | 1.6g | 2% |
| Saturated Fat | 0.4g | 2% |
| Cholesterol | 0mg | 0% |
| Sodium | 5mg | 0% |
| Total Carbohydrate | 45g | 16% |
| Dietary Fiber | 2g | 7% |
| Sugars | 0.4g | – |
| Protein | 5g | 10% |
| *Percent Daily Values are based on a 2,000 calorie diet. |
Variations & Substitutions
- Sprout Other Grains: The same sprouting method can be applied to other grains like quinoa, barley, or wheat berries (though be mindful of gluten if necessary).
- Add Flavors During Cooking: Enhance the flavor of your cooked sprouted rice by adding herbs, spices, or vegetable broth during the cooking process. Consider adding a bay leaf, a sprig of thyme, or a pinch of saffron.
- Sprouted Rice Flour: Dehydrate the sprouted rice and grind it into flour for use in gluten-free baking.
FAQs (Frequently Asked Questions)
Q: Why should I sprout brown rice?
A: Sprouting increases the bioavailability of nutrients in brown rice and reduces the levels of phytic acid, an anti-nutrient that can inhibit mineral absorption. It also makes the rice more digestible.
Q: How do I know when the rice is sprouted enough?
A: Look for tiny sprouts, no longer than the grain itself, emerging from the ends of the rice grains. Over-sprouting can lead to a bitter taste and mushy texture.
Q: Can I use any type of brown rice for sprouting?
A: Yes, you can use any type of whole grain brown rice, including short-grain, long-grain, sweet rice, or sushi rice.
Q: Is sprouted brown rice gluten-free?
A: Yes, as long as you use certified gluten-free brown rice and avoid cross-contamination during the sprouting process, sprouted brown rice is naturally gluten-free.
Q: My sprouted rice smells a little sour. Is it still safe to eat?
A: A slightly sour smell can indicate that the rice has started to ferment. If the smell is strong or unpleasant, or if you see any signs of mold, it’s best to discard the batch.
Final Thoughts
Sprouting brown rice is a rewarding process that unlocks a world of flavor and nutrition. Don’t be intimidated by the seemingly complex procedure; it’s much simpler than it sounds! Give it a try, experiment with different grains, and discover the joy of transforming humble ingredients into culinary gems. Share your sprouted rice creations with friends and family, and let them experience the goodness of this ancient practice. I’d love to hear about your experience and any variations you try – happy sprouting!