
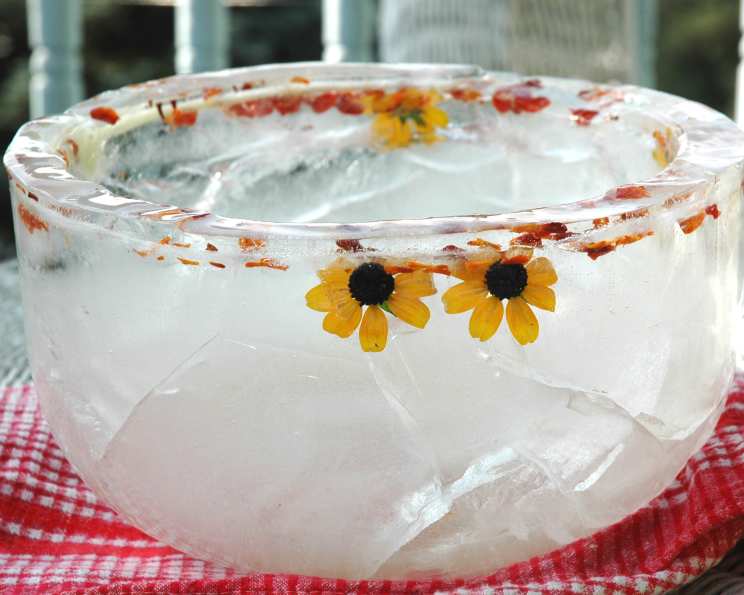
Sculpting Art from Ice: The Ice Bowl Recipe
I remember the first time I saw an ice bowl. It wasn’t in a fancy restaurant or a magazine spread, but at a summer solstice celebration in my town’s square. A local artist had crafted a massive ice bowl filled with vibrant flowers and floating candles. The way the light danced through the ice, highlighting the delicate petals, was pure magic. From then on, I knew I wanted to try my hand at this unique culinary art form. It felt less like cooking and more like sculpting with nature’s most ephemeral medium.
Recipe Overview:
- Prep Time: 30 minutes
- Freeze Time: 48 hours
- Total Time: 48 hours 30 minutes
- Yields: 1 ice bowl
- Serves: 10
Ingredients:
- 1/4 cup crushed ice, plus additional for decoration
- 1 orange, very thinly sliced (or other citrus fruit and flowers that are relatively flat)
- 1 unopened bag of frozen peas (for weighting down inner bowl)
- Water (enough to fill between the bowls)
Equipment Needed:
- 2 nesting bowls (use the largest you can find)
- Tape
- “Skid-free” mat
- Tray with a lip
- Plastic cling wrap
Instructions:
-
Begin by placing 1/4 cup of crushed ice in the bottom of the larger bowl. This will create a textured base and help secure the first layer of decoration.
-
Arrange thin slices of orange (or other citrus fruit or edible flowers) artfully over the crushed ice. Choose fruits and flowers that lie relatively flat so they freeze smoothly.
-
Cover the fruit with another 1/4 cup of crushed ice. This helps to hold the fruit in place and provides a base for the inner bowl.
-
Carefully place the smaller nesting bowl inside the larger bowl. Adjust its position so that it is as close to the center as possible, leaving an even space between the two bowls.
-
To weigh down the inner bowl and prevent it from floating during freezing, place an unopened bag of frozen peas inside the smaller bowl. This ensures that the ice bowl will have a defined shape.
-
Secure the two bowls together using tape. Apply the tape in at least three places across the top to prevent separation during the freezing process.
-
Gently add water to the space between the bowls, filling it to a level slightly above the bottom of the inner bowl. This initial layer of water will form the base of the ice bowl.
-
Carefully transfer the entire setup to the freezer and let it freeze completely. This will usually take at least 4 to 6 hours, depending on your freezer’s temperature.
-
Once the first layer is frozen, take the bowls out of the freezer. This is where you’ll add more decorations to the middle layer.
-
Gently push additional thin slices of fruit and/or flowers between the bowls. Be creative with your arrangements, but ensure that the items are relatively flat to avoid creating air pockets.
-
Sprinkle a layer of crushed ice between the bowls to help hold the fruit and flowers in place and to create a more visually appealing texture.
-
Add more water, carefully filling the space between the bowls to cover the new decorations.
-
Return the bowls to the freezer and freeze again.
-
Keep repeating steps 8 through 13, adding layers of decorations and water, until you reach the desired height of the ice bowl. The more layers you add, the more intricate and beautiful the finished bowl will be.
-
After the bowl is completely frozen solid, remove it from the freezer.
-
Carefully separate the ice bowl from the two nesting bowls. This is often the trickiest part.
-
Remove the frozen peas and the tape.
-
Add warm water to the smaller bowl, swirling it around gently. The warmth will loosen the ice, allowing you to lift out the inner bowl. Be patient and avoid using excessive force, which could crack the ice bowl.
-
Remove the smaller bowl.
-
Return the ice bowl to the freezer to ensure it’s completely frozen before removing the outer bowl.
-
Once the ice bowl is frozen solid again, remove the bottom bowl in a similar fashion, using warm water to loosen the ice.
-
When the ice bowl is finally free, place it back in the freezer on top of plastic cling wrap. Cover it lightly to protect it from freezer burn and to help it maintain its clarity.
-
Let the bowl freeze overnight or for at least an hour before using. This will ensure that it is solid and ready to hold its contents.
-
When ready to serve, place scoops of ice cream in the freezer until the last minute.
-
Place the ice bowl on a “skid-free” mat inside a tray with a lip. This will catch any melting water and prevent the bowl from sliding.
-
Let your guests serve themselves.
Expert Tips & Tricks:
- Clarity is Key: To achieve the clearest ice, use distilled water that has been boiled and cooled before freezing. This removes impurities that can cause cloudiness.
- Temperature Control: Avoid sudden temperature changes that can crack the ice. When adding warm water to release the bowls, do so gradually.
- Decorative Freezing: For unique decorations, consider freezing edible flowers like pansies or violets in ice cubes and adding them to the layers.
- Preventing Cracks: Wrap the outside of the larger bowl with a towel while adding warm water to the inner bowl. This helps to insulate the ice and prevent cracking.
- Reinforcements: For larger ice bowls, consider adding a small amount of gelatin to the water to help strengthen the ice structure.
Serving & Storage Suggestions:
The ice bowl is best used immediately after removing it from the freezer. Place it on a tray with a lip to catch any melting water. Since ice bowls are temporary, they cannot be stored for extended periods. If you need to hold it for a short time (no more than an hour), keep it in the freezer, lightly covered with plastic wrap. Be aware that the ice will continue to melt, so plan accordingly. It’s best suited to events where it can be admired and enjoyed for a few hours.
Nutritional Information:
Since the ice bowl itself is made of water and decorations, the nutritional value is negligible. The nutrition of the dish served in the bowl (e.g., ice cream) should be considered separately.
| Nutrient | Amount per Serving (Ice Bowl) | % Daily Value |
|---|---|---|
| Calories | 6.2 kcal | 0% |
| Total Fat | 0 g | 0% |
| Saturated Fat | 0 g | 0% |
| Cholesterol | 0 mg | 0% |
| Sodium | 0.2 mg | 0% |
| Total Carbohydrate | 1.5 g | 0% |
| Dietary Fiber | 0.3 g | 1% |
| Sugars | 1.2 g | 4% |
| Protein | 0.1 g | 0% |
Variations & Substitutions:
- Fruit Combinations: Experiment with different combinations of citrus fruits, berries, and edible flowers.
- Themed Bowls: Create themed ice bowls for holidays or special events using colored water, food coloring, or festive decorations.
- Savory Bowls: While traditionally used for desserts, ice bowls can also be adapted for savory dishes. Freeze herbs and vegetables in the ice to create a unique serving vessel for chilled soups or salads.
- Wine or Punch Bowl: Scale up the size and use it as a wine or punch bowl for outdoor parties. Just be sure to provide a ladle.
FAQs (Frequently Asked Questions):
Q: How long will the ice bowl last before it melts?
A: The lifespan of an ice bowl depends on the ambient temperature. Generally, it will last for about 2-4 hours indoors before it begins to noticeably melt.
Q: Can I reuse the ice bowl?
A: Unfortunately, no. Once the ice bowl melts, it cannot be reformed.
Q: Can I use tap water to make the ice bowl?
A: While you can, using distilled water that has been boiled and cooled will result in clearer ice.
Q: What can I use instead of frozen peas to weigh down the inner bowl?
A: Any weighted object that fits inside the inner bowl will work. Consider using rocks, marbles, or even a bag of sand.
Q: How do I prevent the ice bowl from cracking?
A: Avoid sudden temperature changes and handle the ice bowl with care. If the bowl starts to crack while removing the molds, carefully drip a little cold water on the crack and return to the freezer for a few minutes. The crack may fuse back together slightly.
Final Thoughts:
Crafting an ice bowl is more than just following a recipe; it’s an opportunity to unleash your creativity and bring a touch of magic to any occasion. Don’t be afraid to experiment with different decorations and techniques to create a truly unique and memorable centerpiece. While the bowl itself is ephemeral, the joy and wonder it brings will linger long after the last drop of water has melted. I encourage you to give it a try and share your creations with the world!