
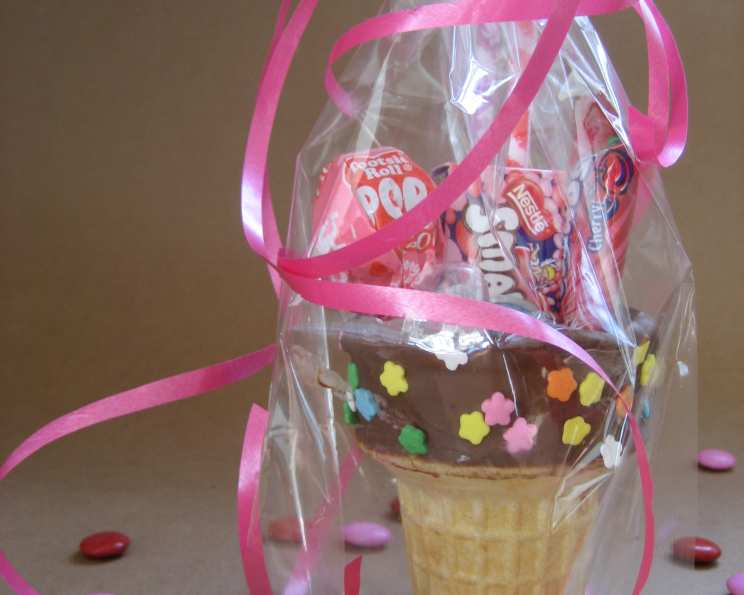
Ice Cream Cones Party Favors: A Sweet Surprise
The memory of birthday parties past often comes back in a rush of sugary goodness. I remember, as a child, the sheer delight of receiving a party favor – something that felt just for me, a little piece of the celebration to take home. One year, my aunt crafted the most wonderful cone-shaped treats. They weren’t just ordinary ice cream cones; they were edible goodie bags, overflowing with candies and topped with colorful sprinkles, and I’ll never forget the joy of unwrapping that little treasure. Now, I love recreating that magic for my own family and friends.
Recipe Overview
- Prep Time: 20 minutes
- Cook Time: 5 minutes
- Total Time: 25 minutes
- Servings: 24
- Yield: 24 cones
- Dietary Type: Vegetarian (check candy ingredients to ensure suitability for other dietary needs)
Ingredients
- 24 flat-bottomed ice cream cones
- 24 lollipops or 72 mini lollipops
- 72 pixie sticks
- 1 (11 ounce) package chocolate chips (or melting candy)
- 3 ounces candy sprinkles (approximately) or 3 ounces non-pareils (approximately)
Equipment Needed
- Microwave-safe bowl or double boiler
- Pastry brush (optional)
- Wax paper
- 24 cellophane party favor bags
- 5/8″ sheer ribbon (optional)
Instructions
-
Prepare your workstation. Lay out a sheet of wax paper to place the finished cones on while they cool. Have the sprinkles or non-pareils in a bowl, ready for dipping. Prepare your cellophane bags and ribbon for easy assembly later.
-
Melt the chocolate. In a microwave-safe bowl, microwave the chocolate chips (or melting candy) in 30-second intervals, stirring in between, until completely melted and smooth. Alternatively, use a double boiler on the stovetop. Be careful not to overheat the chocolate, as it can seize up. If using a microwave, power levels can vary, so keep a close eye on the chocolate to prevent burning.
-
Dip the cones. Hold a flat-bottomed ice cream cone and carefully dip the top and upper sides into the melted chocolate. Ensure even coating on the cone.
-
Alternative Chocolate Application (Optional). If you find dipping difficult, an alternative method is to use a pastry brush to brush the melted chocolate onto the top and upper sides of the ice cream cone. This can provide more control and prevent the cone from breaking.
-
Add the sprinkles. Immediately dip the chocolate-coated cone into the bowl of sprinkles or non-pareils, ensuring a generous and even coating. Gently roll the cone in the sprinkles to adhere them to the chocolate.
-
Cool and Harden. Place the decorated cones on the prepared wax paper. Allow the chocolate to cool and harden completely. This usually takes about 15-20 minutes at room temperature, or you can speed up the process by placing them in the refrigerator for a few minutes.
-
Fill the Cones. Once the chocolate is set, carefully fill each cone with your choice of candies. You can use mini packs of candies like Smarties, M&Ms, or chocolate covered raisins.
-
Add the Lollipops and Pixie Sticks. Stick either one lollipop or three mini lollipops and three pixie sticks into the candy-filled cone, arranging them to stand upright.
-
Package the Favors. Gently place each filled cone into a cellophane party favor bag.
-
Tie the Bags. Gather the top of the cellophane bag and tie it closed with the sheer ribbon for an extra festive touch. You can add a small tag with the child’s name or a thank you message.
-
Serve and Enjoy! Serve your cone party favors. Watch the children’s eyes light up as they receive their sweet treats.
Expert Tips & Tricks
- Melting Chocolate Consistency: To ensure smooth, even coating, add a teaspoon of vegetable oil or shortening to the chocolate while melting. This will thin the chocolate slightly and make it easier to work with.
- Preventing Cone Breakage: Be gentle when handling the ice cream cones, as they can be fragile. If a cone breaks, don’t worry! Simply use the broken pieces as extra candy inside other cones, or save them to crush and sprinkle over ice cream later.
- Chocolate Alternatives: If you’re not a fan of chocolate, you can use colored melting candy or white chocolate instead. This allows you to create even more vibrant and festive cones.
- Sprinkle Adhesion: For better sprinkle adhesion, lightly dampen the chocolate-coated cones with a spritz of cooking spray before dipping them in the sprinkles.
- Make-Ahead Tip: The chocolate-dipped cones can be made a day or two in advance and stored in an airtight container at room temperature. Wait to fill them with candy until just before the party to prevent the candy from becoming stale or sticky.
Serving & Storage Suggestions
Serve the Ice Cream Cones Party Favors immediately or within a few hours for the best quality. Store any leftover cones in an airtight container at room temperature for up to 2-3 days. The chocolate may bloom (develop a white film) due to temperature changes, but it’s still safe to eat. These are best served fresh, as the cones can become soggy over time. Do not store in the refrigerator, as this can soften the cones.
Nutritional Information
Note: Nutritional information is an estimate and may vary based on specific ingredients and quantities used.
| Nutrient | Amount per Serving | % Daily Value |
|---|---|---|
| Calories | 150 kcal | 8% |
| Total Fat | 6g | 9% |
| Saturated Fat | 4g | 20% |
| Cholesterol | 0mg | 0% |
| Sodium | 20mg | 1% |
| Total Carbohydrate | 25g | 9% |
| Dietary Fiber | 1g | 4% |
| Sugars | 15g | |
| Protein | 1g | 2% |
Variations & Substitutions
- Theme It Up: Tailor the sprinkles and candies to match the party’s theme. Use red and green sprinkles for Christmas, pastel colors for Easter, or team colors for a sports-themed party.
- Nut-Free Option: If there are nut allergies, ensure all candies and chocolate used are nut-free.
- Dietary Restrictions: Replace chocolate with dairy-free options or allergy-friendly alternatives, like carob chips.
- Cone Variations: Consider using waffle cones or sugar cones instead of flat-bottomed cones for a different look. Be aware that different cone shapes may affect the ability of the cone to stand up or hold a specific amount of candy.
- Flavor Infusion: Add a drop of peppermint extract to the melted chocolate for a festive holiday twist.
FAQs (Frequently Asked Questions)
Q: Can I use white chocolate instead of milk chocolate?
A: Absolutely! White chocolate, dark chocolate, or colored melting candies work great and add a different flavor and look.
Q: How can I prevent the sprinkles from falling off?
A: Make sure the chocolate is still melted and sticky when you dip the cone into the sprinkles. You can also lightly dampen the chocolate with cooking spray for better adhesion.
Q: Can I make these cones ahead of time?
A: Yes, you can prepare the chocolate-dipped cones a day or two in advance. Store them in an airtight container at room temperature until you’re ready to fill them with candy.
Q: What if I don’t have cellophane bags?
A: You can skip the bags or use parchment paper to wrap each cone individually.
Q: How do I prevent the cones from breaking while dipping them?
A: Be gentle and use a light touch. Avoid pressing too hard on the cones while dipping. Using a pastry brush to apply the melted chocolate can reduce breakage.
Final Thoughts
These Ice Cream Cones Party Favors are not just a treat, they are a memory waiting to be made. Whether you’re celebrating a birthday, a holiday, or simply want to bring a smile to someone’s face, these edible goodie bags are sure to be a hit. I encourage you to gather your ingredients, invite your little helpers, and create a batch of these sweet surprises. Don’t be afraid to get creative with your decorations and fillings – the possibilities are endless! I’d love to hear how your creations turn out, so please share your photos and feedback. Happy crafting and baking!