
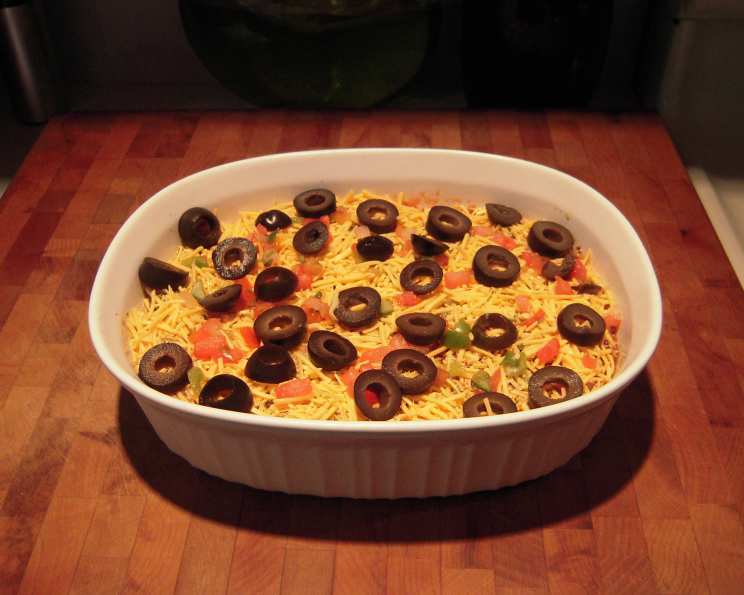
Incredible and Easy Taco Dip!
I’ll never forget my first taste of taco dip. It was at a neighborhood block party, and amidst the sizzling burgers and lively chatter, a simple dish of layered goodness sat unassuming on a picnic table. One scoop with a crunchy tortilla chip, and I was hooked! The explosion of flavors – the savory beans, creamy coolness, and that undeniable taco spice – transported me to a fiesta right there on the curb. Ever since, taco dip has been my go-to for potlucks, game nights, and frankly, any occasion that calls for a crowd-pleasing appetizer.
Recipe Overview
- Prep Time: 15 minutes
- Total Time: 15 minutes + chilling time
- Servings: 8-12
- Dietary Type: Gluten-Free
Ingredients
- 1 1/4 ounces taco seasoning
- 16 ounces fat-free refried beans
- 16 ounces fat-free sour cream
- 10 ounces mexicorn (canned), drained
- 15 ounces low-fat guacamole (prepackaged)
- 16 ounces salsa
- 4 ounces green chilies, diced
- 2 cups shredded Monterey Jack cheese or Monterey Jack pepper cheese blend
- 4 ounces sliced olives
Equipment Needed
- 13 x 9 inch pan
- Mixing bowl
- Spatula or spoon
- Plastic wrap
Instructions
-
In a mixing bowl, combine the refried beans, taco seasoning, and 1-2 tablespoons of the salsa. Mix thoroughly until the taco seasoning is evenly distributed throughout the refried beans.
-
Spread the seasoned refried bean mixture evenly across the bottom of the 13 x 9 inch pan. Ensure the entire bottom surface is covered for a consistent base layer.
-
Carefully spread the fat-free sour cream evenly over the refried bean layer. Use a spatula or spoon to ensure it reaches all the way to the edges of the pan, creating a complete seal. This layer provides a cool and creamy contrast to the other flavors.
-
Sprinkle the drained mexicorn evenly over the sour cream layer. Distribute the kernels for a consistent texture and visual appeal.
-
Gently spread the low-fat guacamole over the corn and sour cream layer, again making sure it goes all the way to the edges of the pan. The guacamole adds a rich, creamy element and characteristic flavor.
-
Spread the remaining salsa evenly over the guacamole layer, ensuring it reaches the edges of the pan. The salsa adds moisture, flavor, and a vibrant color.
-
Sprinkle the diced green chilies over the salsa layer. Distribute them evenly for a subtle kick of heat in every bite. If you prefer a milder dip, use fewer chilies or opt for a milder variety.
-
Completely cover the entire dish with the shredded cheese. Feel free to use Monterey Jack, a Monterey Jack pepper blend, or any shredded cheese blend you prefer, based on your taste. Ensure even coverage for a beautiful, melted cheese topping later.
-
Sprinkle the sliced olives evenly over the cheese. These add a salty, briny flavor and a pop of color.
-
Cover the pan tightly with plastic wrap and refrigerate for at least 2 hours, or preferably overnight. This allows the flavors to meld together, enhancing the overall taste of the dip.
-
Remove the dip from the refrigerator approximately 30 minutes to 1 hour before serving. This will allow it to soften slightly, making it easier to scoop and serve. Serve with your favorite tortilla chips.
Expert Tips & Tricks
- Make-Ahead Magic: This dip is best made a day in advance. The chilling time allows the flavors to marry and deepen, resulting in a far more flavorful final product.
- Spice it Up (or Down): Adjust the amount of taco seasoning to your preference. For a milder dip, use less taco seasoning; for a spicier kick, add a pinch of cayenne pepper to the refried bean mixture.
- Guacamole Hack: If you’re short on time (or avocados), using pre-packaged low-fat guacamole is a great shortcut. However, fresh, homemade guacamole will always elevate the dip to the next level.
- Cheese Please: Don’t be afraid to experiment with different cheese blends. A Mexican cheese blend, cheddar, or even a Colby Jack would all work beautifully.
- Layering is Key: Ensure each layer is spread evenly to guarantee every bite contains a balanced mix of flavors.
- Preventing Soggy Dip: To prevent the bottom layer from becoming soggy, you can lightly toast the tortilla chips before serving. This will give them extra structural integrity to hold the dip.
- Extra Flavor: Try mixing a packet of ranch dressing mix into the sour cream layer for an extra tangy and delicious variation.
Serving & Storage Suggestions
Serve the taco dip chilled with a generous bowl of your favorite tortilla chips. It’s also delicious with vegetable sticks like carrots and celery. If you have any leftovers (though it’s unlikely!), store them in an airtight container in the refrigerator for up to 3 days. After that, the flavors and textures might start to deteriorate. The dip is best served cold and is not suitable for freezing. Leaving the dip at room temperature for longer than 2 hours is not recommended due to the dairy content.
Nutritional Information
| Nutrient | Amount per Serving | % Daily Value |
|---|---|---|
| Calories | 230 kcal | – |
| Calories from Fat | – | 44% |
| Total Fat | 11 g | 17% |
| Saturated Fat | 6 g | 30% |
| Cholesterol | 30 mg | 10% |
| Sodium | 1124 mg | 46% |
| Total Carbohydrate | 24 g | 7% |
| Dietary Fiber | 2 g | 9% |
| Sugars | 8 g | – |
| Protein | 12 g | 23% |
Variations & Substitutions
- Vegan Taco Dip: Substitute the fat-free sour cream with a vegan sour cream alternative. Use vegan refried beans and ensure your taco seasoning and guacamole are also vegan-friendly.
- Spicy Fiesta Dip: Add a layer of pickled jalapeños for an extra kick. You can also use pepper jack cheese to give the cheese layer some heat.
- Mediterranean Twist: Swap the salsa for a homemade or store-bought hummus. Add a layer of crumbled feta cheese and Kalamata olives for a Mediterranean-inspired flavor.
- Layered Taco Salad Dip: Add a final layer of shredded lettuce on top of the cheese and olives for a heartier dip that resembles a taco salad.
- Individual Taco Dips: For a party where people are double-dipping, make individual cups! Layer the ingredients in small, clear plastic cups for an elegant touch.
FAQs (Frequently Asked Questions)
Q: Can I use regular sour cream instead of fat-free?
A: Absolutely! While the recipe calls for fat-free sour cream, regular sour cream will work just fine and add a richer flavor.
Q: What kind of salsa is best for this dip?
A: That depends on your preference! You can use mild, medium, or hot salsa, depending on your desired level of heat. A chunky salsa will add more texture, while a smoother salsa will create a more uniform consistency.
Q: How long can I store taco dip in the refrigerator?
A: Taco dip can be stored in an airtight container in the refrigerator for up to 3 days. Be sure to check for any signs of spoilage before consuming.
Q: Can I use black beans instead of refried beans?
A: Yes, you can substitute black beans for the refried beans. Just make sure to mash them slightly before mixing them with the taco seasoning.
Q: Can I add meat to this dip?
A: Definitely! Ground beef, shredded chicken, or seasoned taco meat would all be delicious additions. Add a layer of meat after the refried beans.
Final Thoughts
This Incredible and Easy Taco Dip is a guaranteed crowd-pleaser that’s perfect for any gathering. Its simplicity makes it a go-to recipe for busy weeknights or impromptu parties. Don’t be afraid to experiment with different ingredients and flavor combinations to create your own signature version. Give it a try, share it with your friends and family, and get ready to watch it disappear! Pair it with your favorite Mexican beer or a refreshing margarita for the ultimate fiesta experience. Enjoy!