
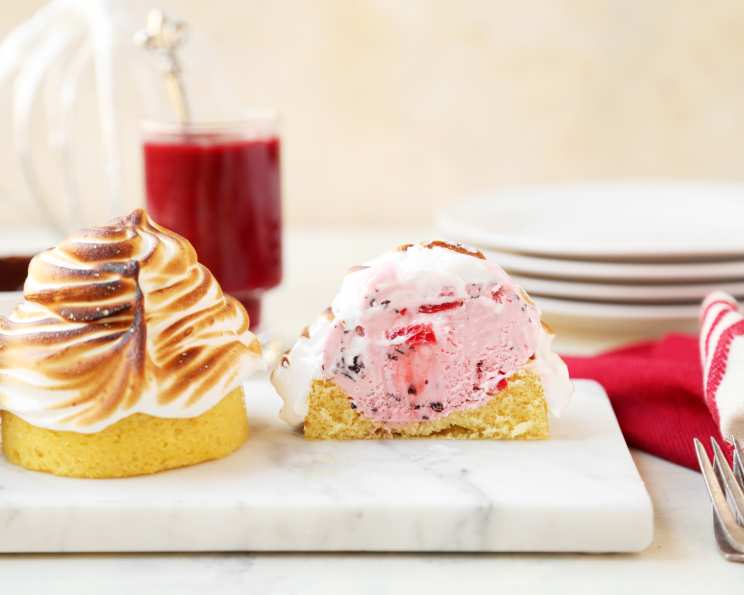
Individual Baked Alaska: A Fiery Finale
I remember the first time I encountered Baked Alaska. It was during my culinary school days, and we were tasked with creating this seemingly impossible dessert – a towering inferno of meringue, defying the laws of physics with its warm exterior and frozen heart. The sheer drama of bringing it to the table, the gasps of amazement, and the crackling sweetness of the toasted meringue… it was pure culinary theater. While the classic version is impressive, these individual Baked Alaskas offer the same wow-factor in perfectly portioned, utterly delightful packages. Get ready to impress!
Recipe Overview
- Prep Time: 45 minutes
- Cook Time: 45 seconds
- Total Time: 42 minutes (excluding freezing time)
- Servings: 6
- Yield: 6 individual desserts
- Dietary Type: Not specified
Ingredients
CHOCOLATE SAUCE
- 7 ounces good quality bittersweet chocolate (do not use chips!)
- 1 cup heavy whipping cream
RASPBERRY SAUCE
- 1 pint frozen raspberries, without syrup
- 2 tablespoons granulated sugar (approx.)
- ½ teaspoon freshly squeezed lemon juice
- 1 pinch salt
BASE
- 1 sponge cake, any flavor, that has been baked in a sheet pan, jelly-roll style
- 1 quart of your favorite flavor ice cream
MERINGUE
- ½ cup egg whites, warmed to room temperature
- ⅔ cup granulated sugar
- ¼ cup light corn syrup
- ¼ cup water
- ¼ cup confectioners’ sugar
Equipment Needed
- Baking sheet
- Parchment paper
- 3″ round cookie cutter (or glass)
- Blender
- Fine mesh strainer
- Heavy, 1-quart saucepan
- Candy thermometer
- Mixer with whip attachment
- Piping bag with plain tip
- Cake turntable or small plate (optional)
- Thin spatula (optional)
- Oversize dinner plates
- Kitchen torch (optional)
- Fine mesh strainer
Instructions
-
Prepare the Chocolate Sauce: Finely chop the bittersweet chocolate.
-
Heat the cream in a saucepan over medium heat until it just reaches a scald. Do not boil.
-
Pour the hot cream over the chopped chocolate.
-
Do not stir immediately. Let the mixture sit undisturbed for about 5 minutes to allow the heat to melt the chocolate.
-
After 5 minutes, stir the mixture with a whisk until it is smooth and glossy. You should have about 1 cup of chocolate sauce. Set aside.
-
Make the Raspberry Sauce: Puree the frozen raspberries in a blender along with the granulated sugar, lemon juice, and salt.
-
Strain the raspberry puree through a fine mesh strainer to remove the seeds, creating a smooth sauce.
-
Refrigerate both the chocolate and raspberry sauces until needed.
-
Assemble the Ice-Cream Bases: Line a baking sheet with parchment paper.
-
Cut out 6 circles from the sponge cake using a 3″ round cookie cutter (or a glass). Aim for even circles about 1/4″ thick. Place the cake circles on the prepared parchment-lined baking sheet.
-
Scoop a generous portion of ice cream onto the center of each cake circle. Make sure you leave a small margin of cake visible all the way around the ice cream. The cake acts as an insulator.
-
Place the ice cream bases in the freezer until the meringue is ready. This will ensure the ice cream is very firm when the meringue is applied.
-
Prepare the Meringue: Combine the granulated sugar, corn syrup, and water in a heavy, 1-quart saucepan over medium heat.
-
Bring the mixture to a boil, then cook until the syrup reaches 230 degrees F (thread stage) on a candy thermometer.
-
While the syrup is cooking, place the egg whites in the bowl of your mixer, and fit the whip attachment to your mixer. Make sure the egg whites are at room temperature for maximum volume.
-
When the syrup reaches the thread stage (230 degrees F), start whipping your egg whites on high speed. You want to achieve soft peaks before adding the syrup.
-
When the syrup reaches 245-250 degrees F (firm-ball stage), lower the speed of the mixer to low, and very, very, VERY slowly start pouring the syrup in, in a slow, steady, thin stream until it is all used up. Adding the syrup too quickly can deflate the egg whites.
-
Immediately return the mixer to high speed and continue whipping until the meringue reaches a very stiff peaked consistency and the bowl is cool to the touch. This is an Italian meringue, and the cooked sugar helps stabilize it.
-
Transfer the meringue to a piping bag fit with a plain tip.
-
Remove the ice cream bases from the freezer.
-
Pipe the Meringue: Now you are going to create a meringue “beehive” around each scoop of ice cream. It is best to work quickly to prevent the ice cream from melting.
-
I find it easier to do this by removing one ice-cream scoop at a time to a cake turntable or a flat-work surface that I can spin around, like a small plate, pipe the meringue, then using a thin spatula, returning it carefully to the parchment. This helps to get a smooth and even coating.
-
To pipe the meringue you need to start at the bottom edge of the cake, pipe a ring of meringue around the ice cream so that it completely covers the cake edge. This seals the ice cream.
-
Continue to pipe a line of meringue all around the scoop of ice cream, making sure you completely cover the ice cream, and that each line of meringue rests on top of the previous one.
-
Finish with a small circle at the top. You are aiming for a complete and even coating of meringue.
-
Repeat with remaining ice cream bases.
-
Return them to the freezer until ready to serve. The longer they freeze at this point, the better they will hold their shape during the browning process.
-
Just before service, decorate your plate: choose an oversize plate, like a dinner plate.
-
Then using the sauces, paint or spoon or swirl them on to your hearts content. Any design you like.
-
I like to just use squiggles, but anything goes at this point.
-
Now- if you don’t have a torch, you will need to turn your oven to broil. If you have a torch, get it ready.
-
Remove the meringues from the freezer, and dust the top of each one with the confectioners sugar using a fine mesh strainer. This helps the meringue to brown evenly.
-
If you are using a broiler, place the baking sheet under the broiler but leave the door open and watch carefully.
-
You will only need about 30-45 seconds, just enough time for the meringue to turn golden brown. Keep a close eye on it; it can burn quickly.
-
Remove from the oven, place one in the center of each plate, and serve immediately.
-
If you are using a torch, turn your torch to a med-low setting, and carefully, gently use the torch to brown the outside of the meringues.
-
Place one meringue on each plate, and serve immediately.
Expert Tips & Tricks
- Warming the egg whites helps them achieve greater volume when whipped.
- The firm-ball stage is crucial for a stable meringue. Using a candy thermometer is essential.
- Piping the meringue quickly is key to preventing the ice cream from melting and creating a soggy base.
- Completely covering the ice cream with meringue is what protects it from the heat. Make sure there are no gaps.
- If using a broiler, keep a close watch to prevent burning the meringue. It happens fast! A kitchen torch gives you more control.
Serving & Storage Suggestions
Individual Baked Alaskas are best served immediately after browning the meringue. The contrast between the warm meringue and the frozen ice cream is the highlight of this dessert. While you can technically store leftover Baked Alaskas in the freezer, the meringue will likely lose its crispness and may become icy. It’s best to make just what you need to avoid compromising the texture. Because of the ice cream, these cannot be left at room temperature for long.
Nutritional Information
| Nutrient | Amount per Serving | % Daily Value |
|---|---|---|
| Calories | 797 kcal | N/A |
| Total Fat | 26.6 g | 40% |
| Saturated Fat | 15.7 g | 78% |
| Cholesterol | 170.6 mg | 56% |
| Sodium | 262.4 mg | 10% |
| Total Carbohydrate | 132.5 g | 44% |
| Dietary Fiber | 4.6 g | 18% |
| Sugars | 99.9 g | 399% |
| Protein | 10.8 g | 21% |
Variations & Substitutions
- Cake Base: As mentioned, you can use any type of cake you like – chocolate chiffon, pound cake, even leftover slices of cupcakes work well. Gluten-free cake can be used for a gluten-free option.
- Ice Cream: Feel free to experiment with different ice cream flavors. Sorbet is also a great choice, especially fruit-based flavors like mango or lime.
- Sauces: Don’t feel limited to chocolate and raspberry. Caramel sauce, lemon curd, or even a spiced apple compote can be delicious.
- Meringue: A Swiss meringue can be used as well, though it might not be as stable as the Italian meringue.
FAQs (Frequently Asked Questions)
Q: Can I make the ice cream bases ahead of time?
A: Absolutely! In fact, it’s recommended. Preparing the ice cream bases and freezing them solid will help prevent the ice cream from melting during the meringue application and browning process.
Q: Can I use store-bought meringue?
A: While you could technically use store-bought meringue cookies, the texture and flavor won’t be the same as a freshly made Italian meringue. Freshly made meringue is much more stable and will provide a better insulating layer for the ice cream.
Q: What if I don’t have a kitchen torch?
A: No problem! As the recipe states, you can use your broiler. Just be sure to keep a close eye on the Baked Alaskas, as they can burn quickly under the broiler’s intense heat. Leaving the door ajar helps.
Q: Why is it important to completely cover the ice cream with meringue?
A: The meringue acts as an insulator, protecting the ice cream from the heat of the broiler or torch. Any exposed ice cream will melt quickly, ruining the effect.
Q: Can I use sugar substitutes in the meringue?
A: I don’t recommend using sugar substitutes in the meringue. The sugar plays a crucial role in stabilizing the egg whites and creating the proper texture.
Final Thoughts
Individual Baked Alaskas are more than just a dessert; they’re an experience. The combination of textures and temperatures, the beautiful presentation, and the sheer novelty of the dish make it a guaranteed crowd-pleaser. Don’t be intimidated by the steps – this recipe is easier than it looks. Gather your ingredients, put on some music, and get ready to create a showstopping dessert that will leave your friends and family in awe. And if you try different variations, I’d love to hear what you came up with! Perhaps pair these with a crisp sparkling wine for a truly celebratory occasion.