
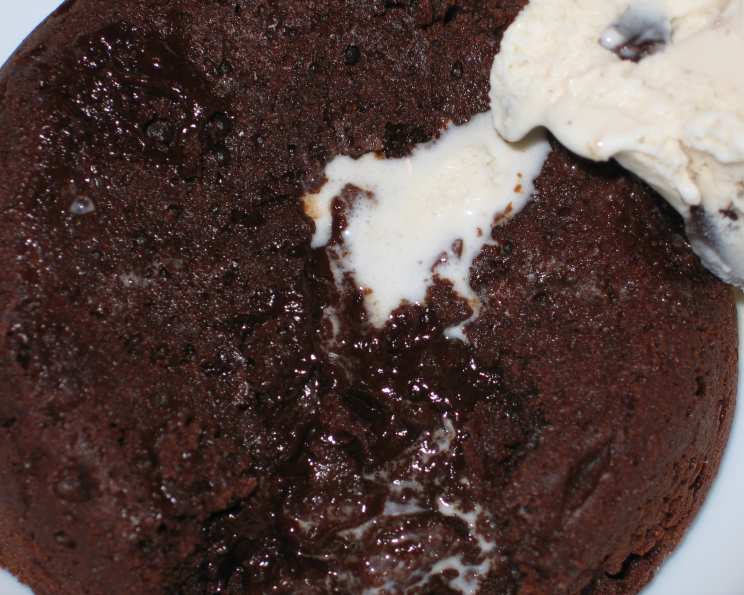
Individual Chocolate Indulgence Cake
The first time I tasted a molten chocolate cake, I was at a tiny bistro in Paris. The waiter placed the warm, unassuming ramekin in front of me, and with the first spoonful, an eruption of rich, dark chocolate sauce flooded the plate. It was a revelation – a seemingly simple dessert that held a universe of decadent flavor and a perfect study of textural contrasts. I’ve been chasing that experience ever since, and this Individual Chocolate Indulgence Cake is my homage to that perfect moment.
Recipe Overview
- Prep Time: 15 minutes
- Cook Time: 10-12 minutes
- Total Time: 25-27 minutes
- Servings: 4
- Yield: 4 cakes
- Dietary Type: Not specified
Ingredients
- 1 cup bittersweet chocolate
- 6 tablespoons butter, unsalted
- 1/4 cup sugar
- 2 eggs
- 1/4 cup all-purpose flour
For the Chocolate Sauce:
- 1 cup whole milk
- 10 1/2 ounces bittersweet chocolate, chopped
- 1/2 cup heavy cream
- 2 tablespoons unsalted butter
- 1/3 cup sugar
Equipment Needed
- Double boiler (or heatproof bowl and saucepan)
- Whisk
- Four 4-ounce disposable aluminum cups, muffin molds, or ramekins
- Sheet pan
- 2-quart heavy-bottomed saucepan
- 1-quart heavy-bottomed saucepan
- Clean, dry bowl
- Plastic wrap
- Microwaveable bowl (optional, for reheating sauce)
- Squeeze bottle (optional, for storing and drizzling sauce)
Instructions
-
Begin by preheating your oven to 400 degrees F (200 degrees C). This is crucial to achieving the molten center, so ensure your oven is properly preheated before you even start mixing.
-
Next, melt the bittersweet chocolate. The best way to do this is using a double boiler. If you don’t have one, simply place a heatproof bowl over a saucepan filled with simmering water, ensuring the bottom of the bowl doesn’t touch the water. Add the bittersweet chocolate to the bowl. Once the chocolate is melted, add the unsalted butter and sugar. Stir until everything is just melted and combined. Remove from heat.
-
Allow the chocolate mixture to cool slightly for a minute or two. Then, add the eggs one at a time, whisking well after each addition until fully incorporated. It’s important to whisk vigorously to ensure the eggs are evenly distributed and prevent them from cooking from the residual heat of the chocolate.
-
Add the all-purpose flour to the chocolate mixture. Mix only until just combined. Be very careful not to overmix the batter, as this will develop the gluten in the flour, resulting in a rubbery cake rather than the desired soft and gooey texture.
-
Lightly grease four 4-ounce disposable aluminum cups, muffin molds, or ramekins with vegetable baking spray. Make sure you cover the entire surface to prevent the cakes from sticking and ensure easy release after baking.
-
Divide the batter evenly among the four prepared molds.
-
Place the molds on a sheet pan. This makes it easier to transfer them to and from the oven and provides a stable surface for baking.
-
Bake for 10 to 12 minutes. Keep a close eye on them. The edges of the cakes should be set, but the centers should still appear slightly soft. It’s better to slightly underbake than overbake, as overbaking will result in a solid, fudgy cake rather than a molten one.
-
While the cakes are baking, prepare the chocolate sauce. Pour the whole milk into a 2-quart heavy-bottomed saucepan. Place the saucepan over medium-high heat and bring the milk to a boil. Watch carefully, as milk can easily boil over.
-
Once the milk boils, remove the saucepan from the heat. Immediately add the chopped bittersweet chocolate.
-
Whisk well, stirring from the center and working your way out to the edge of the saucepan to ensure all the chocolate is incorporated. Continue whisking until the ganache is homogenous and smooth.
-
Set the ganache aside.
-
In a 1-quart heavy-bottomed saucepan, combine the heavy cream, unsalted butter, and sugar.
-
Place the saucepan over medium-high heat and bring the mixture to a boil, stirring occasionally. Continue stirring until the butter is completely melted and the sugar is completely dissolved.
-
Once the cream mixture has come to a boil, pour it into the warm chocolate ganache.
-
Place the combined sauce back over medium-high heat and bring it to a boil, stirring constantly with a whisk. This step is crucial for thickening the sauce.
-
As the chocolate sauce cooks, it will begin to thicken slightly.
-
When the sauce reaches a boil, remove it from the heat and pour it into a clean, dry bowl.
-
Cover the bowl by placing plastic wrap directly on top of the sauce. This prevents a skin from forming as it cools.
-
Let the chocolate sauce cool to room temperature before storing it in the refrigerator. When cold, the sauce will become thick enough to be scooped with a spoon.
-
Once the cakes are done, remove them from the oven and let them cool slightly for a minute or two. Then, carefully invert the molds onto individual serving plates.
-
If desired, decorate the plate with fresh raspberries or other fruit, or drizzle with the chocolate sauce.
-
Serve immediately. The warmth of the cake and the molten center are best enjoyed right away.
-
The sauce can be reheated whenever needed. If using a microwave, simply place the chocolate sauce in a microwaveable bowl and heat it at medium-high power in 30-second intervals until it becomes liquid. On the stovetop, place the sauce in a heavy-bottomed saucepan over medium heat and stir occasionally until it becomes liquid.
-
If storing the sauce in a squeeze bottle, you can easily drizzle it over desserts or decorate plates. It will keep in the refrigerator for up to three weeks. It can also be frozen for up to two months if stored in an airtight container. Thaw in the refrigerator and heat as described above until liquid.
Expert Tips & Tricks
- For an extra layer of flavor, try adding a pinch of sea salt to the chocolate batter. The salt enhances the sweetness and complements the richness of the chocolate.
- If you want an even more intense chocolate flavor, use a high-quality dark chocolate with a cocoa content of 70% or higher.
- To prevent the cakes from sticking, consider lining the molds with parchment paper circles in addition to greasing them.
- If you don’t have ramekins, you can use oven-safe mugs as an alternative.
Serving & Storage Suggestions
Serve these Individual Chocolate Indulgence Cakes immediately for the best experience. The warm, molten center is the star of the show. The cold chocolate sauce adds a delightful contrast in temperature and texture.
Leftover cakes are best stored in the refrigerator in an airtight container. They can be reheated in the microwave for a short period, but the molten center may not be as pronounced.
The chocolate sauce can be stored in the refrigerator for up to three weeks or frozen for up to two months. Reheat gently on the stovetop or in the microwave.
Nutritional Information
| Nutrient | Amount per Serving | % Daily Value |
|---|---|---|
| Calories | 520.9 kcal | N/A |
| Calories from Fat | 347 g | 67% |
| Total Fat | 38.6 g | 59% |
| Saturated Fat | 23.4 g | 116% |
| Cholesterol | 213.7 mg | 71% |
| Sodium | 194.3 mg | 8% |
| Total Carbohydrate | 38.9 g | 12% |
| Dietary Fiber | 0.2 g | 0% |
| Sugars | 32.6 g | N/A |
| Protein | 6.8 g | 13% |
Variations & Substitutions
- For a gluten-free version, substitute the all-purpose flour with a gluten-free flour blend. Be sure to choose a blend that is designed for baking and has a similar texture to all-purpose flour.
- You can infuse the chocolate sauce with different flavors by adding a teaspoon of vanilla extract, coffee extract, or even a hint of chili powder.
- Experiment with different types of chocolate in both the cake and the sauce. Milk chocolate will create a sweeter, milder flavor, while white chocolate will offer a unique and decadent twist.
FAQs (Frequently Asked Questions)
Q: How do I know when the cakes are done baking?
A: The edges of the cakes should be set and slightly firm, while the centers should still appear soft and a little wobbly. A toothpick inserted into the edge should come out clean, but one inserted into the center will have melted chocolate on it.
Q: Can I make the batter ahead of time?
A: It’s best to bake the cakes immediately after making the batter. The batter can be stored in the refrigerator for a short period, but the texture may change.
Q: Can I use a different type of chocolate for the sauce?
A: Yes, you can use milk chocolate or dark chocolate for the sauce. Adjust the amount of sugar accordingly to achieve your desired level of sweetness.
Q: What if I don’t have ramekins?
A: You can use oven-safe mugs or disposable aluminum cups as an alternative.
Q: How do I prevent a skin from forming on the chocolate sauce as it cools?
A: Press plastic wrap directly onto the surface of the sauce to prevent a skin from forming.
Final Thoughts
This Individual Chocolate Indulgence Cake is more than just a recipe; it’s an invitation to experience a moment of pure culinary bliss. Don’t be intimidated by the seemingly decadent nature of the dish. It’s simpler to make than you might think, and the results are truly extraordinary. I encourage you to give this recipe a try, and I’d love to hear about your experiences and any creative twists you add. Pair it with a scoop of vanilla ice cream or a glass of rich dessert wine for an unforgettable treat. Enjoy!