
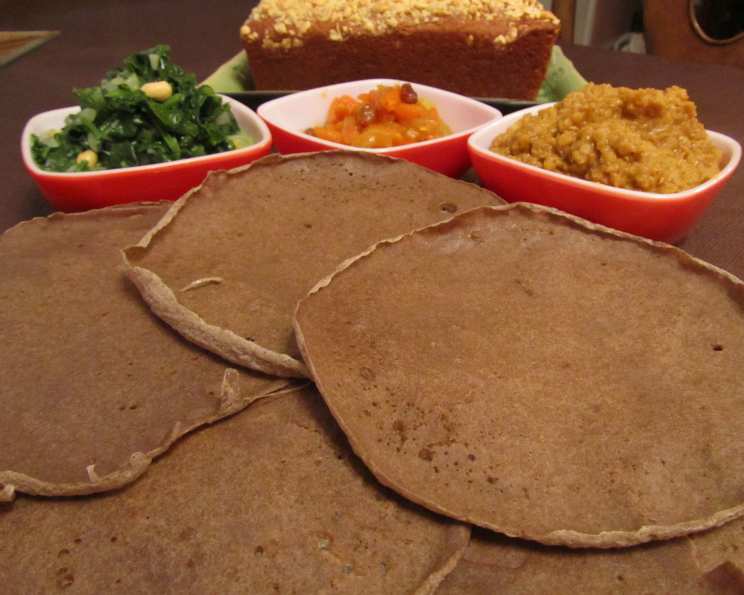
Mastering Injera: The Heart of Ethiopian Cuisine
The first time I tasted injera, I was in a small, bustling Ethiopian restaurant in my neighborhood. The aroma of berbere spice hung heavy in the air, mingling with the earthy scent of the injera itself. A generous platter of vibrant stews, or wats, arrived, and I watched, fascinated, as my friend tore off a piece of the spongy bread and used it to scoop up a mouthful of spicy lentils. The sour tang of the injera, the rich flavors of the stew, and the communal experience of eating with my hands – it was an epiphany. I was instantly hooked and determined to learn how to make this unique and essential flatbread.
Recipe Overview
- Prep Time: 5 minutes
- Cook Time: 2 minutes per injera
- Total Time: 7 minutes
- Servings: 6
- Yields: 6 crepe-like breads
- Dietary Type: Vegan
Ingredients
- 2 cups whole wheat flour (a finely milled type such as chapati flour works well – you can also substitute buckwheat flour)
- 1 cup unbleached white flour
- ½ teaspoon baking soda
- 3 cups club soda, plus more to thin if needed
Equipment Needed
- Large bowl
- Whisk
- Large, well-seasoned or non-stick griddle
- Large cup or ladle
- Large plate
Instructions
- In a large bowl, combine the whole wheat flour, white flour, and baking soda.
- Add the club soda to the flour mixture.
- Stir well to form a thin batter. The consistency should be similar to pancake batter. If the batter seems too thick, add a little more club soda, one tablespoon at a time, until you reach the desired consistency.
- Heat a large, well-seasoned or non-stick griddle over medium-high heat until hot. A properly seasoned cast iron griddle works wonderfully.
- Lightly brush the hot griddle with oil or ghee (if not vegan). This prevents the injera from sticking and helps it to develop the characteristic bubbly surface.
- Using a large cup or ladle, begin on the outside of the griddle and pour the batter in a circle around the inside edges until the center is filled.
- Quickly tilt the griddle back and forth to fill in any holes and spread the batter evenly, as if making crepes. The injera should be thin but not so thin that it tears easily.
- Cook for 1-2 minutes, or until the surface is spongy and filled with tiny air bubbles. This is a sign that the injera is cooking properly and developing its signature texture.
- Do not flip the bread. Unlike pancakes, injera is only cooked on one side.
- Once the surface is cooked and bubbly, slide the injera off the griddle onto a large plate.
- Continue cooking injera until all the batter is used, transferring them to the plate as they are done.
- Arrange the injera around the outside edges of the plate so that the centers overlap. This helps to keep them warm and prevents them from drying out.
- Serve immediately with a meat or vegetable stew.
Expert Tips & Tricks
- Achieving the Right Batter Consistency: The batter consistency is crucial for successful injera. It should be thin enough to spread easily but not so thin that it becomes brittle and tears. Adjust the amount of club soda as needed to achieve the desired consistency.
- Using a Well-Seasoned Griddle: A well-seasoned griddle is essential for preventing the injera from sticking. If you’re using a cast iron griddle, make sure it’s properly seasoned before you start cooking. If you’re using a non-stick griddle, avoid using metal utensils, as they can scratch the surface.
- Creating the Bubbly Texture: The signature bubbly texture of injera is created by the baking soda and club soda in the batter. Ensure the griddle is hot enough so that the air bubbles can form easily. If the griddle is not hot enough, the injera will be flat and dense.
- Adjusting for Altitude: If you live at a high altitude, you may need to adjust the amount of baking soda in the recipe. Start with a slightly smaller amount and increase it as needed to achieve the desired bubbly texture.
- Embrace Imperfection: Don’t worry if your first few injera aren’t perfect. It takes practice to get the hang of pouring the batter and cooking it just right. Even slightly imperfect injera will still taste delicious!
Serving & Storage Suggestions
Injera is best served immediately with your favorite Ethiopian stews (wats) or vegetable dishes. Arrange the injera on a large platter and spoon the stews on top. Tear off pieces of injera and use them to scoop up the food. This is the traditional way to enjoy injera and is a fun and interactive dining experience.
Leftover injera can be stored in an airtight container in the refrigerator for up to 3 days. To reheat, you can microwave it for a few seconds until warmed through. You can also gently warm it in a dry skillet over low heat. Be careful not to overheat it, as it can become dry and brittle. Injera can also be frozen for longer storage. Wrap it tightly in plastic wrap and then place it in a freezer bag. It can be stored in the freezer for up to 2 months. Thaw it in the refrigerator before reheating.
Nutritional Information
| Nutrient | Amount per Serving | % Daily Value |
|---|---|---|
| Calories | 211.8 kcal | N/A |
| Calories from Fat | 10 g | 5% |
| Total Fat | 1.2 g | 1% |
| Saturated Fat | 0.2 g | 1% |
| Cholesterol | 0 mg | 0% |
| Sodium | 131 mg | 5% |
| Total Carbohydrate | 44.7 g | 14% |
| Dietary Fiber | 4.8 g | 19% |
| Sugars | 0.2 g | 0% |
| Protein | 7.4 g | 14% |
Note: Nutritional information is an estimate and may vary based on specific ingredients and cooking methods.
Variations & Substitutions
- Gluten-Free Injera: For a gluten-free version, you can use 100% buckwheat flour or a blend of gluten-free flours such as sorghum, teff, and tapioca starch. You may need to adjust the amount of liquid to achieve the desired batter consistency.
- Teff Flour Injera: For a more authentic injera, use teff flour, the traditional grain used in Ethiopia. Teff flour has a slightly nutty and earthy flavor. You can substitute teff flour for the whole wheat flour in this recipe.
- Spiced Injera: Add a pinch of ground coriander, cumin, or berbere spice to the batter for a flavorful twist.
- Sweet Injera: Add a tablespoon of sugar or honey to the batter for a slightly sweet injera that can be served with fruit and yogurt.
- Herb Injera: Stir in chopped fresh herbs such as cilantro, parsley, or mint to the batter for a refreshing and aromatic injera.
FAQs (Frequently Asked Questions)
Q: Can I make injera ahead of time?
A: Yes, you can make injera ahead of time and store it in the refrigerator for up to 3 days. Reheat it gently before serving.
Q: Why is my injera sticking to the griddle?
A: Your griddle may not be hot enough, or it may not be well-seasoned. Make sure the griddle is properly heated and lightly oiled before pouring the batter.
Q: How do I know when the injera is cooked?
A: The injera is cooked when the surface is spongy and filled with tiny air bubbles. Do not flip the bread.
Q: Can I use regular wheat flour instead of whole wheat flour?
A: Yes, you can use regular wheat flour, but the texture and flavor of the injera will be slightly different. Whole wheat flour adds a more rustic and earthy flavor.
Q: My batter is too thick/thin. What do I do?
A: If the batter is too thick, add more club soda, one tablespoon at a time, until you reach the desired consistency. If the batter is too thin, add a tablespoon of flour at a time until it thickens.
Final Thoughts
Injera is more than just a flatbread; it’s an integral part of Ethiopian culture and cuisine. Its unique flavor and texture perfectly complement the rich and spicy stews that are the hallmark of Ethiopian meals. Don’t be intimidated by the process – with a little practice, you can easily master the art of making injera at home. I encourage you to try this recipe and share your feedback. Serve your homemade injera with a flavorful Ethiopian stew like Doro Wat (chicken stew) or Misir Wat (lentil stew) for a truly authentic and unforgettable culinary experience. Enjoy!