
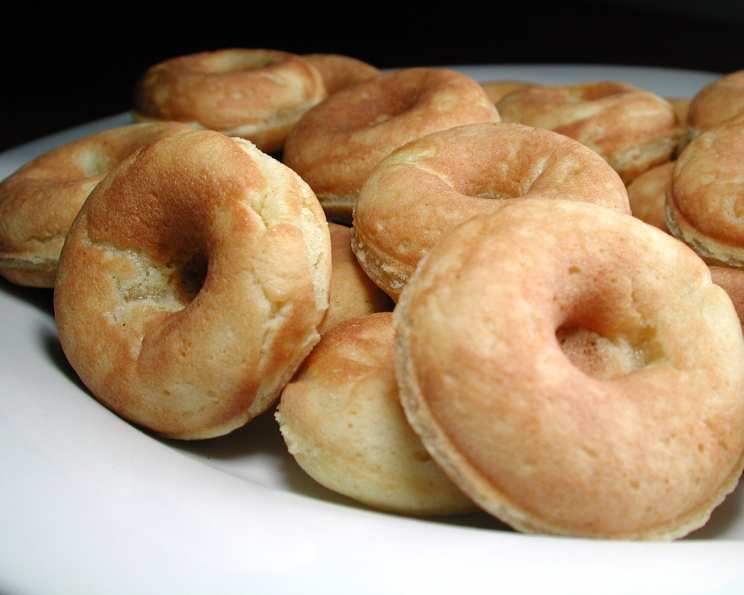
Irene’s Doughnuts (For Doughnut Maker)
The scent of fried dough and warm spices still transports me back to childhood. My grandmother, a woman of endless energy and even more endless love, always had a batch of doughnuts bubbling away in her kitchen on Saturday mornings. The yeasty aroma would fill the entire house, luring us from our sleep and into the promise of a sweet, golden-brown treat. Though she passed many years ago, these doughnuts remind me of her.
Recipe Overview
- Prep Time: 30 minutes
- Cook Time: 20 minutes
- Total Time: 50 minutes
- Yields: 72 doughnuts
- Serves: 72
Ingredients
- 4 eggs
- 2 cups sugar
- 1 teaspoon vanilla extract
- 1 teaspoon salt
- ¼ teaspoon nutmeg, grated
- 1 teaspoon white vinegar
- 1 ½ cups buttermilk
- ½ cup heavy cream
- 5 ½ cups all-purpose flour
- 2 teaspoons baking soda
- 1 teaspoon baking powder
- Lard (for frying)
Equipment Needed
- Large mixing bowl
- Electric mixer
- Doughnut maker
- Deep fryer or large pot
- Slotted spoon or spider
- Paper towels
Instructions
-
In a large mixing bowl, cream together the eggs and sugar using an electric mixer until the mixture is light, fluffy, and well blended. This step is crucial for creating a light and airy doughnut.
-
Add the vanilla extract and white vinegar to the egg and sugar mixture. Mix well to incorporate all the ingredients. The vinegar might seem like an odd addition, but it helps to tenderize the dough and creates a slightly tangy flavor that complements the sweetness.
-
In a separate bowl, combine the flour, baking soda, baking powder, salt, and grated nutmeg. Whisk the dry ingredients together thoroughly to ensure even distribution of the leavening agents and spices.
-
In another bowl, combine the buttermilk and heavy cream. This mixture adds moisture and richness to the dough, resulting in a soft and flavorful doughnut.
-
Add the dry ingredients and the buttermilk mixture alternately to the egg and sugar mixture. Begin and end with the dry ingredients. Mix until just combined. Be careful not to overmix the dough, as this can develop the gluten and result in tough doughnuts. A few streaks of flour are okay at this stage.
-
Using a doughnut maker, drop batter and cook until it pops out when the machine is open.
-
In a deep fryer or large pot, heat the lard to 375°F (190°C). Use a thermometer to ensure the lard is at the correct temperature. If it’s too cold, the doughnuts will absorb too much grease; if it’s too hot, they’ll brown too quickly on the outside and remain undercooked on the inside.
-
Carefully drop the doughnut batter into the hot lard, being careful not to overcrowd the fryer. Fry until golden brown on one side, about 1-2 minutes. Then, flip the doughnuts using a slotted spoon or spider and fry until golden brown on the other side, about another 1-2 minutes.
-
Remove the doughnuts from the lard using a slotted spoon or spider and place them on a plate lined with paper towels to drain any excess grease.
Expert Tips & Tricks
- Temperature is key: Maintaining the correct oil temperature is essential for perfectly cooked doughnuts. Use a deep-fry thermometer to monitor the temperature and adjust the heat as needed.
- Don’t overcrowd: Frying too many doughnuts at once will lower the oil temperature, resulting in greasy doughnuts. Fry in batches to ensure consistent cooking.
- Mix carefully: Overmixing the dough will develop the gluten, leading to tough doughnuts. Mix until just combined, leaving a few streaks of flour.
- For extra flavor: Add a teaspoon of lemon or orange zest to the dough for a bright, citrusy twist.
- Glaze it up: Dip the warm doughnuts in your favorite glaze (chocolate, vanilla, maple) for an extra touch of sweetness and flavor.
- Add Spices: Feel free to adjust the amount of nutmeg to your liking, or add other spices such as cinnamon, cardamom, or allspice for a unique flavor profile.
Serving & Storage Suggestions
Serve Irene’s Doughnuts fresh and warm for the best taste and texture. They are delicious plain or dusted with powdered sugar, cinnamon sugar, or dipped in your favorite glaze.
- Room Temperature: Store leftover doughnuts in an airtight container at room temperature for up to 2 days. They will be best on the first day.
- Refrigeration: For longer storage, store doughnuts in an airtight container in the refrigerator for up to 4 days.
- Freezing: Doughnuts can also be frozen for up to 2 months. Wrap them individually in plastic wrap and then place them in a freezer-safe bag or container. To reheat, thaw at room temperature or in a low oven.
- Reheating: To reheat doughnuts, warm them in a microwave for a few seconds or in a low oven until heated through. Be careful not to overheat, as this can make them tough.
Nutritional Information
| Nutrient | Amount per Serving | % Daily Value |
|---|---|---|
| Calories | 68.2 kcal | N/A |
| Calories from Fat | 9 g | N/A |
| Total Fat | 1 g | 1% |
| Saturated Fat | 0.5 g | 2% |
| Cholesterol | 12.8 mg | 4% |
| Sodium | 82.5 mg | 3% |
| Total Carbohydrate | 13.2 g | 4% |
| Dietary Fiber | 0.3 g | 1% |
| Sugars | 5.8 g | N/A |
| Protein | 1.5 g | 3% |
Note: Nutritional information is an estimate and may vary based on specific ingredients and preparation methods.
Variations & Substitutions
- Gluten-Free: Substitute a gluten-free all-purpose flour blend for the regular all-purpose flour. You may need to adjust the amount of liquid slightly to achieve the desired dough consistency.
- Dairy-Free: Replace the buttermilk with a dairy-free buttermilk alternative (such as almond milk mixed with a tablespoon of lemon juice or vinegar) and the heavy cream with a dairy-free heavy cream alternative.
- Spiced Doughnuts: Add a teaspoon of ground cinnamon, ginger, or cardamom to the dry ingredients for a warm, spiced flavor.
- Chocolate Doughnuts: Add ¼ cup of cocoa powder to the dry ingredients for a chocolatey twist.
- Lemon Poppy Seed: Add the zest of one lemon and 2 tablespoons of poppy seeds to the batter.
- Apple Cider Doughnuts: Replace half of the buttermilk with apple cider for a fall-inspired flavor.
FAQs (Frequently Asked Questions)
Q: Can I use a different type of oil for frying?
A: Yes, you can use other oils with a high smoke point, such as canola oil, vegetable oil, or peanut oil. However, lard is recommended for its flavor and ability to create a crispy exterior.
Q: How do I know when the doughnuts are done?
A: The doughnuts are done when they are golden brown on both sides and feel firm to the touch. You can also insert a toothpick into the center of a doughnut; if it comes out clean, the doughnut is cooked through.
Q: Can I bake these doughnuts instead of frying them?
A: While this recipe is designed for frying, you can try baking them in a doughnut pan. However, the texture and flavor will be different. Bake at 350°F (175°C) for 10-12 minutes, or until golden brown.
Q: What can I do if my dough is too sticky?
A: If your dough is too sticky, add a tablespoon of flour at a time until it reaches a manageable consistency. Be careful not to add too much flour, as this can make the doughnuts tough.
Q: Can I make the dough ahead of time?
A: Yes, you can make the dough ahead of time and store it in the refrigerator for up to 24 hours. Bring the dough to room temperature before frying.
Final Thoughts
Irene’s Doughnuts are more than just a recipe; they’re a sweet memory waiting to be made. The simple ingredients and straightforward instructions come together to create a delightful treat that’s perfect for sharing with loved ones. So gather your ingredients, fire up your doughnut maker or fryer, and get ready to experience the joy of homemade doughnuts. Don’t be afraid to experiment with different flavors and glazes to create your own signature version. And most importantly, enjoy the process and the delicious results!