
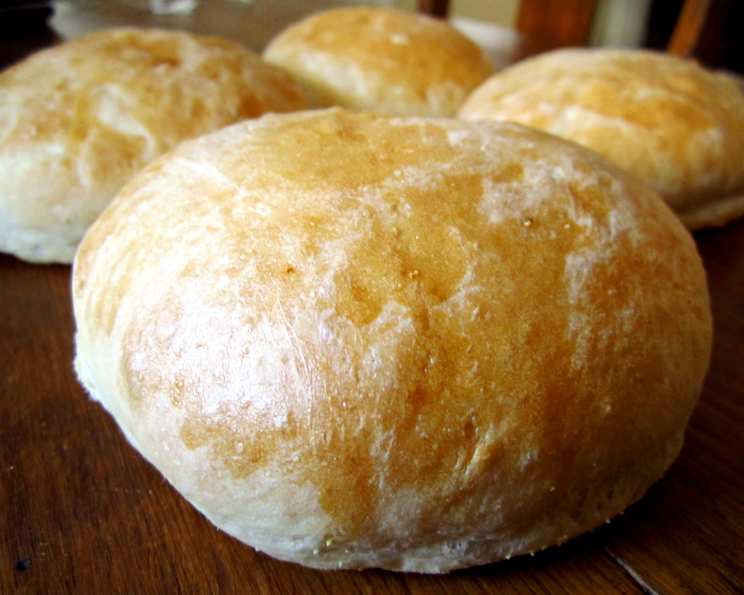
Italian Bread Bowls: A Rustic Comfort
The memory of my grandmother Nonna Emilia’s kitchen is forever etched in my mind, a warm haven filled with the comforting aroma of baking bread. One particular winter, she crafted these incredible Italian bread bowls, filled with a hearty ribollita. The way the crust yielded with a gentle tear, releasing steam and that intoxicating scent, is a sensory experience I’ve strived to recreate ever since. This recipe is my homage to her, a reminder of the simple joys of sharing warmth and good food with loved ones.
Recipe Overview
- Prep Time: 30 minutes
- Cook Time: 25-30 minutes
- Total Time: 1 hour 35 minutes (plus rising time)
- Servings: 8
- Yields: 8 Bowls
- Dietary Type: Vegetarian (can be vegan with appropriate fillings)
Ingredients
- 2 (1/4 ounce) packages active dry yeast
- 2 1/2 cups warm water (110 degrees F/45 degrees C)
- 2 teaspoons salt
- 2 tablespoons vegetable oil
- 7 cups all-purpose flour, plus more for dusting
- 1 tablespoon cornmeal
- 1 egg white
- 1 tablespoon water
Equipment Needed
- Large mixing bowl
- Electric mixer
- Lightly oiled large bowl
- Damp cloth
- Baking sheets
- Small bowl
- Wire racks
Instructions
-
Activate the Yeast: In a large bowl, dissolve the active dry yeast in the warm water. It’s crucial that the water is the correct temperature; too cold and the yeast won’t activate, too hot and you risk killing it. Let the mixture stand until it becomes creamy and frothy, about 10 minutes. This step ensures your bread will rise properly.
-
Combine Wet and Dry Ingredients: Add the salt, vegetable oil, and 4 cups of the all-purpose flour to the yeast mixture. Beat well using an electric mixer. This incorporates the initial dry ingredients and begins to develop the gluten.
-
Incorporate Remaining Flour: Gradually stir in the remaining all-purpose flour, 1/2 cup at a time, beating well with the electric mixer at medium speed after each addition. The dough will become stiffer as you add more flour. Don’t be tempted to add too much flour at once, as this can make the bread tough.
-
Knead the Dough: Once the dough has pulled together into a shaggy mass, turn it out onto a lightly floured surface. Knead the dough until it is smooth and elastic, about 6 minutes. This step is essential for developing the gluten, which gives the bread its structure. Use a firm, rhythmic motion, pushing the dough away from you with the heel of your hand, folding it over, and turning it.
-
First Rise: Lightly oil a large bowl. Place the dough in the bowl and turn it to coat with the oil. This prevents the dough from drying out and sticking to the bowl as it rises. Cover the bowl with a damp cloth and let the dough rise in a warm place until it has doubled in volume, about 40 minutes. The rising time can vary depending on the temperature of your environment.
-
Divide and Shape: Once the dough has doubled, punch it down gently to release the air. Divide the dough into 8 equal portions. Shape each portion into a 4-inch round loaf. Aim for a uniform shape to ensure even baking.
-
Second Rise: Place the shaped loaves on lightly greased baking sheets that have been sprinkled with cornmeal. The cornmeal adds a subtle texture and flavor to the bottom of the bread bowls. Cover the loaves and let them rise in a warm place, free from drafts, until they have doubled in bulk, about 35 minutes. Again, rising time is affected by environmental temperature.
-
Preheat the Oven: While the loaves are undergoing their second rise, preheat your oven to 400 degrees F (200 degrees C). It’s crucial that the oven is fully preheated before baking to ensure even cooking and proper browning.
-
Prepare Egg Wash: In a small bowl, beat together the egg white and 1 tablespoon of water to create an egg wash. This gives the bread bowls a beautiful glossy finish.
-
First Bake: Lightly brush the loaves with half of the egg wash. Bake in the preheated oven for 15 minutes.
-
Second Bake: Remove the loaves from the oven and brush with the remaining egg wash. Return them to the oven and bake for 10 to 15 more minutes, or until they are golden brown. The internal temperature should reach around 200°F (93°C). If the tops are browning too quickly, you can tent them with foil.
-
Cool and Prepare Bowls: Cool the bread bowls completely on wire racks. Once cooled, cut a 1/2 inch thick slice from the top of each loaf. Scoop out the centers, leaving a 3/4-inch-thick shell. Be careful not to puncture the bottom or sides of the bowl.
-
Serve: Fill the bread bowls with hot soup and serve immediately. The warmth of the soup will enhance the aroma and flavor of the bread.
Expert Tips & Tricks
- Yeast Proofing: Always proof your yeast to ensure it’s active. If it doesn’t foam after 10 minutes, it’s best to discard it and start with fresh yeast.
- Dough Consistency: The dough should be slightly tacky but not sticky. If it’s too sticky, add flour a tablespoon at a time until it reaches the desired consistency.
- Crispy Crust: For an extra crispy crust, you can place a pan of hot water on the bottom rack of the oven during baking. The steam will help create a beautiful crust.
- Soup Thickness: Thicker soups work best in bread bowls, preventing the bread from becoming soggy too quickly. Creamy soups, chili, and stews are excellent choices.
- Salt Quantity: Adjust the amount of salt to taste, depending on the saltiness of your soup filling.
Serving & Storage Suggestions
Serve the Italian bread bowls immediately after filling them with hot soup. Garnish with fresh herbs like parsley or basil for added flavor and visual appeal. For any leftover bread bowls, store them in an airtight container at room temperature for up to 2 days. You can also freeze them for up to 2 months. To reheat, wrap the bread bowls in foil and bake in a preheated oven at 350°F (175°C) until warmed through. Avoid microwaving them, as this can make them soggy. The scooped-out bread can be used to make croutons or breadcrumbs.
Nutritional Information
| Nutrient | Amount per Serving | % Daily Value |
|---|---|---|
| Calories | 439 kcal | – |
| Total Fat | 4.6 g | 7% |
| Saturated Fat | 0.6 g | 3% |
| Cholesterol | 0 mg | 0% |
| Sodium | 593.1 mg | 24% |
| Total Carbohydrate | 84.9 g | 28% |
| Dietary Fiber | 3.4 g | 13% |
| Sugars | 0.3 g | – |
| Protein | 12.5 g | 25% |
Variations & Substitutions
- Gluten-Free: Use a gluten-free all-purpose flour blend and follow the package instructions for best results. You may need to add a binder like xanthan gum.
- Whole Wheat: Substitute up to half of the all-purpose flour with whole wheat flour for a nuttier flavor and added fiber.
- Herb Infusion: Add 1-2 tablespoons of dried Italian herbs to the dough for extra flavor. Rosemary, thyme, and oregano work well.
- Garlic Bread Bowls: Brush the inside of the bread bowls with garlic butter before filling with soup.
- Vegan Bread Bowls: Replace the egg wash with a plant-based milk alternative like almond or soy milk for a similar glossy finish. Ensure your soup filling is also vegan.
FAQs (Frequently Asked Questions)
Q: Why is my dough not rising?
A: Several factors can affect dough rising, including inactive yeast, cold temperature, or too much salt. Make sure your yeast is fresh and proof it before using. Find a warm spot for the dough to rise and don’t overdo the salt.
Q: Can I make the dough ahead of time?
A: Yes, you can prepare the dough the day before and let it rise in the refrigerator overnight. This will slow down the rising process and develop more flavor. Bring it to room temperature before shaping and baking.
Q: How do I prevent the bread bowls from becoming soggy?
A: Choose a thicker soup or stew, and avoid filling the bread bowls too far in advance. You can also brush the inside of the bowls with melted butter or garlic butter to create a moisture barrier.
Q: Can I use a bread machine for this recipe?
A: Yes, you can use a bread machine to make the dough. Follow your bread machine’s instructions for making dough, and then shape and bake the loaves as described in the recipe.
Q: What are some good soup fillings for these bread bowls?
A: Classic choices include tomato soup, French onion soup, chili, clam chowder, broccoli cheddar soup, and potato soup. Get creative and try your favorite soup or stew!
Final Thoughts
These Italian bread bowls are more than just a vessel for soup; they’re a comforting, rustic experience that evokes feelings of warmth and togetherness. Don’t be intimidated by the process—bread baking is a rewarding experience, and the results are well worth the effort. Gather your ingredients, embrace the process, and share these delicious creations with the people you love. Buon appetito! I hope you enjoy making and eating this recipe as much as my family and I do.