
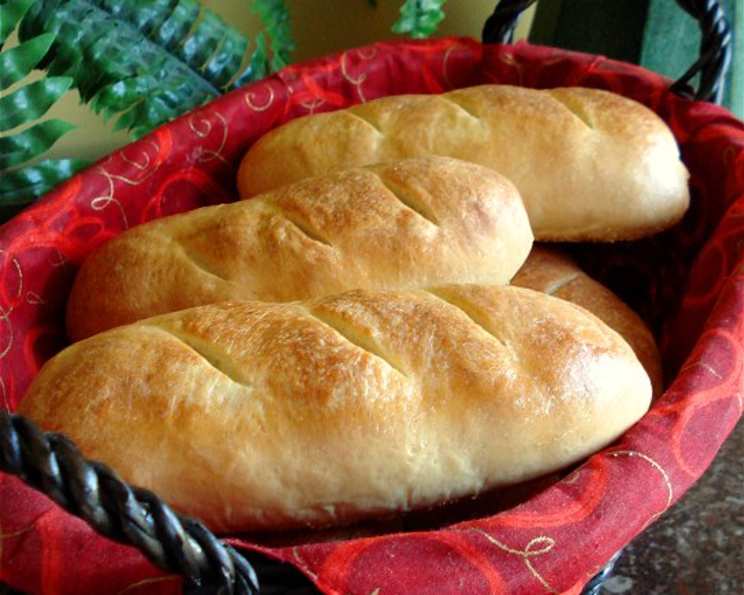
The Soul of Italy: Mastering Homemade Italian Bread
The first time I truly understood the power of bread was during a summer spent in Tuscany. Every morning, the aroma of freshly baked pane would drift through the open windows of our farmhouse, a siren call to the kitchen. The crust, a symphony of textures from shatteringly crisp to yielding chewiness, gave way to a soft, airy interior that tasted faintly of sunshine and the rich soil of the Italian countryside. Dipped in olive oil, paired with sun-ripened tomatoes and basil, or simply enjoyed on its own, that bread was more than just sustenance; it was a connection to the land, to tradition, and to the heart of Italian culture. This recipe is my attempt to recreate that magic, to bring a piece of Tuscany into your own kitchen.
Recipe Overview
- Prep Time: 30 minutes
- Cook Time: 25-30 minutes
- Total Time: 3 hours (including proofing)
- Yield: 2 loaves or 6 rolls
- Dietary Type: Vegetarian
Ingredients
- 5 ½ – 6 cups all-purpose flour
- 1 tablespoon sugar
- 2 teaspoons salt
- 5 teaspoons active dry yeast (2 packages)
- 1 tablespoon butter or 1 tablespoon margarine, softened
- 1 ¾ cups very warm water (120-130°F)
- Cornmeal, for dusting
- Peanut oil or light olive oil, for brushing
- 1 egg white
- 1 tablespoon cold water
Optional additions:
- ½ – 1 teaspoon dried oregano, basil, or rosemary
- 1 head roasted garlic
Equipment Needed
- Large mixing bowl
- Electric mixer (optional, but recommended)
- Measuring cups and spoons
- Plastic wrap
- Clean kitchen towel
- Baking sheets
- Sharp knife or razor blade
Instructions
-
In a large bowl, thoroughly mix 1 ½ cups of the flour, the sugar, the salt, and the undissolved yeast. This ensures the yeast is evenly distributed and ready to activate.
-
Add the softened butter or margarine to the dry ingredients. This adds richness and contributes to a softer crumb.
-
Gradually add the very warm water (120-130°F) to the dry ingredients. Use a thermometer to ensure the water isn’t too hot, which can kill the yeast. Beat with an electric mixer at medium speed for 2 minutes, scraping the bowl occasionally to ensure all ingredients are incorporated.
-
Add ¾ cup of flour to the mixture.
-
Beat at high speed for 2 minutes, again scraping the bowl occasionally. This develops the gluten in the flour, which is essential for the bread’s structure.
-
Stir in enough additional flour (gradually, about ½ cup at a time) to make a stiff dough. You may not need all 6 cups, so add it incrementally until the dough pulls away from the sides of the bowl.
-
Turn the dough onto a lightly floured board and knead until smooth and elastic, about 8-10 minutes. Kneading develops the gluten further, creating a strong, pliable dough.
-
Cover the dough with plastic wrap and then a clean kitchen towel, and let it rest for 20 minutes. This allows the gluten to relax, making the dough easier to shape.
-
To make loaves: Divide the dough in half. Roll each half into a 15×10 inch rectangle. Starting at the wide side, roll up tightly, like a jelly roll. Pinch the seam to seal. Taper the ends by rolling gently back and forth to create the classic loaf shape.
-
To make rolls: Divide the dough into 6 equal pieces. Roll each piece into a rectangle 8×5 inches. Starting with the wide side, roll up tightly, pinching the seam to seal. Taper the ends.
-
Place the shaped dough seam side down on greased baking sheets sprinkled with cornmeal. The cornmeal prevents sticking and adds a subtle texture to the bottom of the bread.
-
Brush the dough with peanut oil or light olive oil. This helps create a beautiful, golden-brown crust.
-
Cover the dough loosely with plastic wrap and refrigerate for 2-24 hours. This slow, cold fermentation develops a deeper, more complex flavor.
-
When ready to bake, remove the baking sheets from the refrigerator and uncover carefully.
-
Let the dough stand at room temperature for 10 minutes to take the chill off.
-
Make 3 or 4 diagonal slits in the dough with a sharp knife or razor blade. These slits allow the bread to expand evenly in the oven, preventing it from cracking.
-
Bake at 425°F (220°C) for 15 minutes for rolls, or 20 minutes for loaves.
-
Remove from oven and brush with egg white beaten with cold water. This creates a glossy, professional-looking finish.
-
Return to oven; bake 5-10 minutes longer, or until golden brown. The internal temperature should reach around 200°F (93°C).
Roasted Garlic (Optional):
To roast the garlic, peel as much of the outer skin away as possible, leaving the cloves unpeeled and the head intact. Optionally, trim the tips of the cloves to expose the “meat” to the oil. Place the head(s) in a covered casserole dish or on a piece of heavy aluminum foil. Drizzle with olive oil and bake, covered, at 350°F (175°C) for about 45 minutes (mine takes over an hour in a terra-cotta garlic baker), or until the cloves are soft and can be squeezed easily out of their skins. Let the roasted garlic cool before adding it to the flour for the bread.
Expert Tips & Tricks
- The Water Temperature is Key: Make sure your water is between 120-130°F. Too cold and the yeast won’t activate; too hot and it will die. A thermometer is your best friend here.
- Don’t Overknead: Overkneading can result in tough bread. Knead until the dough is smooth and elastic, but not tight.
- The Longer the Proof, the Better the Flavor: The cold fermentation in the refrigerator is what really elevates this bread. Don’t skimp on this step!
- Score Deeply: Make sure your cuts are deep enough to allow the bread to expand properly. A lame (bread scoring tool) works best, but a sharp serrated knife will also do the trick.
- Listen to Your Dough: Baking times can vary depending on your oven. Keep an eye on the bread and adjust the baking time accordingly. It’s done when it’s golden brown and sounds hollow when tapped on the bottom.
- Adjusting the Recipe: Feel free to experiment with different flours. Whole wheat flour can add a nutty flavor, but you may need to adjust the amount of water.
- Don’t skip the egg wash! The egg wash at the end gives it a beautiful sheen and helps keep the crust soft.
Serving & Storage Suggestions
This Italian bread is incredibly versatile. Serve it warm with a drizzle of olive oil and balsamic vinegar for a simple appetizer. It’s also perfect for making sandwiches, bruschetta, or croutons.
To store, wrap the bread tightly in plastic wrap or a bread bag. It will stay fresh at room temperature for 2-3 days. For longer storage, you can freeze the bread for up to 2 months. To reheat, thaw completely and then bake at 350°F (175°C) for 10-15 minutes, or until warmed through. You can also slice the bread and toast it for a quick and easy snack.
Nutritional Information
| Nutrient | Amount per Serving (estimated) | % Daily Value (estimated) |
|---|---|---|
| Calories | 300 kcal | 15% |
| Total Fat | 5g | 8% |
| Saturated Fat | 1g | 5% |
| Cholesterol | 0mg | 0% |
| Sodium | 400mg | 17% |
| Total Carbohydrate | 55g | 20% |
| Dietary Fiber | 2g | 8% |
| Sugars | 2g | – |
| Protein | 10g | 20% |
Note: Nutritional information is an estimate and may vary based on specific ingredients and portion sizes.
Variations & Substitutions
- Herb Infusion: Add a tablespoon of your favorite dried herbs, such as rosemary, thyme, or oregano, to the dry ingredients for an extra layer of flavor.
- Cheese Please: Incorporate grated Parmesan or Asiago cheese into the dough for a savory twist.
- Olive Bread: Add ½ cup of chopped Kalamata olives to the dough for a Mediterranean-inspired loaf.
- Sweet Bread: Increase the sugar to 1/4 cup and add a teaspoon of vanilla extract for a slightly sweet bread that’s perfect for breakfast.
- Whole Wheat: Substitute up to half of the all-purpose flour with whole wheat flour for a nuttier, more rustic flavor.
FAQs (Frequently Asked Questions)
Q: Can I use instant yeast instead of active dry yeast?
A: Yes, you can. Use the same amount of instant yeast (5 teaspoons or 2 packages). You can add it directly to the dry ingredients without proofing it in water first.
Q: My dough isn’t rising. What could be the problem?
A: Several factors can affect rising. Make sure your yeast is fresh and that the water is the correct temperature (120-130°F). Also, avoid placing the dough in a drafty area or a cold environment.
Q: Can I skip the refrigeration step?
A: While you can, I don’t recommend it. The cold fermentation develops a much richer and more complex flavor in the bread. If you’re short on time, you can refrigerate it for a minimum of 2 hours.
Q: My bread is browning too quickly. What should I do?
A: If the bread is browning too quickly, tent it with aluminum foil for the last 10-15 minutes of baking.
Q: How can I get a crispier crust?
A: Spritz the oven with water a few times during the first few minutes of baking. The steam will help create a crispier crust.
Final Thoughts
This Italian bread recipe is a labor of love, but the reward is well worth the effort. The aroma of freshly baked bread filling your kitchen, the satisfying crunch of the crust, and the soft, airy texture of the crumb – it’s an experience that will transport you to the sun-drenched hills of Tuscany. Don’t be afraid to experiment with different flavors and techniques to make it your own. I encourage you to try this recipe and share your creations with friends and family. Pair it with a hearty pasta dish, a vibrant Caprese salad, or simply enjoy it on its own with a glass of good wine. Buon appetito!