
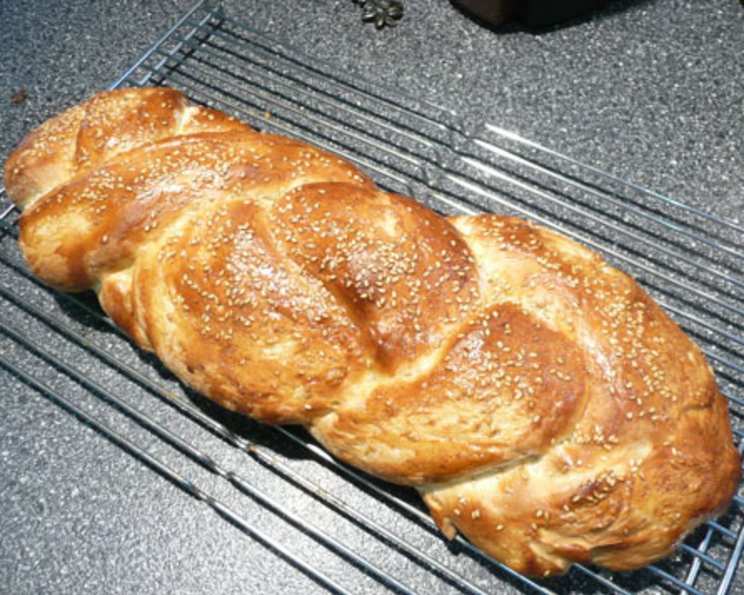
Italian Herb Braid: A Taste of Nostalgia
I still remember the aroma that would fill our kitchen when my mom baked this Italian Herb Braid. It was the kind of scent that wrapped around you like a warm hug, a comforting blend of yeast, herbs, and something undeniably homemade. More often than not, the loaf wouldn’t even make it to the bread basket – we’d tear into it while it was still warm, slathering each piece with butter and savoring the simple, satisfying flavors. This bread, for me, is more than just a recipe; it’s a memory baked into every slice.
Recipe Overview
- Prep Time: 20 minutes
- Cook Time: 25 minutes
- Rise Time: 25 minutes
- Total Time: 1 hour 10 minutes
- Yields: 1 loaf
- Serves: 8
- Dietary Type: Vegetarian
Ingredients
- 2 3/4 – 3 1/4 cups bread flour, plus more for kneading
- 2 tablespoons sugar
- 1/4 ounce fast rise yeast (about 2 1/4 teaspoons)
- 1/2 teaspoon oregano, dried
- 1/2 teaspoon thyme, dried
- 1 teaspoon salt
- 3/4 cup water
- 3 tablespoons butter, unsalted
- 1/4 cup milk
- 1 egg, beaten (for brushing)
- Sesame seeds, for sprinkling (optional)
Equipment Needed
- Large mixing bowl
- Small microwave-safe bowl
- Measuring cups and spoons
- Baking sheet
- Shallow pan
- Wire rack
Instructions
-
In a large bowl, mix 1 1/4 cups of the bread flour, the sugar, fast rise yeast, oregano, thyme, and salt. Make sure the bowl is large enough to accommodate the expanding dough during the initial mixing stage.
-
In a separate microwave-safe bowl, combine the water, butter, and milk.
-
Microwave the water, butter, and milk mixture until it reaches approximately 130°F (54°C). This temperature is ideal for activating the yeast without scalding it. A cooking thermometer can be helpful to ensure accuracy.
-
Gradually add the warmed liquid mixture to the dry ingredients in the large bowl. Be sure to add it slowly to prevent any lumps from forming.
-
Using an electric mixer fitted with a dough hook (or a sturdy spoon), beat the mixture for 2 minutes at medium speed, then increase the speed to high and beat for another 2 minutes. This process develops the gluten in the flour, which is essential for a good bread texture.
-
With a spoon, stir in enough of the remaining bread flour to form a soft, elastic dough. Add the flour gradually, about 1/4 cup at a time, until the dough comes together.
-
Turn the dough out onto a lightly floured surface and knead for approximately 4 minutes, adding more flour as needed to prevent it from sticking to your hands or the counter. The dough should be smooth and elastic, not sticky.
-
Divide the dough into three equal portions.
-
Roll each portion into a 24-inch rope. Aim for even thickness to ensure uniform baking.
-
Braid the three ropes together, as you would braid hair.
-
Tuck the ends of the braid underneath to create a neat, loaf-like shape. This prevents the ends from unraveling during baking.
-
Brush the entire surface of the braid with the beaten egg. This will give the bread a beautiful golden-brown color and a slightly shiny finish.
-
Sprinkle the top of the braid with sesame seeds, if desired. This adds a nutty flavor and visual appeal.
-
Place the braided loaf on a greased baking sheet.
-
Place the baking sheet on top of a shallow pan that is half-full of boiling water. The steam from the water helps to create a moist environment for the dough to rise.
-
Cover the loaf loosely with plastic wrap or a clean kitchen towel.
-
Let rise in a warm place for approximately 25 minutes, or until the dough has visibly increased in size.
-
Preheat the oven to 400°F (200°C).
-
Bake the braid in the preheated oven for 25 minutes, or until it is golden brown and sounds hollow when tapped on the bottom. If the top is browning too quickly, you can loosely tent it with foil during the last few minutes of baking.
-
Remove the baked braid from the oven and cool it on a wire rack before slicing and serving. This allows the steam to escape and prevents the bread from becoming soggy.
Expert Tips & Tricks
- For a richer flavor, try using olive oil instead of butter in the dough.
- If you don’t have fast-rise yeast, you can use active dry yeast. Just proof it in warm water with a pinch of sugar for about 5-10 minutes before adding it to the dry ingredients.
- To ensure even baking, rotate the baking sheet halfway through the baking time.
- For a softer crust, brush the baked loaf with melted butter immediately after removing it from the oven.
- If your kitchen is cold, you can proof the dough in a slightly warmed oven (turned off, of course!) or on top of the refrigerator.
- To easily slice the braid, use a serrated bread knife for clean, even slices.
Serving & Storage Suggestions
This Italian Herb Braid is delicious served warm with butter, olive oil, or your favorite spread. It also makes a fantastic accompaniment to soups, salads, or pasta dishes. Leftovers can be stored in an airtight container at room temperature for up to 2 days, or in the refrigerator for up to 5 days. For longer storage, wrap the cooled loaf tightly in plastic wrap and freeze it for up to 2 months. To reheat, thaw the bread completely and warm it in a 350°F (175°C) oven for 10-15 minutes, or until heated through.
Nutritional Information
| Nutrient | Amount per Serving | % Daily Value |
|---|---|---|
| Calories | 215 kcal | 11% |
| Total Fat | 5g | 7% |
| Saturated Fat | 3g | 15% |
| Cholesterol | 13mg | 4% |
| Sodium | 335mg | 14% |
| Total Carbohydrate | 37g | 12% |
| Dietary Fiber | 1g | 4% |
| Sugars | 3g | N/A |
| Protein | 5g | 10% |
Nutritional information is an estimate and can vary based on specific ingredients and portion sizes.
Variations & Substitutions
- Cheese and Herb Braid: Add 1/2 cup of grated Parmesan or Asiago cheese to the dry ingredients for a cheesy, savory twist. You can also sprinkle some cheese on top of the braid before baking.
- Garlic Herb Braid: Add 1-2 cloves of minced garlic to the dry ingredients for a bolder flavor.
- Rosemary and Sea Salt Braid: Substitute the oregano and thyme with 1 teaspoon of chopped fresh rosemary and sprinkle the top of the braid with coarse sea salt before baking.
- Sweet Herb Braid: For a slightly sweeter bread, increase the sugar to 1/4 cup and add 1/2 teaspoon of vanilla extract to the wet ingredients.
- Whole Wheat Braid: Replace up to half of the bread flour with whole wheat flour for a heartier, more nutritious bread. You may need to add a little more water to compensate for the increased absorbency of the whole wheat flour.
FAQs (Frequently Asked Questions)
Q: Can I use active dry yeast instead of rapid-rise yeast?
A: Yes, you can. Dissolve the active dry yeast in the warm water with a teaspoon of sugar and let it sit for 5-10 minutes until foamy before adding it to the dry ingredients.
Q: My dough is too sticky. What should I do?
A: Gradually add more flour, a tablespoon at a time, while kneading, until the dough becomes smooth and elastic but not sticky. Be careful not to add too much flour, or the bread will be dry.
Q: Can I make the dough ahead of time?
A: Yes, you can. After kneading, place the dough in a lightly oiled bowl, cover it with plastic wrap, and refrigerate it for up to 24 hours. Let the dough come to room temperature for about 30 minutes before shaping and baking.
Q: Why do I need to bake the bread over boiling water?
A: Baking the bread over boiling water creates a steamy environment that helps the dough rise properly and prevents the crust from drying out too quickly. This results in a softer, more tender crumb.
Q: How do I know when the bread is done?
A: The bread is done when it is golden brown and sounds hollow when tapped on the bottom. You can also use a food thermometer to check the internal temperature, which should be around 200-210°F (93-99°C).
Final Thoughts
This Italian Herb Braid is a simple yet satisfying bread that’s perfect for any occasion. The delightful aroma and comforting flavors will fill your kitchen with warmth and create lasting memories. Don’t be afraid to experiment with different herbs and variations to make it your own. I encourage you to give this recipe a try and share your creations with friends and family. Pair it with a hearty bowl of minestrone soup or a crisp Italian salad for a complete and delicious meal! Buon appetito!