
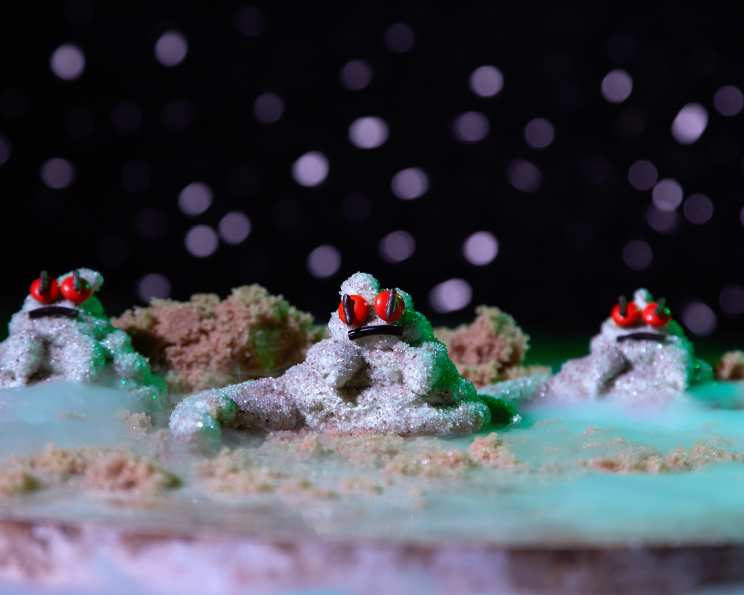
Jabba the Hutt Marshmallows: A Galactic Treat
I remember the first time I saw Jabba the Hutt. It was at a neighborhood birthday party, and someone had brought a worn-out VHS copy of Return of the Jedi. I was mesmerized, not necessarily by the heroics of Luke Skywalker, but by the sheer, imposing presence of that slimy gangster. Years later, that childhood fascination merged with my love of baking, resulting in these unexpectedly delightful Jabba the Hutt Marshmallows. They’re a whimsical, tangy, and utterly delicious homage to a character who, let’s face it, has a certain…charm.
Recipe Overview
- Prep Time: 30 minutes
- Cook Time: 10 minutes
- Total Time: 1 hour 30 minutes (includes drying time)
- Servings: 15 marshmallow treats
- Yield: 15 marshmallows
- Dietary Type: Not specified
Ingredients
- 1/2 cup green sanding sugar
- 1/4 cup chocolate sugar
- 1 (1 ounce) package gelatin
- 1 cup granulated sugar
- Salt
- 1 teaspoon lime extract
- 1/4 teaspoon avocado gel food coloring
- 1/4 cup candy melts
- Orange mini M&Ms
- 1 black licorice wheel
Equipment Needed
- 9×13 inch baking dish
- Standing mixer with whisk attachment
- Small pot
- Candy thermometer
- Piping bag
- #12 round piping tip
- Microwave
- Tweezers (optional)
Instructions
-
First, prepare your sanding sugar bed. In a 9×13 inch baking dish, combine the green sanding sugar and chocolate sugar. Whisk them together thoroughly until evenly distributed. This mixture will both coat the marshmallows and provide a flavorful base. Set the prepared dish aside.
-
Next, bloom the gelatin. In the bowl of a standing mixer fitted with the whisk attachment, pour ⅓ cup of water. Sprinkle the entire package (1 ounce) of gelatin evenly over the water. Allow the gelatin to bloom; this usually takes about 5-10 minutes, allowing it to soften and properly dissolve later.
-
Prepare the sugar syrup. Position a candy thermometer securely in a small pot. Add the granulated sugar, ¼ cup of water, and a pinch of salt to the pot. Whisk the mixture gently to combine. Place the pot over high heat. Once the mixture begins to boil, do not stir it. Allow the mixture to cook undisturbed until it reaches 240°F on the candy thermometer (soft-ball stage). This usually takes around 8-10 minutes. It’s crucial to monitor the temperature closely for the correct marshmallow consistency.
-
Combine the syrup and gelatin. Once the sugar syrup reaches 240°F, carefully and slowly pour it into the bowl of the stand mixer with the machine set to low speed. Gradually increase the speed to high and beat the mixture until stiff peaks form. This process typically takes about 10-15 minutes. The mixture will become thick, glossy, and voluminous as it whips. It is important to beat until stiff peaks form, as this gives the marshmallows their structure.
-
Flavor and color the marshmallow. In the last minute of mixing, add the lime extract and ¼ teaspoon of green gel food coloring. Mix until the color is evenly distributed throughout the marshmallow mixture. Don’t overmix at this stage, or you could deflate the marshmallow.
-
Pipe the Jabba shapes. Transfer the marshmallow mixture to a piping bag fitted with a #12 round tip. Pipe the Jabbas directly onto the prepared sanding sugar bed in the baking dish. Begin by piping a curved tail. Then, pipe a large, swirled mound for the body. Pipe a smaller swirled mound on top of the body for the head, and finally, add small arms.
-
Coat and dry. Immediately after piping each marshmallow, use a spoon to gently coat it with the surrounding sanding sugar mixture. This will prevent sticking and add extra flavor and texture. Allow the marshmallows to dry uncovered for at least one hour, or preferably longer, until they are firm to the touch.
-
Create the licorice frowns. Carefully unroll the black licorice wheel. Cut it in half vertically to create thinner strings. From these strings, cut small, curved frowns to fit the faces of the Jabba marshmallows.
-
Melt the chocolate. Place the candy melts in a microwave-safe bowl. Microwave in 30-second intervals, stirring in between, until the chocolate is completely smooth and melted. Be careful not to overheat the chocolate, or it will seize up. Transfer the melted chocolate to a small piping bag, and cut off the tip to create a very small opening.
-
Add the eyes and frowns. Use the melted chocolate as an adhesive to attach the orange mini M&Ms as eyes onto each Jabba marshmallow. Tweezers can be helpful for precise placement. Then, attach the black licorice frowns to create the signature Jabba expression.
-
Final drying. Allow the decorated Jabba the Hutt Marshmallows to dry completely before serving. This will ensure that the chocolate and licorice adhere properly and the marshmallows are firm enough to handle.
Expert Tips & Tricks
- Temperature is key: Ensure your sugar syrup reaches the precise 240°F for the right marshmallow texture. An undercooked syrup will result in a sticky, runny marshmallow, while an overcooked syrup will be hard and brittle.
- Gelatin Bloom: Blooming the gelatin properly is crucial for a smooth, lump-free marshmallow.
- Piping perfection: If you don’t have a #12 piping tip, you can simply snip the end of a piping bag. Practice piping a few shapes on parchment paper first to get the hang of it.
- Color intensity: The avocado gel food coloring yields a vibrant green, but you can adjust the amount to achieve your desired shade. A few drops of yellow can brighten it up.
- Avoid sticking: Generously coating the marshmallows with the sanding sugar mixture is key to preventing them from sticking together.
Serving & Storage Suggestions
Serve these delightful Jabba the Hutt Marshmallows as a fun treat at a Star Wars-themed party, as a whimsical dessert, or simply as a conversation starter. They’re best enjoyed within a few days of making them, but can be stored in an airtight container at room temperature for up to a week. Avoid refrigerating them, as this can make them sticky.
Nutritional Information
| Nutrient | Amount per Serving | % Daily Value |
|---|---|---|
| Calories | 97 kcal | 5% |
| Total Fat | 0g | 0% |
| Saturated Fat | 0g | 0% |
| Cholesterol | 0mg | 0% |
| Sodium | 4mg | 0% |
| Total Carbohydrate | 23g | 8% |
| Dietary Fiber | 0g | 0% |
| Sugars | 23g | 46% |
| Protein | 2g | 4% |
Note: Nutritional information is an estimate and may vary based on specific ingredients and measurements.
Variations & Substitutions
- Flavor variations: Experiment with other extracts, such as almond, vanilla, or peppermint, for different flavor profiles.
- Color variations: Use different gel food colorings to create different alien species!
- Sugar-free version: Substitute the granulated sugar with a sugar-free sweetener suitable for candy making. Be aware that this may affect the texture of the marshmallows.
- Chocolate-covered Jabba: Dip the finished marshmallows in melted dark chocolate for an extra decadent treat.
FAQs (Frequently Asked Questions)
Q: Why is my marshmallow mixture not thickening?
A: Ensure your sugar syrup reached the correct temperature (240°F). Also, make sure your gelatin has bloomed properly before adding the syrup.
Q: Can I use liquid food coloring instead of gel food coloring?
A: Gel food coloring is recommended because it’s more concentrated and won’t add excess liquid to the marshmallow mixture, which could affect its consistency. If using liquid, use sparingly.
Q: My marshmallows are too sticky. What did I do wrong?
A: The sugar syrup might not have reached a high enough temperature, or the marshmallows might not have dried long enough. Make sure to coat them generously with sanding sugar.
Q: Can I make these ahead of time?
A: Yes, you can make the marshmallows a day or two in advance. Store them in an airtight container at room temperature. Decorate them closer to the serving time.
Q: What can I use instead of black licorice for the frowns?
A: You could use thin strips of black fondant or even edible black marker to draw the frowns on the marshmallows.
Final Thoughts
These Jabba the Hutt Marshmallows are more than just a recipe; they’re a celebration of creativity, a nod to a beloved franchise, and a delicious adventure in the kitchen. Don’t be intimidated by the candy thermometer; with a little patience and attention to detail, you can create these whimsical treats that are sure to impress. So, gather your ingredients, channel your inner baker, and may the Force (and a candy thermometer) be with you! Feel free to share your creations and modifications – I can’t wait to see your galactic masterpieces!