
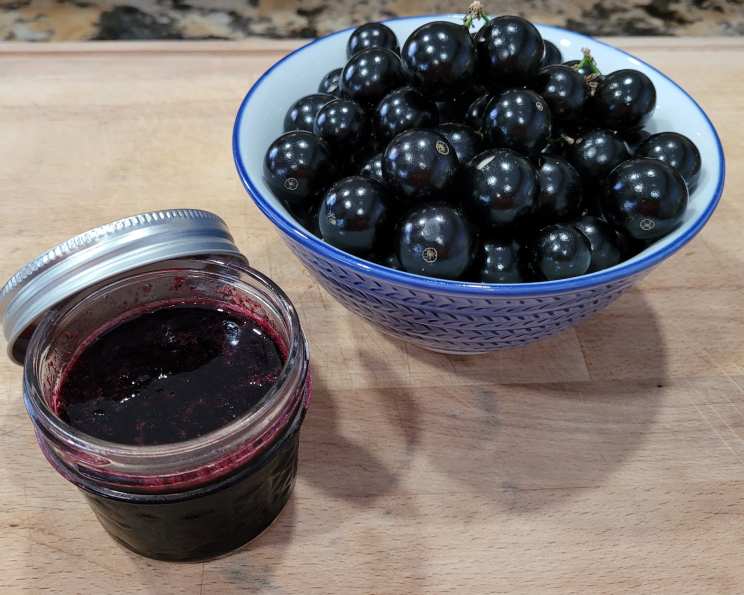
Jaboticaba Jelly: A Taste of Brazilian Sunshine
The first time I tasted jaboticaba jelly, I was a young culinary student on a research trip to Brazil. We were visiting a small farm, where the trees looked like they were studded with dark purple jewels. The farmer’s wife offered us slices of homemade bread, slathered with the most exquisite, ruby-red jelly. It was a revelation – a burst of tart berry flavor, unlike anything I had ever experienced. It tasted like sunshine and adventure, a taste of a place far away. I’ve been chasing that memory ever since, and this recipe comes remarkably close to capturing that magical flavor.
Recipe Overview
- Prep Time: 30 minutes
- Cook Time: 45-60 minutes
- Total Time: 1 hour 15 minutes – 1 hour 30 minutes
- Yields: Approximately 4 jars
- Dietary Type: Vegan
Ingredients
- 3-4 lbs jaboticabas, to make 3 to 4 cups of juice
- 3-4 cups sugar
Equipment Needed
- Large pot
- Colander
- Potato masher
- Sieve
- Candy thermometer (optional)
- Sterilized jars with lids and rings
Instructions
-
Prepare the Jaboticabas: Begin by carefully washing the jaboticabas. Remove any stems or leaves.
-
Extract the Juice: Place the jaboticabas in a large pot and cover them with water. Bring the mixture to a boil and continue boiling until the fruit is softened, typically around 20-30 minutes. The skins should be splitting and the fruit easily mashed.
-
Strain the Juice: Carefully pour the boiled jaboticabas and water mixture into a colander set over a large bowl. Allow the juice to drain naturally, capturing all the liquid.
-
Maximize Juice Extraction: Once the initial draining is complete, use a potato masher to gently press the fruit against the colander, extracting as much juice as possible. Then, transfer the mashed fruit to a sieve placed over a separate bowl. Work the fruit through the sieve to remove any remaining pulp and seeds, ensuring a smooth jelly.
-
Measure the Juice: Measure the amount of jaboticaba juice you have extracted. This measurement is crucial for determining the correct amount of sugar to use.
-
Combine Juice and Sugar: In a clean, heavy-bottomed pot, combine equal parts of jaboticaba juice and sugar. For example, if you have 3 cups of juice, use 3 cups of sugar.
-
Cook the Jelly: Place the pot over medium-high heat and bring the mixture to a rolling boil, stirring constantly to prevent scorching. As the mixture boils, the sugar will dissolve and the liquid will begin to thicken.
-
Test for Doneness: Continue to boil the mixture until it reaches the gel point. There are two ways to test for doneness:
- Spoon Test: Drop a small spoonful of the hot jelly onto a chilled plate. Let it cool for a few seconds. Then, gently push the jelly with your finger. If it wrinkles or “scoots” across the plate, it is ready.
- Candy Thermometer: Use a candy thermometer to monitor the temperature. The jelly is ready when it reaches 220°F (104°C). This temperature is approximately 8 degrees above the boiling point of water at your altitude.
-
Remove from Heat: Once the jelly has reached the gel point, remove the pot from the heat.
-
Fill the Jars: Carefully pour the hot jelly into sterilized, hot jars, leaving about ¼ inch of headspace at the top. Wipe the rims of the jars clean with a damp cloth.
-
Seal the Jars: Place the sterilized lids on the jars and screw on the bands fingertip-tight.
-
Process the Jars (Optional): For long-term storage, process the filled jars in a boiling water bath for 10 minutes. This ensures a proper seal and prevents spoilage. If you choose not to process the jars, store them in the refrigerator.
-
Cool and Store: Remove the jars from the boiling water bath (if processed) and place them on a towel-lined surface to cool completely. As the jars cool, you should hear a “popping” sound, indicating that they have sealed properly. Store the sealed jars in a cool, dark place. Refrigerate any unsealed jars.
Expert Tips & Tricks
- Sterilizing Jars: Proper sterilization is crucial to prevent mold growth. Wash jars and lids in hot, soapy water, then boil them for 10 minutes. Keep them hot until ready to fill.
- Altitude Adjustments: At higher altitudes, water boils at a lower temperature. You may need to adjust the cooking time or target temperature slightly to ensure the jelly sets properly.
- Pectin Power: Jaboticabas are naturally low in pectin. If you find your jelly isn’t setting, you can add a small amount of commercial pectin to the mixture. Follow the manufacturer’s instructions.
- Defoaming: As the jelly cooks, a layer of foam may form on the surface. Skim this off with a spoon for a clearer, more attractive finished product. A tiny pat of butter added at the beginning of cooking can also reduce foaming.
- Citrus Boost: A squeeze of lemon juice at the end of cooking can enhance the flavor and help with gelling. Be careful not to add too much, as it can make the jelly too tart.
Serving & Storage Suggestions
Jaboticaba jelly is delicious spread on toast, scones, or biscuits. It also makes a wonderful glaze for meats, particularly pork or poultry. For a sophisticated appetizer, serve it with a soft cheese like brie or goat cheese and crackers.
Properly sealed jars of jaboticaba jelly can be stored in a cool, dark place for up to a year. Once opened, refrigerate the jelly and use it within a few weeks. Unsealed jars should always be stored in the refrigerator and consumed promptly.
Nutritional Information
(Note: This is an estimate, as nutritional information can vary based on the specific fruit and sugar content.)
| Nutrient | Amount per Serving | % Daily Value |
|---|---|---|
| Calories | 200 kcal | 10% |
| Total Fat | 0g | 0% |
| Saturated Fat | 0g | 0% |
| Cholesterol | 0mg | 0% |
| Sodium | 0mg | 0% |
| Total Carbohydrate | 50g | 17% |
| Dietary Fiber | 0g | 0% |
| Sugars | 50g | N/A |
| Protein | 0g | 0% |
Variations & Substitutions
- Spiced Jaboticaba Jelly: Add a pinch of ground cinnamon, cloves, or nutmeg to the jelly while it cooks for a warm, spiced flavor.
- Jaboticaba-Mint Jelly: Steep fresh mint leaves in the hot juice for about 10 minutes before adding the sugar. Remove the mint leaves before boiling.
- Jaboticaba-Chili Jelly: Add a small pinch of red pepper flakes to the jelly for a touch of heat. Start with a small amount and adjust to taste.
- Alternative Sweeteners: While sugar is traditional, you could experiment with other sweeteners like honey or agave nectar. Keep in mind that this may affect the flavor and texture of the jelly.
FAQs (Frequently Asked Questions)
Q: Can I use frozen jaboticabas?
A: Yes, you can use frozen jaboticabas. Thaw them completely before cooking and drain off any excess liquid.
Q: My jelly is too runny. What did I do wrong?
A: Runny jelly is often caused by not cooking the mixture long enough to reach the gel point. Return the jelly to the pot and continue boiling until it reaches the desired consistency.
Q: My jelly is too thick. Can I fix it?
A: If your jelly is too thick, you can try adding a small amount of water to the pot and reheating it. Be careful not to add too much water, as this can make it runny.
Q: Do I have to process the jars in a boiling water bath?
A: Processing the jars is recommended for long-term storage. If you plan to consume the jelly within a few weeks, you can skip this step and store the jars in the refrigerator.
Q: Where can I find jaboticabas?
A: Jaboticabas are not widely available outside of South America. You may be able to find them at specialty produce markets or online retailers. If you live in a tropical or subtropical climate, you may be able to grow your own tree.
Final Thoughts
Making jaboticaba jelly is a rewarding experience that brings a unique and delicious taste to your table. While the process may seem a bit daunting at first, the result is well worth the effort. Don’t be afraid to experiment with different variations and find the flavor that you love the most. So, gather your ingredients, put on some music, and enjoy the journey of creating your own batch of sunshine-infused jaboticaba jelly. I encourage you to share your creations and experiences – perhaps you’ll even capture a bit of that magic I first experienced on that Brazilian farm!