
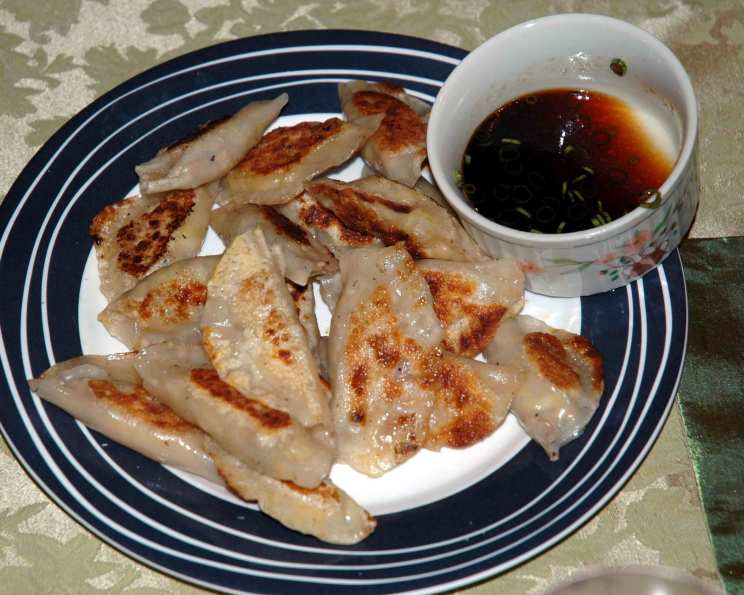
Homemade Japanese Gyoza: A Culinary Journey
The aroma of ginger, garlic, and sizzling pork – it takes me back to Mrs. Ito’s tiny kitchen in Kyoto. Her weathered hands, dusted with flour, moved with a speed that defied age as she expertly folded dozens of gyoza. The air buzzed with conversation, laughter, and the rhythmic tap of her cleaver, a soundtrack to a culinary experience I’ll never forget. Each bite was an explosion of savory flavors, a testament to simple ingredients transformed with care and passion. Recreating that magic in my own kitchen is always a joy.
Recipe Overview
- Prep Time: 2 hours
- Cook Time: 30 minutes
- Total Time: 2 hours 30 minutes
- Servings: Varies
- Yield: 100 gyoza
- Dietary Type: Not specified
Ingredients
- 1 lb country-style pork sausage
- 1 lb ground lean pork
- 1 tablespoon soy sauce
- 2 teaspoons chili oil
- 1 carrot, finely shredded
- 4 cloves garlic, minced
- 6 green onions, chopped
- 2-3 tablespoons fresh ginger, grated
- 1/2 medium cabbage, shredded
- 1/2 cup beef broth
- 2 packages gyoza skins
- Peanut oil
Dipping Sauce
- 1/3 cup tahini (sesame paste)
- 1/3 cup rice vinegar
- 1/3 cup Japanese soy sauce
- 1/4 cup sugar or 1/4 cup light corn syrup
- 1 1/2 tablespoons sesame oil
- 1 tablespoon fresh garlic, pressed or finely chopped
- 1 tablespoon chili oil
- 1/2 teaspoon Szechwan pepper
- 2-3 green onions, chopped
Equipment Needed
- Large skillet
- Slotted spoon
- Bowl
- Gyoza press (optional)
- Blender or food processor
Instructions
- Prepare the Meat Mixture: In a large skillet, brown the pork sausage and ground lean pork over medium-high heat.
- Add Flavor: While the meat is browning, add the soy sauce and chili oil. Continue to sauté until the meat is fully cooked.
- Incorporate Vegetables: Once the meat is browned, add the shredded carrot, minced garlic, chopped green onions, and grated ginger to the skillet. Fry for several minutes, allowing the flavors to meld.
- Add Cabbage: Add the shredded cabbage to the skillet and cook until it wilts slightly.
- Steam and Reduce: Pour the beef broth into the skillet. Cover the skillet and let the mixture steam until most of the liquid is reduced. This step helps to concentrate the flavors and prevent soggy gyoza.
- Cool the Filling: Remove the meat and vegetable mixture from the skillet using a slotted spoon and place it in a bowl to cool completely. This is crucial for easier handling and preventing the gyoza skins from tearing.
- Prepare the Gyoza Skins: Lightly brush water around the edges of a gyoza wrapper. This will act as a glue to seal the gyoza properly.
- Fill the Gyoza: Place a spoonful of the cooled filling in the center of the gyoza wrapper. Be careful not to overfill, as this can make them difficult to seal.
- Seal the Gyoza: Seal the gyoza by using a gyoza press or by pinching the edges together with your fingers, creating small folds. Aim for a tight seal to prevent the filling from leaking out during cooking.
- Heat the Oil: Heat less than 1/4 cup of peanut oil in a pan over medium heat. The oil should be hot but not smoking.
- Brown the Gyoza: Add several gyoza to the pan, being careful not to overcrowd them. Brown the gyoza on both sides, which usually takes a few minutes per side. This step is essential for achieving a crispy exterior.
- Steam the Gyoza: Carefully add 1/4 cup of water to the hot pan and quickly cover it with a lid. Let the gyoza steam until the water has evaporated completely. This process cooks the filling thoroughly and creates a tender, juicy inside.
- Cool and Serve: Remove the cooked gyoza from the pan and place them on a plate to cool slightly before serving.
- Repeat: Repeat steps 11-13 until all the gyoza are cooked.
- Freeze (Optional): If you want to freeze some of the gyoza for later, freeze them in a single layer on a baking sheet before transferring them to a freezer bag.
Dipping Sauce:
- Combine Ingredients: Simply combine all of the dipping sauce ingredients – tahini, rice vinegar, Japanese soy sauce, sugar (or corn syrup), sesame oil, garlic, chili oil, Szechwan pepper, and green onions – in a blender or food processor.
- Blend: Blend at high speed until the sauce is smooth and well combined.
- Serve: Pour the sauce into a small serving bowl and top with a couple of drops of chili oil (if desiring a hotter sauce) and chopped green onions.
Expert Tips & Tricks
- Make-Ahead Filling: Prepare the filling a day in advance to save time on the day of assembly. The flavors will also meld together more fully overnight.
- Prevent Sticking: To prevent the gyoza from sticking to the pan, ensure the pan is hot before adding the oil, and don’t overcrowd the pan.
- Perfect Browning: Achieve even browning by using a non-stick pan and keeping the heat consistent.
- Alternative Sealing: If you don’t have a gyoza press, you can use a fork to crimp the edges of the gyoza for a decorative and secure seal.
- Spice Adjustment: Adjust the amount of chili oil and Szechwan pepper in the dipping sauce to your preferred level of spiciness.
- Vegetarian Option: Substitute the pork and sausage with finely chopped mushrooms and firm tofu for a vegetarian version.
Serving & Storage Suggestions
Serve the gyoza hot and fresh with the dipping sauce. Arrange them attractively on a plate and garnish with extra chopped green onions or sesame seeds.
Storage:
-
Room Temperature: Gyoza should not be left at room temperature for more than 2 hours.
-
Refrigerator: Cooked gyoza can be stored in an airtight container in the refrigerator for up to 3 days.
-
Freezer: Uncooked gyoza can be frozen for up to 2 months. Store them in a single layer on a baking sheet until frozen solid, then transfer them to a freezer bag.
Reheating: -
Pan-fry: Reheat cooked gyoza in a pan with a little oil until heated through and crispy.
-
Steam: Steam frozen gyoza until heated through.
-
Microwave: While not ideal for maintaining crispness, gyoza can be reheated in the microwave in a pinch.
Nutritional Information
Please note that the nutritional information is an estimate and can vary based on specific ingredients and portion sizes.
| Nutrient | Amount per Serving | % Daily Value |
|---|---|---|
| Calories | 37 kcal | 2% |
| Total Fat | 3 g | 4% |
| Saturated Fat | 1 g | 5% |
| Cholesterol | 7 mg | 2% |
| Sodium | 100 mg | 4% |
| Carbohydrate | 1 g | 0% |
| Fiber | 0 g | 0% |
| Sugar | 1 g | 2% |
| Protein | 2 g | 3% |
Variations & Substitutions
- Vegan Gyoza: Replace the pork and sausage with a mixture of finely chopped mushrooms, firm tofu, and shredded vegetables like carrots and zucchini. Use vegetable broth instead of beef broth.
- Chicken Gyoza: Substitute ground chicken for the pork for a lighter option.
- Shrimp Gyoza: Use finely chopped shrimp as the filling for a seafood twist.
- Gluten-Free Gyoza: While traditional gyoza wrappers are made with wheat flour, you might find gluten-free wrappers in specialty stores or online.
- Spicy Gyoza: Add more chili oil or a pinch of cayenne pepper to the filling for an extra kick.
- Sesame Ginger Dipping Sauce: Omit the tahini and increase the sesame oil for a more pronounced sesame flavor. Add a bit more grated ginger to the dipping sauce for a zingy taste.
FAQs (Frequently Asked Questions)
Q: Can I use pre-made gyoza wrappers?
A: Yes, using pre-made gyoza wrappers saves a lot of time and effort. They are widely available in Asian grocery stores.
Q: How do I prevent the gyoza from sticking to the pan?
A: Make sure your pan is hot before adding the oil, and don’t overcrowd the pan. Using a non-stick pan also helps.
Q: Can I bake the gyoza instead of pan-frying?
A: While pan-frying gives the best texture, you can bake them at 400°F (200°C) for about 20 minutes, flipping halfway through. Spritz them with oil before baking for a crispier result.
Q: How do I know when the gyoza are fully cooked?
A: The gyoza are cooked when the bottoms are golden brown and crispy, and the filling is cooked through. The steaming process also helps to ensure the filling is cooked.
Q: Can I freeze cooked gyoza?
A: Yes, cooked gyoza can be frozen. Let them cool completely before freezing in a single layer on a baking sheet. Once frozen, transfer them to a freezer bag. Reheat in a pan with a little oil.
Final Thoughts
Creating these homemade gyoza is more than just cooking; it’s an experience. Gathering friends and family to help with the folding process can make it a fun and memorable event. Don’t be intimidated by the number of steps – each one is simple, and the end result is well worth the effort. So, roll up your sleeves, gather your ingredients, and embark on this culinary adventure. And be sure to let me know how yours turned out!