
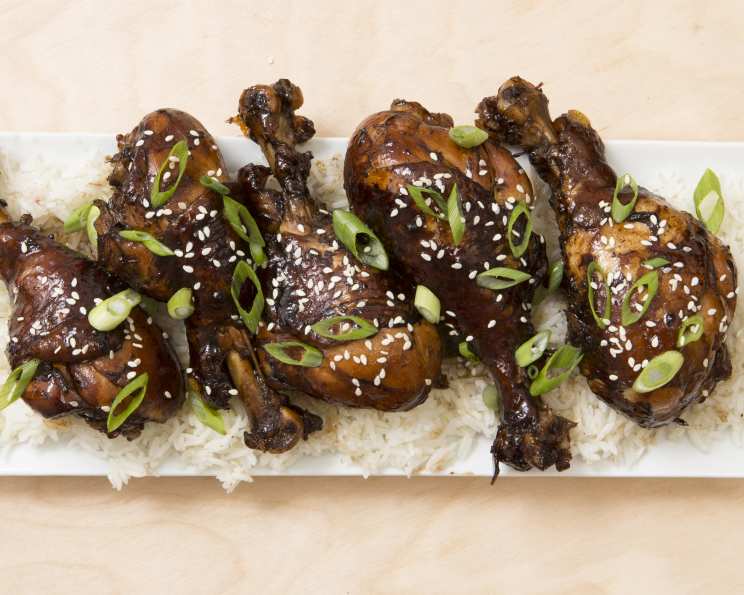
Japanese Mum’s Glazed Chicken Drumsticks
The first time I tried this dish, it was at a potluck hosted by a friend who’d just returned from teaching English in Japan. The table was laden with unfamiliar delights, but one plate in particular caught my eye: glistening, dark-red chicken drumsticks, piled high and radiating a savory-sweet aroma that drew me in like a moth to a flame. I hesitantly took one, and that first bite was an epiphany. The skin was sticky and caramelized, the meat tender and juicy, and the flavor an intoxicating blend of umami, tang, and just a hint of spice. I went back for seconds, and then thirds, practically inhaling them. I knew then that I needed this recipe in my life.
Recipe Overview
- Prep Time: 5 minutes
- Cook Time: 40 minutes
- Total Time: 45 minutes
- Servings: 4
- Dietary Type: Not Gluten-Free
Ingredients
- 8 chicken drumsticks, skin on (the skin is important for flavour, and is so tasty to eat!)
- 1 cup water
- ½ cup balsamic vinegar
- ⅓ cup soy sauce
- 2 ½ tablespoons sugar
- 1 garlic clove, peeled and bruised
- 1 small hot chili pepper, slit open, seeds removed
Equipment Needed
- Large saucepan or pot
Instructions
-
In a large saucepan or pot, combine all the ingredients: chicken drumsticks, water, balsamic vinegar, soy sauce, sugar, garlic clove, and hot chili pepper.
-
Place the saucepan over high heat and bring the mixture to a boil.
-
Once boiling, reduce the heat to a simmer and cook for approximately 20 minutes. As it simmers, be sure to remove any scum that rises to the surface using a spoon or ladle. This helps ensure a clearer, cleaner-tasting glaze.
-
After 20 minutes, increase the heat back to high. Frequently turn the drumsticks in the liquid, ensuring they are evenly coated.
-
Continue to cook, turning the drumsticks, until the liquid has reduced to a sticky glaze. This process may take another 15-20 minutes. Monitor the chicken closely to prevent burning and ensure it’s cooked through. The glaze is ready when it thickly coats the back of a spoon.
-
Once the chicken is cooked and glazed, carefully arrange the chicken drumsticks on a serving platter.
-
Remove the garlic clove and chili pepper from the remaining glaze in the saucepan.
-
Spoon the glaze generously over the drumsticks, ensuring each piece is well-coated. Be aware that it’s a glaze rather than a sauce, so there won’t be a large amount of liquid. The flavour is intensely concentrated.
Expert Tips & Tricks
- Achieving the Perfect Glaze: Patience is key when reducing the liquid to a glaze. Don’t rush the process. A gentle simmer and frequent turning of the drumsticks will prevent burning and promote even caramelization.
- Preventing Overcooked Chicken: If you feel the chicken is cooking too quickly and nearing overcooked status, remove it from the pan before the glaze has fully reduced. You can then continue reducing the liquid on its own to achieve the desired consistency.
- Using Chicken Breast: While drumsticks are ideal for their flavor and moisture, you can adapt this recipe for chicken breast. However, breast meat tends to dry out more easily. Remove the breast from the pan once cooked through (internal temperature of 165°F or 74°C) and continue reducing the glaze separately.
- Skip the Cornstarch: Resist the temptation to thicken the glaze with cornstarch. The natural reduction method, while time-consuming, yields a richer, more flavorful glaze without the need for additional stock or broth.
- Checking Doneness: To make sure that your chicken is cooked through, the internal temperature of the thickest part of the drumstick, close to the bone, should reach 165°F (74°C). Use a meat thermometer to verify.
- Bruising the Garlic: Bruising the garlic clove releases its flavour without making it too overpowering. Simply crush it gently with the flat side of a knife.
- Managing the Chili: Removing the seeds from the chili pepper provides a mild heat. If you prefer a spicier dish, leave some seeds in or add a pinch of red pepper flakes.
Serving & Storage Suggestions
Serve the glazed chicken drumsticks hot, garnished with sesame seeds and chopped green onions for a pop of color and added flavor. They pair wonderfully with steamed rice, stir-fried vegetables, or a refreshing cucumber salad.
To store leftovers, allow the chicken to cool completely before placing it in an airtight container. Refrigerate for up to 3-4 days. For longer storage, freeze for up to 2 months. Thaw in the refrigerator overnight before reheating.
To reheat, you can use a microwave, oven, or skillet. For best results, reheat in a skillet over medium heat with a splash of water or broth to prevent drying. Cover and cook until heated through, about 5-7 minutes.
Nutritional Information
| Nutrient | Amount per Serving | % Daily Value |
|---|---|---|
| Calories | 313 kcal | N/A |
| Calories from Fat | 114 kcal | N/A |
| Total Fat | 12.7 g | 19% |
| Saturated Fat | 3.5 g | 17% |
| Cholesterol | 118.3 mg | 39% |
| Sodium | 1470.5 mg | 61% |
| Total Carbohydrate | 15.8 g | 5% |
| Dietary Fiber | 0.4 g | 1% |
| Sugars | 13.6 g | N/A |
| Protein | 31.1 g | 62% |
Note: Nutritional information is an estimate and may vary based on specific ingredients and cooking methods.
Variations & Substitutions
- Gluten-Free: Substitute tamari for the soy sauce to make this dish gluten-free.
- Spicy: Increase the amount of chili pepper or add a pinch of red pepper flakes for extra heat.
- Sweetness: Adjust the amount of sugar to your liking. Honey or maple syrup can also be used as alternatives.
- Vegetarian: While this recipe is specifically for chicken, you could adapt the glaze for firm tofu or tempeh. Press the tofu well to remove excess water, then pan-fry or bake it before adding the glaze.
- Citrus Twist: Add a tablespoon of lemon or orange zest to the glaze for a bright, citrusy flavor.
FAQs (Frequently Asked Questions)
Q: Can I use chicken thighs instead of drumsticks?
A: Yes, chicken thighs work well in this recipe. They have a similar fat content to drumsticks, which helps keep them moist during cooking.
Q: Can I make this recipe ahead of time?
A: Absolutely. The chicken can be cooked and glazed ahead of time, then reheated before serving. The flavors actually meld together and deepen over time.
Q: How do I prevent the glaze from burning?
A: Frequent turning of the drumsticks and careful monitoring of the heat are key to preventing the glaze from burning. If the glaze starts to darken too quickly, reduce the heat slightly.
Q: Can I use a different type of vinegar?
A: While balsamic vinegar provides a unique depth of flavor, you can substitute it with apple cider vinegar or rice vinegar if desired. However, the flavor profile will be slightly different.
Q: What side dishes go well with this chicken?
A: Steamed rice, stir-fried vegetables, cucumber salad, and pickled ginger are all excellent accompaniments to the rich, flavorful chicken.
Final Thoughts
This Japanese Mum’s Glazed Chicken is more than just a recipe; it’s a culinary hug, a burst of flavor that evokes memories of shared meals and warm hospitality. It’s deceptively simple to make, yet incredibly satisfying. Don’t be intimidated by the glaze – with a little patience, you’ll be rewarded with a dish that will impress your family and friends. So, gather your ingredients, put on some music, and let the enticing aromas fill your kitchen. I encourage you to try this recipe, share it with loved ones, and let me know what you think! This chicken pairs beautifully with a crisp, dry sake or a refreshing green tea. Enjoy!