
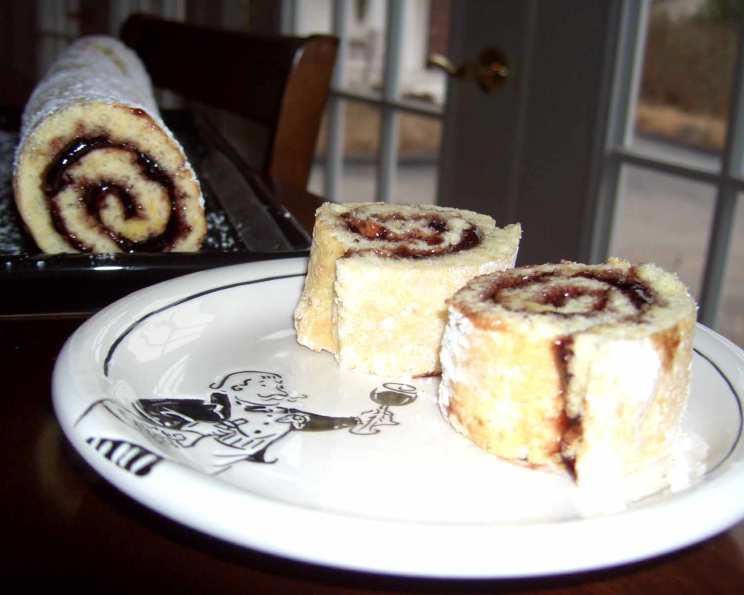
The Perfect Jelly Roll for a Crowd: Mastering the 11×17 Inch Pan
I still remember the aroma of my grandmother’s kitchen every holiday season. Nestled amongst the gingerbread cookies and spiced nuts was always her legendary jelly roll, a magnificent swirl of tender cake and homemade raspberry jam. It wasn’t just the taste; it was the sheer size of it, perfectly fitting her enormous 11×17 inch baking sheet, promising enough for everyone at the table. That jelly roll, a symbol of abundance and warmth, is the inspiration behind this recipe, one I’ve perfected over years of tweaking and testing to bring you that same delightful experience.
Recipe Overview
- Prep Time: 20 minutes
- Cook Time: 8-10 minutes
- Total Time: 1 hour 30 minutes (includes cooling)
- Servings: 12-16 slices
- Yield: One 11×17 inch jelly roll
- Dietary Type: Not specified (can be adapted)
Ingredients
- 2 tablespoons sweet butter
- 2/3 cup all-purpose flour
- 1/2 teaspoon baking powder
- 5 eggs, separated
- 1 teaspoon vanilla
- 1/2 teaspoon salt
- 1/2 cup granulated sugar
- 3 tablespoons powdered sugar, divided
- 1 (8 ounce) jar raspberry jam (or filling of your choosing)
Equipment Needed
- 11 x 17 inch sheet pan
- Wax paper
- Medium bowl
- Large bowl
- Electric mixer (handheld or stand mixer)
- Rubber spatula
- Clean kitchen towel
- Sifter or fine-mesh sieve
- Offset spatula (optional, for spreading filling)
Instructions
-
Prepare the Pan: Lightly grease an 11 x 17 inch sheet pan with butter or cooking spray. Line the pan with wax paper, ensuring it extends slightly over the edges for easy removal. Grease the wax paper and then lightly flour it, tapping out any excess. This ensures the cake releases cleanly.
-
Preheat the Oven: Place a rack in the center of your oven and preheat to 400°F (200°C). Make sure your oven is fully preheated before baking for even cooking.
-
Melt the Butter: Melt the 2 tablespoons of sweet butter in a microwave-safe bowl or a small saucepan over low heat. Set it aside to cool slightly. It should be liquid but not hot.
-
Combine Dry Ingredients (Part 1): In a medium bowl, whisk together the 2/3 cup all-purpose flour and 1/2 teaspoon baking powder. This ensures the baking powder is evenly distributed throughout the flour.
-
Combine Wet Ingredients (Part 1): In another bowl, stir together the egg yolks, 1 teaspoon vanilla, and the melted butter. Make sure the butter isn’t too hot, or it may cook the egg yolks.
-
Combine Wet and Dry Ingredients (Part 2): Mix half of the flour mixture into the egg yolk mixture. Stir until just combined. Don’t overmix at this stage.
-
Whip Egg Whites: In a large, clean bowl, beat the egg whites and 1/2 teaspoon salt with an electric mixer until soft peaks begin to form. The salt helps stabilize the egg whites.
-
Add Sugar to Egg Whites: Gradually beat in the 1/2 cup granulated sugar until stiff, glossy peaks form. The peaks should hold their shape but not be dry.
-
Incorporate Egg Whites into Yolk Mixture: Fold one large spoonful of the beaten egg white mixture into the yolk mixture to lighten it. Then, add the entire yolk mixture into the remaining egg white mixture and partially fold together. This initial step helps to incorporate the egg whites without deflating them too much.
-
Finish Combining Batter: Sift the remaining flour mixture over the top of the egg white mixture. Gently fold together until thoroughly mixed. Be careful not to overmix, as this can develop the gluten in the flour and result in a tough cake. The batter should be light and airy.
-
Bake the Cake: Quickly spread the batter evenly in the prepared sheet pan. Use an offset spatula or the back of a spoon to ensure the batter reaches all corners of the pan.
-
Bake: Bake for 8-10 minutes, or until the top springs back when touched lightly. The cake should be lightly golden brown. Keep a close eye on it, as it can burn easily.
-
Prepare the Towel: While the cake is baking, sift 2 tablespoons of powdered sugar onto a clean kitchen towel. This prevents the cake from sticking to the towel when rolled.
-
Invert and Remove Paper: As soon as the cake is done baking, invert it onto the prepared towel and gently remove the wax paper. Be careful, as the cake will be hot.
-
Trim Edges: Trim about 1/2 inch from all the edges of the cake. This makes it easier to roll and creates a neater-looking jelly roll.
-
Roll the Cake: Starting with one of the long edges, roll up the cake tightly in jelly-roll fashion, using the towel to help guide it.
-
Cool the Cake: Wrap the rolled cake in the towel and let it cool completely (about 1 hour). This helps the cake retain its shape.
-
Unroll and Fill: Gently unroll the cooled cake onto a clean board or sheet of parchment paper. Spread the raspberry jam (or your filling of choice) evenly over the surface of the cake, leaving a small border at the far edge to prevent the filling from squeezing out.
-
Reroll and Finish: Carefully reroll the cake, placing the seam down.
-
Dust and Rest: Sift the remaining 1 tablespoon of powdered sugar over the top of the jelly roll. Let it rest for an hour before slicing and serving. This allows the filling to set slightly and the cake to absorb the moisture.
Expert Tips & Tricks
- Don’t Overbake: Overbaking will result in a dry, brittle cake that cracks easily when rolled. Err on the side of underbaking rather than overbaking.
- Work Quickly: Once the batter is made, work quickly to spread it in the pan and get it into the oven. The longer the batter sits, the more the air will escape from the beaten egg whites, resulting in a denser cake.
- Warm Jam for Easy Spreading: If your jam is too thick to spread easily, warm it slightly in the microwave or in a saucepan over low heat.
- Add Flavor Extracts: Enhance the flavor of the cake by adding a few drops of lemon, almond, or orange extract to the batter.
Serving & Storage Suggestions
Serve the jelly roll chilled or at room temperature. Cut into 1-inch slices using a serrated knife for clean cuts. A dusting of extra powdered sugar or a dollop of whipped cream makes a lovely presentation.
- Room Temperature: Jelly rolls can be stored at room temperature for up to 2 days in an airtight container.
- Refrigerator: For longer storage, keep the jelly roll in the refrigerator for up to 5 days.
- Freezer: Jelly rolls can be frozen for up to 2 months. Wrap tightly in plastic wrap and then in aluminum foil. Thaw in the refrigerator overnight before serving.
Nutritional Information
(Estimated values, will vary based on specific ingredients)
| Nutrient | Amount per Serving | % Daily Value |
|---|---|---|
| Calories | 220 kcal | 11% |
| Total Fat | 7g | 11% |
| Saturated Fat | 4g | 20% |
| Cholesterol | 85mg | 28% |
| Sodium | 110mg | 5% |
| Total Carbohydrate | 35g | 12% |
| Dietary Fiber | 1g | 4% |
| Sugars | 22g | |
| Protein | 4g | 8% |
Variations & Substitutions
- Filling Variations: Experiment with different fillings such as lemon curd, Nutella, peanut butter, whipped cream, or other fruit jams and preserves.
- Chocolate Jelly Roll: Add 2 tablespoons of unsweetened cocoa powder to the flour mixture for a chocolate version.
- Gluten-Free: Substitute the all-purpose flour with a gluten-free all-purpose baking flour blend. Be sure to check the specific blend for any additional binding agents that might be required.
- Dairy-Free: Use a dairy-free butter substitute and ensure your chosen filling is also dairy-free.
FAQs (Frequently Asked Questions)
Q: Why is my jelly roll cracking when I roll it?
A: Overbaking is the most common reason for cracking. The cake becomes dry and brittle. Be sure to bake it for the recommended time and check for doneness by lightly touching the top.
Q: Can I use a different size pan?
A: While you can, the batter quantities are designed for an 11×17 inch pan. Using a smaller pan will result in a thicker cake that may be difficult to roll.
Q: My egg whites aren’t forming stiff peaks. What am I doing wrong?
A: Make sure your bowl and beaters are clean and grease-free. Even a tiny bit of fat can prevent the egg whites from whipping properly. Also, avoid getting any egg yolk into the egg whites.
Q: Can I make this ahead of time?
A: Yes! The jelly roll can be made a day or two in advance. Store it in the refrigerator, tightly wrapped, until ready to serve.
Q: How do I prevent the filling from squeezing out when I roll the cake?
A: Don’t overfill the cake with jam or filling. Leaving a small border around the edges will help prevent it from squeezing out.
Final Thoughts
This jelly roll recipe is more than just a dessert; it’s an invitation to create memories. Picture sharing this beautiful swirl of cake and jam with your loved ones, the same way my grandmother did, creating a tradition of warmth and sweetness. Don’t be intimidated by the steps; embrace the process, have fun experimenting with different fillings, and most importantly, enjoy every delicious bite! Share your creations and experiences – I can’t wait to hear how it turns out for you!