
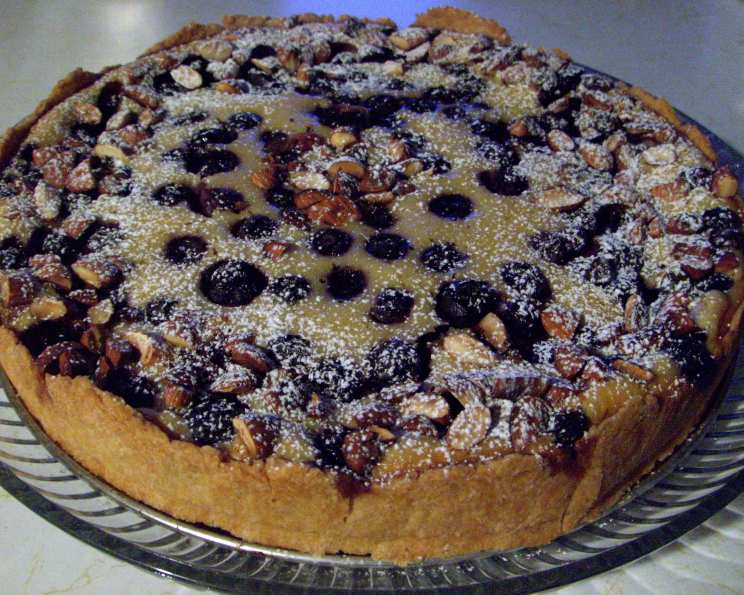
Julia Child’s Baked Yogurt Tart: A Taste of Simplicity
I remember the first time I made this tart. It was a sweltering summer afternoon, the kind where even the air felt heavy and still. The nectarines from the farmer’s market were almost too ripe, their juice threatening to run down my chin with every bite. Seeking refuge in my slightly-less-sweltering kitchen, I decided to tackle Julia Child’s Baked Yogurt Tart. The cool, tangy yogurt filling, studded with those sun-kissed nectarines, was exactly what I needed – a slice of simple, elegant bliss that perfectly captured the essence of summer. The scent of the baking crust, mingling with the vanilla and fruit, filled the house with a comforting aroma that instantly calmed my spirit.
Recipe Overview
- Prep Time: 30 minutes
- Cook Time: 55-65 minutes
- Total Time: 2 hours (including cooling)
- Servings: 8
- Yield: 1 tart
- Dietary Type: Vegetarian
Ingredients
- Pie dough, well chilled (or pastry, enough to line a 9″ round cake pan or 9″ round springform pan, at least 1 1/2″ deep)
- 3 large eggs
- ¾ cup sugar
- 2 cups plain nonfat yogurt
- 2 tablespoons pure vanilla extract
- ¾ cup all-purpose flour
- 1 ½ cups nectarines or 1 ½ cups stone fruit, sliced
- ⅓ cup coarsely chopped toasted almonds
- Confectioners’ sugar, for dusting
Equipment Needed
- 9-inch round cake pan or springform pan (at least 1 1/2″ deep)
- Rolling pin
- Parchment paper or aluminum foil
- Dried beans, rice, or pie weights
- Mixing bowls
- Electric mixer or whisk
- Sifter
- Jelly roll pan
- Cooling rack
Instructions
-
On a lightly floured surface, roll out the chilled pie dough into a 12-inch circle, about 1/8 to 1/4 inch thick. Take your time here and work with cold dough to prevent sticking.
-
Carefully fit the dough into the pan, gently pressing it against the bottom and up the sides. Make sure there are no air pockets.
-
Trim the edges to about 1/2 inch beyond the rim of the pan, and then crimp the edges decoratively. This will give your tart a polished look.
-
Chill the prepared crust in the refrigerator for about 30 minutes. This helps prevent shrinking during baking.
-
Preheat your oven to 400°F (200°C).
-
Line the bottom of the chilled crust with a round of parchment paper or aluminum foil. Fill the liner with dried beans, rice, or pie weights. This is known as “blind baking” and it prevents the crust from puffing up during the initial baking.
-
Bake the crust for 20-25 minutes in the preheated oven, or until it is set and lightly browned. The edges should be a nice golden color.
-
Remove the weights and liner from the crust.
-
Cool the crust to room temperature on a wire rack. This is essential before adding the filling.
-
Reduce the oven temperature to 325°F (160°C).
-
In a mixing bowl, beat the eggs and sugar together using an electric mixer or whisk until they thicken slightly and turn pale, about 2-3 minutes. This step incorporates air and creates a light, airy filling.
-
Fold in the yogurt and vanilla extract, mixing just until blended. Be careful not to overmix, as this can make the filling tough.
-
Gradually add the flour through a sifter, folding it in gently until just combined. Sifting the flour prevents lumps and ensures a smooth filling.
-
Pour the yogurt filling into the cooled tart shell, smoothing the top. Don’t worry if the filling only comes about 2/3 of the way to the top – the fruit will take care of that.
-
Scatter the sliced nectarines (or other stone fruit) evenly over the top of the tart. As the tart bakes, the fruit will sink slightly into the filling.
-
Sprinkle the coarsely chopped toasted almonds around the edge of the tart. The almonds add a lovely crunch and nutty flavor.
-
Place the tart on a jelly roll pan to catch any potential drips during baking.
-
Bake for 35-40 minutes, or until the top is golden and the filling is set. A slight jiggle in the center is okay, as it will continue to set as it cools.
-
Transfer the tart to a wire rack and cool to room temperature.
-
Unmold the tart from the pan.
-
Serve the tart at room temperature, or chilled if desired.
-
Dust the top of the tart with confectioners’ sugar just before serving.
-
Serve the same day as baked.
-
Cover and refrigerate any leftovers.
Expert Tips & Tricks
- For a richer flavor, use full-fat yogurt instead of nonfat.
- If you don’t have toasted almonds, you can substitute with other nuts like pecans or walnuts.
- To prevent the crust from browning too quickly, you can cover the edges with aluminum foil during the last 15 minutes of baking.
- For a more intense vanilla flavor, use vanilla bean paste instead of vanilla extract.
- If your oven tends to bake unevenly, rotate the tart halfway through baking.
- Make sure your yogurt isn’t too watery. If it is, you can strain it through cheesecloth for a few hours to remove excess liquid. This will result in a thicker, creamier filling.
Serving & Storage Suggestions
Serve this beautiful tart as a delightful dessert for any occasion. It pairs perfectly with a scoop of vanilla ice cream or a dollop of whipped cream. Store leftover tart in the refrigerator, covered, for up to 3 days. It’s best enjoyed cold, as the filling firms up nicely. While freezing is not recommended due to the yogurt’s texture potentially changing, the tart will maintain its best quality if consumed within a few days of baking.
Nutritional Information
| Nutrient | Amount per Serving | % Daily Value |
|---|---|---|
| Calories | 295 kcal | 15% |
| Total Fat | 9g | 12% |
| Saturated Fat | 3g | 15% |
| Cholesterol | 85mg | 28% |
| Sodium | 95mg | 4% |
| Total Carbohydrate | 45g | 17% |
| Dietary Fiber | 2g | 7% |
| Sugars | 28g | – |
| Protein | 8g | 16% |
Note: Nutritional information is an estimate and may vary based on specific ingredients and portion sizes.
Variations & Substitutions
- Gluten-Free: Use a gluten-free pie crust and substitute the all-purpose flour with a gluten-free all-purpose flour blend.
- Dairy-Free: Substitute the yogurt with a plant-based yogurt alternative, such as coconut yogurt or almond yogurt.
- Seasonal Fruit: Adapt the recipe to the season by using different fruits like berries, apples, or pears.
- Citrus Zest: Add a teaspoon of lemon or orange zest to the filling for a brighter flavor.
- Spiced Yogurt: Incorporate a pinch of cinnamon, nutmeg, or cardamom into the yogurt filling for a warm, spiced twist.
FAQs (Frequently Asked Questions)
Q: Can I use a store-bought pie crust?
A: Yes, you can definitely use a store-bought pie crust to save time. Just make sure it’s a good quality crust that won’t crack or shrink during baking.
Q: What if I don’t have pie weights?
A: If you don’t have pie weights, you can use dried beans or rice as a substitute. Just make sure to fill the crust evenly to prevent it from puffing up.
Q: Can I make this tart ahead of time?
A: Yes, you can bake the tart a day ahead of time and store it in the refrigerator. However, it’s best to add the confectioners’ sugar just before serving.
Q: My yogurt filling seems a bit runny. Is that normal?
A: A slight jiggle in the center of the filling is normal when you take the tart out of the oven. The filling will continue to set as it cools. If your filling is very runny, it could be due to overmixing or using a yogurt with a high water content.
Q: Can I freeze this tart?
A: Freezing this tart is not recommended, as the yogurt filling may change texture upon thawing. It is best enjoyed fresh or within a few days of baking.
Final Thoughts
This Baked Yogurt Tart is more than just a recipe; it’s an invitation to slow down, embrace simplicity, and create something truly delicious with just a few humble ingredients. Don’t be afraid to experiment with different fruits and flavors to make it your own. Whether you’re a seasoned baker or a kitchen novice, this tart is sure to impress. So, gather your ingredients, preheat your oven, and get ready to experience the joy of baking a truly special dessert. Share your creations and let me know how it turned out! Consider pairing it with a light, crisp white wine for a truly memorable experience.