
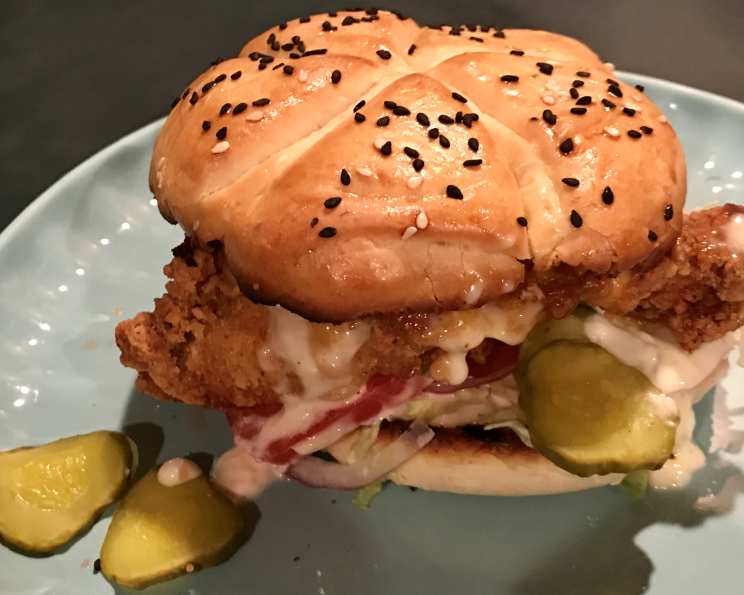
Kaiser Rolls: A Taste of Nostalgia
The scent of baking bread has always been a powerful time machine for me. One whiff, and I’m transported back to my grandmother’s kitchen, a warm and bustling space filled with the murmur of conversation and the comforting aroma of yeast. She wasn’t much for fancy pastries, but her Kaiser rolls were legendary. Each perfectly formed star was a testament to her patience and love, and slathered with butter and a touch of apricot jam, they were a childhood staple. Recreating these rolls brings back those cherished memories, and I’m excited to share this recipe so you can create your own traditions.
Recipe Overview
- Prep Time: 2 hours (includes rising time)
- Cook Time: 15-17 minutes
- Total Time: 2 hours 15-17 minutes
- Servings: 6
- Yield: 6 large rolls
- Dietary Type: Vegetarian
Ingredients
- 3 cups unbleached all-purpose flour
- 1 1/2 teaspoons instant yeast
- 1 1/2 teaspoons sugar
- 1 1/4 teaspoons salt
- 1 large egg
- 2 tablespoons unsalted butter, softened
- 3/4 cup water, lukewarm
- Milk (for brushing, optional)
- Poppy seeds or sesame seeds (for topping, optional)
Equipment Needed
- Large mixing bowl or stand mixer
- Measuring cups and spoons
- Greased bowl or dough-rising bucket
- Baking sheet
- Parchment paper (optional)
- Kaiser roll stamp (optional)
- Wire rack
Instructions
-
In a large bowl, or the bowl of your electric mixer, combine all of the ingredients: flour, yeast, sugar, salt, egg, softened butter, and lukewarm water. Stir until the dough forms a cohesive mass and begins to clear the sides of the bowl.
-
Knead the dough for 5 minutes, then allow it to rest for 10 minutes. This rest period is crucial, as it gives the dough a chance to absorb the liquid fully and allows the gluten in the flour to relax, resulting in a more tender crumb.
-
Knead the dough for an additional 5 minutes, or until it’s smooth and supple. The finished dough should be quite stiff, but not at all “gnarly” or tough. Adjust its consistency with additional flour or water, as needed, adding one tablespoon at a time.
-
Transfer the dough to a lightly greased bowl or dough-rising bucket, cover the bowl or bucket with plastic wrap or a damp towel, and allow the dough to rise until it’s noticeably puffy, about 1 hour. The rising time may vary depending on the temperature of your kitchen.
-
Alternatively, if you have a bread machine, you can use it for the kneading and first rise. Place all of the ingredients into the pan of your machine, program the machine for the manual or dough setting, and press start.
-
About 10 minutes before the end of the final kneading cycle (if using a bread machine), examine the dough’s consistency; it should be quite stiff, but not at all “gnarly;” adjust its consistency with additional flour or water, as necessary, adding one tablespoon at a time.
-
Allow the machine to complete its cycle (if using a bread machine).
-
Transfer the dough to a lightly greased work surface, and divide it into six equal pieces. A kitchen scale can be helpful to ensure consistent size.
-
Shape the pieces into round balls, and place them on a lightly greased or parchment-lined baking sheet.
-
Working with one ball of dough at a time, center your Kaiser stamp (if using) over the dough.
-
Press down firmly, cutting to the bottom but not all the way through the dough. This is an important step that requires a bit of practice. If you don’t cut deeply enough, the signature Kaiser shape will disappear as the roll bakes. However, if you cut too deeply (all the way through), the roll will form “petals” as it rises and look more like a daisy than a Kaiser roll.
-
Repeat with the remaining rolls.
-
Place the rolls cut-side down (yes, cut-side down – this helps them retain their shape!) onto a lightly greased or parchment-lined baking sheet.
-
Cover the rolls with plastic wrap or a damp towel, and allow them to rise for 45 minutes to 1 hour, or until they’ve almost doubled in volume.
-
Preheat your oven to 425°F (220°C).
-
Turn the rolls cut-side up.
-
Brush the tops of the rolls with milk and coat with poppy seeds or sesame seeds, if desired. This adds a lovely visual appeal and a subtle nutty flavor.
-
Bake the rolls in the preheated oven for 15 to 17 minutes, or until they’re golden brown. Rotate the baking sheet halfway through baking to ensure even browning.
-
Remove the rolls from the oven and cool them on a wire rack.
Expert Tips & Tricks
- Use a kitchen scale: For consistent results, especially when dividing the dough, a kitchen scale is your best friend.
- Control the dough temperature: Dough that’s too warm will rise too quickly and may result in a flat, dense roll. Conversely, dough that’s too cold will rise very slowly. Aim for a dough temperature between 75-78°F (24-26°C) after kneading.
- Don’t over-proof: Over-proofed dough will deflate in the oven, resulting in a flat, dense roll. Watch the dough carefully during the second rise, and bake when it’s almost doubled in size.
- Create steam in the oven: For a crispier crust, create steam in the oven by placing a pan of hot water on the bottom rack during baking.
- Kaiser Stamp Alternative: If you don’t have a kaiser roll stamp, you can use a sharp knife or lame to score the rolls in a star pattern.
Serving & Storage Suggestions
Kaiser rolls are incredibly versatile. They are fantastic for sandwiches, burgers, or served simply with butter and jam. For a truly decadent treat, try them warm with a smear of Nutella!
Store cooled Kaiser rolls at room temperature in an airtight container for up to 2 days. For longer storage, freeze them in a freezer-safe bag for up to 2 months. To reheat, thaw the rolls at room temperature and then warm them in a 350°F (175°C) oven for 5-10 minutes, or until heated through. You can also split them and toast them for a crispy texture.
Nutritional Information
| Nutrient | Amount per Serving | % Daily Value |
|---|---|---|
| Calories | 280.7 kcal | N/A |
| Total Fat | 5.3 g | 8% |
| Saturated Fat | 2.8 g | 13% |
| Cholesterol | 41.2 mg | 13% |
| Sodium | 499.5 mg | 20% |
| Total Carbohydrate | 49.2 g | 16% |
| Dietary Fiber | 2 g | 7% |
| Sugars | 1.2 g | N/A |
| Protein | 8 g | 15% |
Note: Nutritional information is an estimate and may vary based on specific ingredients and preparation methods.
Variations & Substitutions
- Whole Wheat Kaiser Rolls: Substitute up to half of the all-purpose flour with whole wheat flour for a nuttier flavor and added fiber.
- Sourdough Kaiser Rolls: Incorporate some sourdough starter into the dough for a tangier flavor. You’ll need to adjust the rising time accordingly.
- Garlic Herb Kaiser Rolls: Add minced garlic and your favorite dried herbs (such as rosemary, thyme, or oregano) to the dough for a savory twist.
- Sweet Kaiser Rolls: Add a bit more sugar and a touch of vanilla extract to the dough for a slightly sweet roll that’s perfect with fruit preserves.
- Gluten-Free Kaiser Rolls: While this recipe uses all-purpose flour, you can try using a gluten-free all-purpose blend, but be aware that you may need to adjust the liquid content.
FAQs (Frequently Asked Questions)
Q: Why are my Kaiser rolls flat and dense?
A: This could be due to several factors, including using old yeast, over-proofing the dough, or not kneading the dough enough. Make sure your yeast is fresh, avoid over-proofing by monitoring the dough’s rise carefully, and knead the dough until it’s smooth and supple.
Q: Can I make the dough ahead of time?
A: Yes! You can prepare the dough through the first rise, then refrigerate it overnight. In the morning, let the dough come to room temperature for about 30 minutes before shaping and continuing with the recipe.
Q: Can I freeze the baked Kaiser rolls?
A: Absolutely! Wrap the cooled rolls individually in plastic wrap and then place them in a freezer-safe bag. They can be frozen for up to 2 months.
Q: What if I don’t have a Kaiser roll stamp?
A: No problem! You can use a sharp knife or lame to score the rolls in a star pattern. Just be sure to make the cuts deep enough to create the characteristic Kaiser shape.
Q: Why are my rolls browning too quickly?
A: If your rolls are browning too quickly, lower the oven temperature by 25°F (15°C) and cover the rolls loosely with foil during the last few minutes of baking.
Final Thoughts
Homemade Kaiser rolls are a rewarding baking project that will fill your kitchen with the irresistible aroma of freshly baked bread. While they require a bit of patience, the results are well worth the effort. So, gather your ingredients, embrace the process, and enjoy the satisfaction of creating these delicious rolls from scratch. I encourage you to experiment with different variations and toppings to make them your own. Share your creations with friends and family, and don’t forget to let me know how they turn out! These are perfect paired with some deli-sliced turkey or ham and your favorite toppings!