
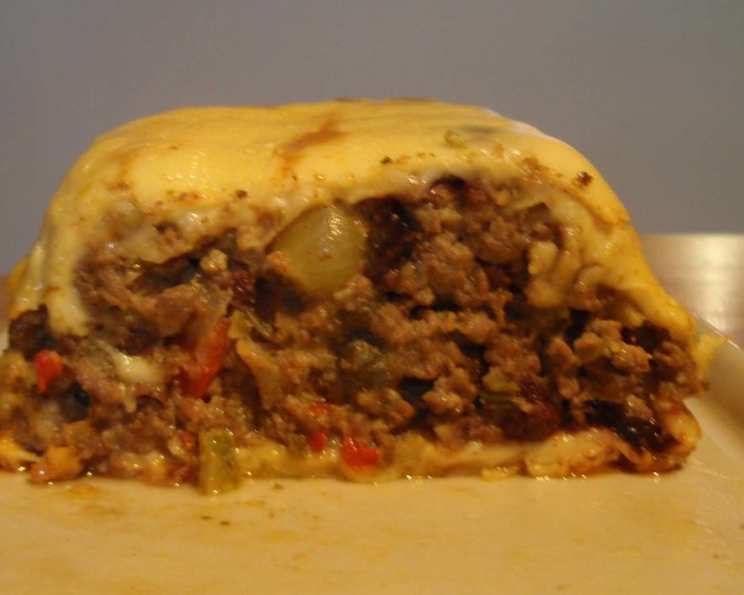
Keshi Yena: A Culinary Journey to Curaçao
The first time I tasted Keshi Yena, I was instantly transported. It wasn’t just the savory aroma or the perfectly melted cheese; it was the feeling of warmth and connection to a vibrant culture. I remember sitting on a sun-drenched patio in Curaçao, the gentle breeze carrying the sound of music and laughter, as I savored each bite of this unique stuffed cheese. The combination of flavors and textures – the creamy Edam, the seasoned meat, the subtle sweetness of raisins – created a culinary experience that I’ll never forget. It’s a dish that truly embodies the spirit of the island.
Recipe Overview
- Prep Time: 45 minutes
- Cook Time: 1 hour 30 minutes
- Total Time: 2 hours 15 minutes
- Servings: 10-12
- Yield: 1 ball
- Dietary Type: Not specified
Ingredients
- 2 lbs Edam cheese, in ball
- 2 lbs Ground beef
- 1 tablespoon Parsley
- 1 tablespoon Capers (optional)
- 3 Tomatoes, peeled and chopped
- 1/4 Hot pepper, minced
- 1 Green pepper, chopped
- 2 medium Onions, chopped
- 1 clove Garlic, minced
- 1 tablespoon Tomato paste
- 2 tablespoons Ketchup
- 1 tablespoon Piccalilli relish
- 2 teaspoons Worcestershire sauce
- 2 tablespoons Butter
- 5 Eggs
- 1/4 cup Raisins or 1/4 cup pitted prunes
- 1/4 cup Olives, sliced
- Salt to taste
- Pepper to taste
- Tabasco sauce to taste
- Margarine or Oil for greasing
Equipment Needed
- Sharp knife
- Large skillet
- Mixing bowl
- Casserole dish or double boiler
- Double boiler (if using double boiler method)
Instructions
- Begin by preparing the Edam cheese. Carefully cut a small horizontal circle, creating a “lid” on the upper part of the cheese ball. This will allow you to access the inside.
- Using a spoon or small knife, carefully scoop out the inside of the cheese, leaving a shell approximately 1/4 to 1/2 inch thick. Be careful not to puncture the shell; this is crucial for holding the filling.
- Now, prepare the filling. In a large skillet over medium heat, sauté the chopped onions and green pepper in butter until they are softened and translucent. Add the minced garlic and cook for another minute until fragrant.
- Add the ground beef to the skillet and cook, breaking it up with a spoon, until it is browned. Drain any excess fat.
- Add the peeled and chopped tomatoes, minced hot pepper, tomato paste, ketchup, piccalilli relish, Worcestershire sauce, parsley, and capers (if using) to the skillet. Season with salt and pepper to taste, and add a dash of Tabasco sauce for a touch of heat, if desired.
- Simmer the mixture for approximately 20 minutes, or until the tomatoes have reduced and the sauce has thickened slightly. Stir occasionally to prevent sticking.
- Remove the skillet from the heat and allow the mixture to cool slightly. This is important to prevent the eggs from scrambling when you add them.
- While the mixture is cooling, beat four of the eggs in a separate mixing bowl.
- Once the meat mixture has cooled slightly, blend the beaten eggs into the mixture. Stir well to combine all ingredients evenly.
- Generously grease a casserole dish or the top of a double boiler with margarine or oil. This will prevent the cheese from sticking.
- Place the cheese shell upright in the greased dish. Make sure it is stable and won’t tip over during baking.
- Carefully fill the cheese shell with the vegetable/beef mixture. Pack it in firmly, making sure to fill all the way to the top.
- Cover the filled cheese shell with the “lid” (the cheese circle) that you cut off earlier. This will help to seal in the filling and keep the cheese moist during baking.
- Beat the remaining egg and spread the beaten egg on top of the cheese as a sealer. This will give the cheese a golden-brown color and help to hold the lid in place.
- Bake the Keshi Yena.
- Oven Method: Set the casserole in a pan of hot water (a water bath) and bake in a preheated oven at 350°F (175°C) for 1 1/2 hours. The water bath helps to keep the cheese moist and prevent it from drying out.
- Double Boiler Method: Place the double boiler over simmering water and cook, covered, for the same amount of time (1 1/2 hours), replenishing the water as necessary.
- Check for doneness. The Keshi Yena is done when the filling is heated through and the cheese is melted and slightly browned.
Variation: For individual servings, slice the cheese about 1/4 inch thick. Line a deep buttered dish or individual custard cups with cheese slices, overlapping the edges. Place the filling inside, cover with cheese, and brush with beaten egg to seal. Place in a pan of hot water and bake as directed above.
Expert Tips & Tricks
- Cheese Selection: While Edam is traditional, you can experiment with other semi-hard cheeses like Gouda. Just ensure they have a good melting quality.
- Spice Level: Adjust the amount of hot pepper to your preference. For a milder dish, remove the seeds from the pepper before mincing.
- Make-Ahead: The filling can be prepared a day in advance and stored in the refrigerator. This will save time on the day you plan to bake the Keshi Yena.
- Preventing Cracks: Baking in a water bath is key to preventing the cheese from cracking and drying out.
- Even Cooking: If using the oven method, rotate the casserole dish halfway through baking to ensure even browning.
- Substitutions: Ground turkey or chicken can be substituted for ground beef.
Serving & Storage Suggestions
Keshi Yena is best served warm, straight from the oven. It can be served as a main course or as a flavorful side dish. Garnish with fresh parsley or a sprinkle of paprika for a pop of color.
Storage: Leftover Keshi Yena should be stored in an airtight container in the refrigerator. It will last for up to 3-4 days.
Reheating: To reheat, you can gently warm it in the oven at a low temperature (around 250°F or 120°C) until heated through. You can also microwave it in short intervals, but be careful not to overheat it, as the cheese can become rubbery.
Keshi Yena is not ideal for freezing, as the texture of the cheese can change upon thawing.
Nutritional Information
| Nutrient | Amount per Serving | % Daily Value |
|---|---|---|
| Calories | 410.4 kcal | N/A |
| Calories from Fat | 274 g | 67% |
| Total Fat | 30.4 g | 46% |
| Saturated Fat | 18.3 g | 91% |
| Cholesterol | 180 mg | 59% |
| Sodium | 1030.3 mg | 42% |
| Total Carbohydrate | 7.8 g | 2% |
| Dietary Fiber | 1.2 g | 5% |
| Sugars | 5.1 g | 20% |
| Protein | 26.8 g | 53% |
Note: Nutritional information is an estimate and may vary based on specific ingredients and cooking methods.
Variations & Substitutions
- Vegetarian Keshi Yena: Substitute the ground beef with a mix of vegetables like mushrooms, zucchini, and eggplant. You can also add lentils or beans for protein.
- Spicy Keshi Yena: Add more minced hot pepper or a pinch of cayenne pepper to the filling for an extra kick.
- Seafood Keshi Yena: Replace the ground beef with cooked shrimp or crabmeat for a unique twist.
- Gluten-Free Keshi Yena: Ensure the Worcestershire sauce and piccalilli relish are gluten-free.
FAQs (Frequently Asked Questions)
Q: Can I use pre-shredded cheese for the shell?
A: No, pre-shredded cheese won’t work as it won’t form a solid shell. You need the Edam cheese in ball form to create the characteristic shell.
Q: How do I prevent the cheese shell from cracking during baking?
A: Baking the Keshi Yena in a water bath is crucial. The steam from the water bath helps to keep the cheese moist and prevent it from drying out and cracking.
Q: Can I make Keshi Yena ahead of time?
A: Yes, you can prepare the filling a day in advance and store it in the refrigerator. However, it’s best to assemble and bake the Keshi Yena on the day you plan to serve it.
Q: What if I can’t find piccalilli relish?
A: You can substitute it with a mix of finely chopped pickled vegetables, such as gherkins, cauliflower, and onions, in a vinegar-based sauce.
Q: Is Keshi Yena spicy?
A: Keshi Yena has a mild spice level, but you can adjust it to your preference by adding more or less minced hot pepper.
Final Thoughts
Keshi Yena is more than just a recipe; it’s a celebration of Caribbean flavors and traditions. It’s a dish that’s perfect for sharing with family and friends, and it’s sure to impress even the most discerning palates. So, gather your ingredients, embrace the process, and prepare to embark on a culinary journey to Curaçao. Don’t be afraid to experiment with variations and make it your own. I encourage you to try this recipe and share your feedback. Perhaps pair it with a crisp white wine or a refreshing tropical cocktail for the ultimate Caribbean experience. Bon appétit!