
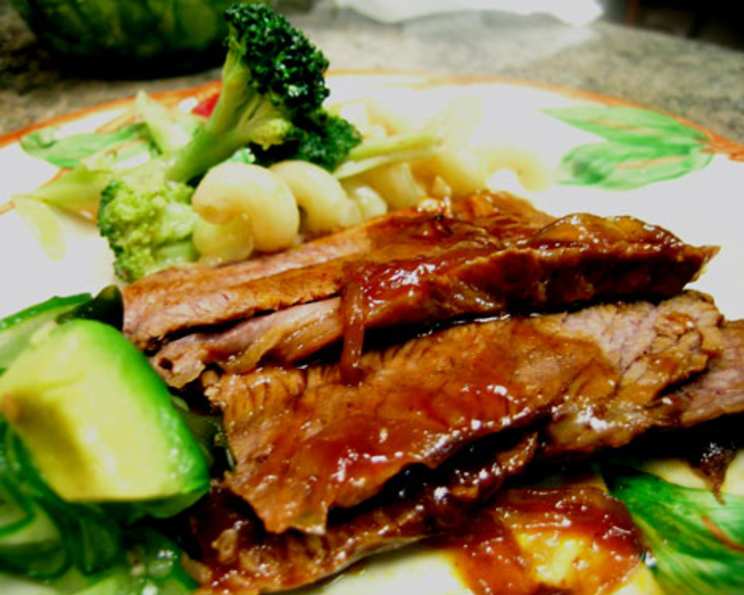
Kickback Brisket: A Simple Path to Tender Perfection
I remember the first time I made brisket. It was for a family reunion, and I was determined to impress everyone with my culinary prowess. I labored for hours, meticulously following a complicated recipe with dozens of obscure ingredients. The result? A tough, dry slab of meat that was politely nibbled at and mostly left untouched. From that day on, I vowed to find a simpler, foolproof method for achieving brisket nirvana. This recipe for Kickback Brisket is exactly that – easy, flavorful, and consistently tender, even for a beginner.
Recipe Overview
- Prep Time: 15 minutes
- Cook Time: 3 hours
- Total Time: 3 hours 15 minutes
- Servings: 6
- Dietary Type: Varies (see notes)
Ingredients
- 1 yellow onion, thinly sliced
- 1-2 garlic cloves, minced
- 2 teaspoons olive oil
- 1 (1 1/4 ounce) envelope Lipton onion mushroom dry soup mix
- 1 cup beer
- 1/2 cup ketchup
- 1 teaspoon sugar (optional, adjust to taste)
- 1/4 teaspoon ground black pepper
- 1 teaspoon liquid smoke flavoring
- 1 tablespoon Worcestershire sauce
- 3-4 lbs boneless beef brisket
Equipment Needed
- Large frying pan
- 13 x 9-inch baking or roasting pan
- Aluminum foil
Instructions
-
Preheat your oven to 325 degrees Fahrenheit (160 degrees Celsius). This low and slow cooking is essential for breaking down the tough fibers in the brisket and achieving that melt-in-your-mouth texture.
-
In a large frying pan, heat the olive oil over medium heat. Add the thinly sliced yellow onion and minced garlic cloves. Sauté until the onions are nicely browned and softened, about 8-10 minutes. This step develops a deep, sweet flavor that will infuse the entire brisket. Remove the onion and garlic mixture from the pan and set aside.
-
In the 13 x 9-inch baking or roasting pan, create the flavorful braising liquid. Start by adding the Lipton Onion Mushroom Soup Mix. Gradually whisk in the beer until the soup mix is well blended and there are no lumps. The beer adds a depth of flavor and helps to tenderize the meat.
-
Next, incorporate the remaining wet ingredients: ketchup, liquid smoke flavoring, and Worcestershire sauce. The ketchup provides sweetness and tang, the liquid smoke adds that characteristic smoky flavor (essential if you don’t have a smoker), and the Worcestershire sauce contributes umami and depth.
-
Now, add back the sautéed onion and garlic mixture to the baking pan, distributing it evenly in the liquid.
-
If desired, stir in the sugar and black pepper. The amount of sugar is optional and depends on your preference for sweetness. Some people like a more savory brisket, while others prefer a touch of sweetness to balance the flavors. Adjust the amount of sugar to your taste.
-
Place the boneless beef brisket in the baking pan and turn it to coat it thoroughly with the braising liquid. Make sure all sides of the brisket are submerged in the mixture. This will ensure even flavoring and moisture retention during cooking.
-
Loosely cover the baking pan with aluminum foil. This helps to trap the moisture and create a steamy environment, further tenderizing the brisket. Be careful not to seal the foil too tightly, as you want some steam to escape.
-
Bake in the preheated oven for 3 hours, or until the brisket is very tender. The brisket is done when it can be easily pierced with a fork or when a meat thermometer inserted into the thickest part registers an internal temperature of around 203 degrees Fahrenheit (95 degrees Celsius). Keep in mind that cooking times may vary depending on the thickness of the brisket and the accuracy of your oven. Check the brisket periodically during cooking and add more beer or water if the liquid evaporates too quickly.
-
Once the brisket is cooked, remove it from the oven and let it rest for at least 15-20 minutes before slicing. This allows the juices to redistribute throughout the meat, resulting in a more tender and flavorful brisket.
Expert Tips & Tricks
- For a deeper smoky flavor: Consider using smoked paprika in addition to (or instead of) the liquid smoke.
- Make-ahead tip: The brisket can be prepared up to 2 days in advance. After baking, let it cool completely in the braising liquid, then refrigerate. Skim off any solidified fat before reheating.
- If the sauce is too thin: After removing the brisket from the pan, you can thicken the sauce by simmering it on the stovetop over medium heat until it reaches your desired consistency.
- Brisket too dry? Basting the brisket with the pan juices every hour during cooking helps prevent it from drying out. If you still find it dry, add a little extra beer or water to the pan.
Serving & Storage Suggestions
Serve the Kickback Brisket sliced against the grain, spooning the flavorful braising liquid over the top. This brisket is delicious served with mashed potatoes, roasted vegetables, or a simple side salad.
Storage:
- Room Temperature: Do not leave cooked brisket at room temperature for more than 2 hours.
- Refrigerator: Store leftover brisket in an airtight container in the refrigerator for up to 3-4 days.
- Freezer: For longer storage, freeze the brisket in an airtight container or freezer bag for up to 2-3 months.
Reheating:
Reheat the brisket in the oven at 325°F (160°C) until heated through, or microwave in intervals. For best results, add a little of the braising liquid to keep the brisket moist.
Nutritional Information
Note: Nutritional information is an estimate and can vary based on specific ingredients and portion sizes.
| Nutrient | Amount per Serving | % Daily Value |
|---|---|---|
| Calories | 650 kcal | 33% |
| Total Fat | 45g | 69% |
| Saturated Fat | 18g | 90% |
| Cholesterol | 140mg | 47% |
| Sodium | 350mg | 15% |
| Total Carbohydrate | 7g | 2% |
| Dietary Fiber | 1g | 4% |
| Sugars | 4g | 8% |
| Protein | 40g | 80% |
Variations & Substitutions
- Dietary Adaptation: To make the recipe Gluten-Free, ensure the Worcestershire sauce and the Lipton Onion Mushroom Soup Mix are gluten-free. Some beer also contains gluten.
- Spice it up: Add a pinch of cayenne pepper or a dash of hot sauce to the braising liquid for a spicier kick.
- Sweeten it up: Use brown sugar or maple syrup instead of white sugar for a different sweetness profile.
- Different liquid: Substitute beef broth or red wine for the beer for a different flavor.
FAQs (Frequently Asked Questions)
Q: Can I use a different cut of beef?
A: While brisket is the best choice for this recipe due to its high fat content and connective tissue, you could potentially use a chuck roast as a substitute. Be aware that the cooking time may need to be adjusted.
Q: Do I have to use Lipton Onion Mushroom Soup Mix?
A: While it’s a key ingredient in this recipe, you can try substituting it with a homemade onion soup mix using dried onions, mushroom powder, and beef bouillon. The flavor will be slightly different, but still delicious.
Q: Can I cook this in a slow cooker?
A: Yes, you can adapt this recipe for a slow cooker. Sauté the onions and garlic as directed, then combine all the ingredients in the slow cooker. Cook on low for 8-10 hours, or on high for 4-6 hours, until the brisket is very tender.
Q: How do I slice the brisket properly?
A: Always slice the brisket against the grain. Look for the direction of the muscle fibers and cut perpendicular to them. This will shorten the fibers and make the brisket more tender.
Q: What’s the best way to reheat brisket without drying it out?
A: The best way to reheat brisket is in the oven with some of the braising liquid. Cover the brisket with foil and bake at 325°F (160°C) until heated through. You can also reheat it in a microwave, but be sure to add a little liquid to prevent it from drying out.
Final Thoughts
This Kickback Brisket recipe is a testament to the fact that delicious food doesn’t have to be complicated. It’s a simple, straightforward method that yields a consistently tender and flavorful brisket every time. So, gather your ingredients, preheat your oven, and get ready to enjoy a truly satisfying meal. And don’t forget to share your brisket creations with friends and family – they’ll thank you for it!