
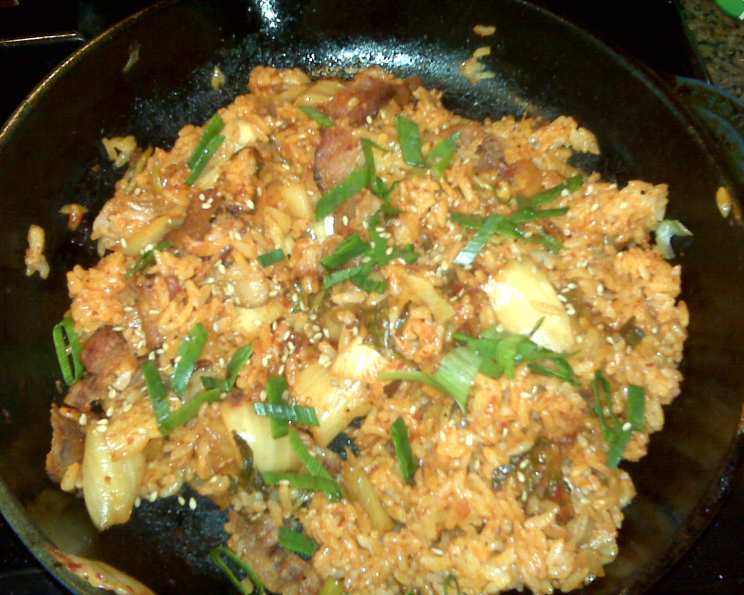
Kimchi Fried Rice: A Fiery & Flavorful Feast
I can still picture my auntie, a whirlwind of energy in the kitchen, expertly tossing ingredients in a well-worn wok. The aroma of sizzling kimchi and bacon would fill the air, a symphony of savory and spicy notes that promised a comforting, deeply satisfying meal. This wasn’t just food; it was a love language, a way for her to connect with us, her American nieces and nephews, through the vibrant flavors of her Korean heritage. Years later, this Kimchi Fried Rice recipe remains a cherished reminder of her warmth and culinary prowess.
Recipe Overview
- Prep Time: 10 minutes
- Cook Time: 25 minutes
- Total Time: 35 minutes
- Servings: 4
- Dietary Type: Can be Gluten-Free
Ingredients
- 1 cup rice
- ½ lb bacon, chopped
- 1 tablespoon oil (Vegetable or olive or peanut)
- 1 cup kimchi, chopped
- 1 teaspoon sesame oil
- 1 tablespoon Korean red pepper paste (Kochujang)
- 1 tablespoon Dashida (Korean beef flavored roasted salt)
- 1 tablespoon toasted sesame seeds
- 2 scallions, chopped for garnish
Equipment Needed
- Large pot with lid
- Frying pan
- Wok (recommended for best results, but a large skillet will also work)
- Cutting board
- Knife
Instructions
-
Begin by cooking the rice. In a large pot, combine the rice with 2 cups of water over high heat. Bring the mixture to a boil. Once boiling, immediately reduce the heat to low, cover the pot tightly, and allow the rice to steam undisturbed for 20 minutes. Avoid lifting the lid during this time, as it will release steam and affect the final texture of the rice. After 20 minutes, remove the pot from the heat and let it stand, covered, for another 10 minutes. Fluff the rice gently with a fork before using. If using leftover cooked rice, proceed to the next step.
-
Prepare the bacon. In a frying pan over medium heat, cook the chopped bacon until it is nice and crispy. This will take approximately 5-7 minutes. Remove the bacon from the pan with a slotted spoon and place it on a paper towel-lined plate to drain off any excess grease. Once cooled slightly, chop the crispy bacon into small pieces and set aside.
-
Sauté the kimchi. Heat 1 tablespoon of oil (vegetable, olive, or peanut oil) in a wok or large skillet over medium-high heat. Add the chopped kimchi to the wok and sauté it for 3-5 minutes, stirring frequently. The kimchi should become slightly translucent and release its characteristic pungent aroma. This step is crucial for developing the deep, fermented flavor that is the heart of this dish.
-
Combine and season. Add the cooked rice to the wok with the sautéed kimchi. Drizzle 1 teaspoon of sesame oil over the rice and kimchi. Add 1 tablespoon of Kochujang (Korean red pepper paste) – or more, depending on your preference for heat – and 1 tablespoon of Dashida (Korean beef flavored roasted salt). Mix all the ingredients thoroughly, ensuring that the rice is evenly coated with the kimchi and seasonings.
-
Incorporate the bacon and cook. Add the chopped, crispy bacon to the wok and continue to stir-fry for another 2-3 minutes, allowing all the flavors to meld together beautifully. Taste the fried rice and adjust the seasoning as needed. Be cautious when adding more Dashida, as it is quite salty.
-
Adjust for Moisture. If the fried rice seems a little dry, you can add a tablespoon or two of the kimchi juice from the kimchi jar. This will add moisture and enhance the overall flavor.
-
Garnish and serve. Transfer the Kimchi Fried Rice to a serving platter or individual bowls. Garnish generously with toasted sesame seeds and chopped scallions for a pop of color and added texture.
Expert Tips & Tricks
- Rice Selection: Using day-old cooked rice is highly recommended for the best texture. Freshly cooked rice tends to be stickier and can result in a mushy fried rice. If you must use freshly cooked rice, spread it out on a baking sheet to cool and dry slightly before adding it to the wok.
- Kimchi Quality: The flavor of your kimchi fried rice will depend heavily on the quality of your kimchi. Look for well-fermented kimchi with a good balance of sourness, spiciness, and umami. Experiment with different brands or even homemade kimchi to find your favorite.
- Heat Level: Kochujang (Korean red pepper paste) is the primary source of heat in this dish. Start with 1 tablespoon and add more to taste, depending on your tolerance for spice. Gochugaru (Korean chili flakes) can also be added for extra heat and a slightly different flavor profile.
- Wok Hei: If you’re using a wok, try to achieve wok hei, which translates to “wok breath”. This refers to the slightly smoky, charred flavor that develops when ingredients are cooked over high heat in a wok. Make sure your wok is properly seasoned and preheated before adding any ingredients.
- Vegetarian Option: To make this dish vegetarian, simply omit the bacon. You can substitute it with diced mushrooms, tofu, or other vegetables of your choice.
Serving & Storage Suggestions
Serve the Kimchi Fried Rice hot, straight from the wok. It pairs perfectly with Korean BBQ, grilled meats, or a simple side of dried seaweed. Leftovers can be stored in an airtight container in the refrigerator for up to 3 days. To reheat, simply microwave until heated through, or stir-fry in a pan with a little oil until warmed. Add a splash of water or kimchi juice if the rice seems dry. While you can freeze Kimchi Fried Rice, the texture of the rice may change upon thawing, becoming slightly mushier. It’s best enjoyed fresh or within a few days of making.
Nutritional Information
| Nutrient | Amount per Serving | % Daily Value |
|---|---|---|
| Calories | 497.6 kcal | N/A |
| Calories from Fat | 288 g | 58% |
| Total Fat | 32.1 g | 49% |
| Saturated Fat | 9.4 g | 47% |
| Cholesterol | 38.6 mg | 12% |
| Sodium | 474.4 mg | 19% |
| Total Carbohydrate | 40.5 g | 13% |
| Dietary Fiber | 1.4 g | 5% |
| Sugars | 0.2 g | 0% |
| Protein | 10.5 g | 21% |
Variations & Substitutions
- Vegetarian/Vegan: As mentioned earlier, omit the bacon for a vegetarian version. For a vegan version, ensure your kimchi is vegan (some contain fish sauce) and substitute the Dashida with a vegan alternative or simply use salt and a touch of mushroom powder for umami.
- Protein Boost: Add cooked chicken, beef, pork, or shrimp for extra protein.
- Vegetable Medley: Incorporate other vegetables like carrots, peas, corn, or bell peppers for added nutrients and texture.
- Egg-cellent Addition: Fry an egg (sunny-side up or over-easy) and place it on top of the fried rice for a richer, more indulgent meal. The runny yolk will coat the rice and add a creamy element.
- Cheese, Please! A sprinkle of shredded mozzarella or cheddar cheese can add a surprising and delicious twist.
FAQs (Frequently Asked Questions)
Q: Can I use brown rice instead of white rice?
A: Yes, you can use brown rice. Keep in mind that brown rice will require a longer cooking time and will have a slightly chewier texture compared to white rice.
Q: What if I don’t have Dashida?
A: Dashida is a Korean beef-flavored seasoning. If you don’t have it, you can substitute it with a small amount of beef bouillon powder or simply use salt and a pinch of MSG for a similar umami flavor.
Q: Is this recipe gluten-free?
A: The recipe can be gluten-free if you use gluten-free Kochujang and ensure the Dashida (or substitute) is also gluten-free. Many brands of Kochujang contain wheat.
Q: Can I make this ahead of time?
A: You can cook the rice and chop the ingredients ahead of time. However, it’s best to cook the kimchi fried rice just before serving for the best texture and flavor.
Q: How spicy is this recipe?
A: The spiciness of this recipe depends on the amount of Kochujang you use. Start with 1 tablespoon and add more to taste, depending on your preference.
Final Thoughts
Kimchi Fried Rice is more than just a recipe; it’s an invitation to explore the vibrant flavors of Korean cuisine and create a dish that is both comforting and exciting. Don’t be afraid to experiment with different ingredients and seasonings to make it your own. Whether you’re a seasoned chef or a beginner cook, this recipe is sure to impress. Gather your ingredients, fire up your wok, and get ready to experience a truly unforgettable meal. I encourage you to try this recipe and share your feedback. Enjoy!