
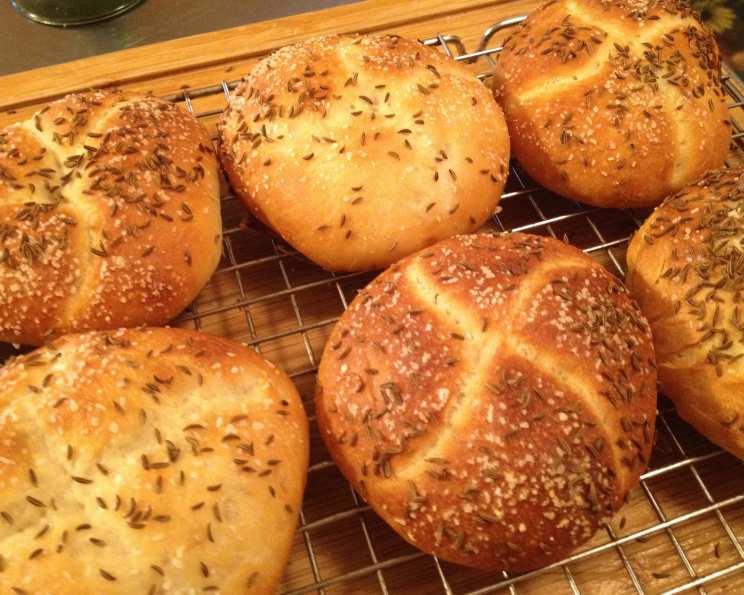
The Authentic Kimmelweck Roll: A Taste of Buffalo
My grandmother, a proud Buffalonian through and through, never let a summer pass without a massive family picnic. The star of the show, without fail, was her slow-roasted beef on kimmelweck, served with a horseradish sauce that could clear your sinuses. The salty, caraway-studded rolls were unlike anything I’d ever tasted, and even now, the aroma instantly transports me back to those sun-drenched days filled with laughter and the comforting presence of family. This recipe attempts to capture the magic of her kimmelweck, a taste of home I cherish.
Recipe Overview
- Prep Time: 1 hour 30 minutes (includes proofing)
- Cook Time: 25 minutes
- Total Time: 2 hours 20 minutes
- Yields: 8 rolls
- Dietary Type: Vegetarian
Ingredients
- 2 1⁄2 teaspoons active dry yeast (1 envelope)
- 1 cup water, lukewarm
- 2 tablespoons vegetable oil
- 1 tablespoon sugar
- 1⁄2 tablespoon salt
- 1 teaspoon honey or 1 teaspoon barley malt syrup
- 2 large egg whites
- 3 – 3 1⁄4 cups bread flour (preferably high-gluten)
- 1 tablespoon water
- Coarse salt, for sprinkling
- Caraway seed, for sprinkling
Equipment Needed
- Small bowl
- Large mixing bowl
- Plastic wrap
- Lightly floured work surface
- Greased bowl
- Parchment-lined or greased baking sheet
- Towel
- Small dish
- Very sharp knife
- Wire racks
Instructions
-
Begin by proofing the yeast. In a small bowl, sprinkle the active dry yeast over 1/4 cup of the lukewarm water. Set aside for about 5 minutes, allowing it to become foamy. This indicates the yeast is active and ready to leaven the dough.
-
In a large mixing bowl, combine the remaining 3/4 cup lukewarm water, vegetable oil, sugar, salt, honey (or barley malt syrup), and 1 egg white. Stir well to dissolve the sugar and salt.
-
Add 1-1/2 cups of the bread flour to the wet ingredients and mix until a smooth batter forms. Then, add the proofed yeast mixture.
-
Gradually add in an additional 1 1/2 cups bread flour, mixing until a shaggy dough begins to form.
-
Turn the dough out onto a lightly floured work surface. Knead the dough for 5 to 7 minutes. It should become smooth and elastic but remain slightly tacky to the touch. Add only as much additional flour as necessary to prevent the dough from sticking excessively. Avoid adding too much flour, as this can result in a dry, dense roll.
-
Transfer the kneaded dough to a large greased bowl, turning to coat. Cover the bowl tightly with plastic wrap.
-
Set aside at room temperature to rise until doubled in size, about an hour. This first rise allows the yeast to work its magic, developing flavor and creating a light, airy texture.
-
Punch down the dough to release the accumulated gases. Recover the bowl with plastic wrap.
-
Let the dough rise a second time for about 30 minutes. This second rise further enhances the flavor and texture of the rolls.
-
Return the dough to the lightly floured work surface and divide it into 8 equal pieces.
-
Shape each piece into a smooth round, then flatten the rounds slightly. These should resemble small, slightly flattened buns.
-
Place the shaped rounds on a parchment-lined or greased baking sheet, ensuring they are well-spaced to allow for spreading during baking.
-
Cover the rolls loosely with a clean towel and let them rise for about 30 minutes. This final proofing allows the rolls to puff up slightly before baking.
-
While the rolls are proofing for the final time, preheat your oven to 425°F (220°C). Ensuring the oven is fully preheated is crucial for achieving the desired crust and texture.
-
In a small dish, combine the remaining egg white with the 1 tablespoon water and blend well to create an egg wash.
-
Gently brush the rolls lightly with the egg white wash. This will give them a beautiful golden-brown color and a slight sheen.
-
Using a very sharp knife, score 4 crescent-shaped slits into each roll, radiating out from the center. The depth of these cuts should be sufficient to allow the rolls to expand during baking, but not so deep that they tear.
-
Sprinkle the rolls generously with coarse salt and caraway seeds. Then, lightly sprinkle the rolls with water before baking.
-
Bake for 5 minutes.
-
Quickly open the oven door, sprinkle the rolls again with water, and close the oven. The steam created by the water helps to create a crisp, chewy crust.
-
Bake the rolls for about 20 minutes more, or until they are deeply browned and crisp. Keep a close eye on them, as baking times may vary depending on your oven.
-
Cool the baked rolls on wire racks. This allows air to circulate around the rolls, preventing them from becoming soggy.
For Salt and Pepper Sticks: Follow the recipe directions with the following exceptions: Omit the second rise. Divide the dough into 13 equal pieces, roll each piece out into a 12″ rope of even thickness, and space the ropes 1-1/2″ apart on the prepared baking sheet. After the final rise, apply the egg wash, but do not make any cuts into the dough; sprinkle with coarse sea salt crystals and coarsely ground or cracked black pepper instead of with salt crystals and caraway seeds. Do not spritz with water. Bake for about 18 minutes.
Expert Tips & Tricks
- High-gluten bread flour is key to achieving the authentic kimmelweck roll texture. If you can’t find it, you can add vital wheat gluten to all-purpose flour.
- The double rise is important for developing the flavor and texture of the dough. Don’t skip it!
- The water spritzes during baking are crucial for creating the signature crisp, chewy crust. Don’t be afraid to be generous with the water.
- Make sure your knife is very sharp when scoring the rolls. A dull knife will tear the dough.
- If the tops of the rolls are browning too quickly, tent them loosely with foil during the last few minutes of baking.
Serving & Storage Suggestions
Kimmelweck rolls are best served warm, ideally on the day they are baked. They are the perfect accompaniment to sliced roast beef, especially when paired with a sharp horseradish sauce. Leftover rolls can be stored in an airtight container at room temperature for up to 2 days. For longer storage, freeze the rolls in a freezer-safe bag for up to 2 months. To reheat, wrap the frozen rolls in foil and bake in a preheated oven at 350°F (175°C) for about 10-15 minutes, or until warmed through. You can also refresh the crust by briefly toasting them.
Nutritional Information
| Nutrient | Amount per Serving | % Daily Value |
|---|---|---|
| Calories | 217.8 kcal | N/A |
| Calories from Fat | N/A | 16% |
| Total Fat | 4 g | 6% |
| Saturated Fat | 0.5 g | 2% |
| Cholesterol | 0 mg | 0% |
| Sodium | 452.3 mg | 18% |
| Total Carbohydrate | 38.6 g | 12% |
| Dietary Fiber | 1.6 g | 6% |
| Sugars | 2.5 g | 9% |
| Protein | 6.2 g | 12% |
Note: Nutritional information is an estimate and may vary based on specific ingredients and preparation methods.
Variations & Substitutions
- For a vegan version, replace the honey with maple syrup or agave, and use a plant-based milk for the egg wash (or simply brush with olive oil).
- Experiment with different toppings! Try adding sesame seeds, poppy seeds, or even everything bagel seasoning along with the caraway seeds and salt.
- For a richer flavor, substitute some of the water with milk or buttermilk.
- For a whole wheat version, substitute up to half of the bread flour with whole wheat flour. Keep in mind this will result in a denser roll.
FAQs (Frequently Asked Questions)
Q: Why is it important to proof the yeast?
A: Proofing the yeast confirms that it is alive and active, ensuring that your dough will rise properly. If the yeast doesn’t foam during proofing, it may be expired and should be replaced.
Q: Can I use all-purpose flour instead of bread flour?
A: While you can use all-purpose flour, bread flour is recommended for its higher gluten content, which helps to create a chewier, more structured roll.
Q: What if my dough is too sticky to knead?
A: Add flour gradually, about a tablespoon at a time, until the dough is manageable. Be careful not to add too much flour, as this can result in a dry, dense roll.
Q: How can I tell if the rolls are done baking?
A: The rolls should be deeply browned and crisp. You can also check the internal temperature with a thermometer; it should be around 200-210°F (93-99°C).
Q: Can I make the dough ahead of time?
A: Yes, you can make the dough ahead of time and store it in the refrigerator for up to 24 hours. Allow the dough to come to room temperature before shaping and baking.
Final Thoughts
Now it’s your turn to experience the unique delight of a homemade kimmelweck roll! Don’t be intimidated by the process; with a little patience and these helpful tips, you’ll be enjoying these iconic rolls in no time. I encourage you to experiment with the variations and toppings to create your own signature kimmelweck. And most importantly, share your creations with friends and family – the best dishes are always those enjoyed together. Perhaps you could even serve them with a side of my grandmother’s horseradish sauce… but be warned, it packs a punch! Enjoy!