
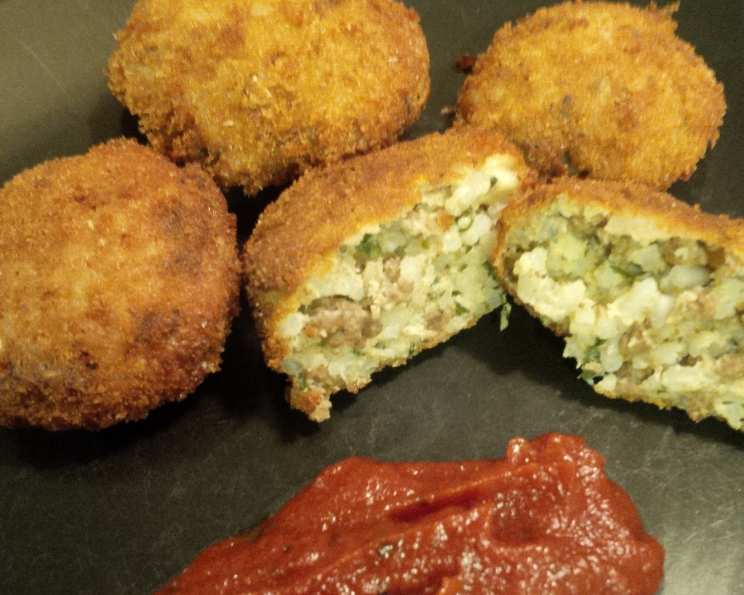
Kittencal’s Ground Beef and Feta Rice Balls: A Culinary Revelation
The aroma of frying food always takes me back to my grandmother’s kitchen. I remember the joyful chaos as she prepared family feasts, the sizzling sounds, and the irresistible smells filling every corner of the house. One dish that always stood out was her crispy rice balls, though hers were a simpler affair. These Ground Beef and Feta Rice Balls take that comforting memory and elevate it with savory ground beef, fragrant herbs, and the delightful tang of feta. Each bite is a little taste of home, refined.
Recipe Overview
- Prep Time: 30 minutes
- Cook Time: 15 minutes
- Total Time: 45 minutes
- Servings: Variable
- Yield: Approximately 35 balls
- Dietary Type: Not specified; contains meat and dairy
Ingredients
- ½ lb ground beef (or use spicy or mild Italian sausages with casings removed)
- 1 small onion, finely chopped
- 4 large garlic cloves, finely chopped (garlic-lovers use more)
- 3 cups cooked rice, firmly packed when measuring
- 2 eggs, beaten
- ⅓ cup melted butter
- ⅔ cup fresh grated Parmesan cheese
- 1 pinch cayenne pepper (optional)
- 2 tablespoons dried parsley (can use ¼ cup chopped fresh parsley)
- ⅓ cup coarsely crumbled feta cheese (can use more)
- ½ – 1 teaspoon garlic powder (optional add in for more garlic flavor)
- Salt & freshly ground black pepper
- 1 egg (may need another egg)
- 1 cup dry breadcrumbs
- Oil, for deep-frying
Equipment Needed
- Large skillet
- Large bowl
- Small bowl
- Deep-fryer or another large skillet
- Slotted spoon or spider
Instructions
- In a skillet, cook the ground beef with onion and garlic until the ground beef is browned. If using sausage, remove the casings and crumble before cooking with the onion and garlic.
- Drain the excess fat from the skillet.
- Transfer the cooked ground beef mixture to a large bowl and allow it to cool slightly.
- Add the cooked rice, beaten eggs, melted butter, Parmesan cheese, cayenne pepper (if using), and dried parsley to the bowl with the ground beef.
- Using your hands, mix the ingredients to combine thoroughly.
- Season the mixture generously with salt and freshly ground black pepper. Add garlic powder if desired, for a boost of garlic flavor. Remember to taste and adjust seasonings as needed, keeping in mind the saltiness of the cheeses.
- Chill the mixture in the refrigerator for at least 2 hours, or preferably overnight. This step is crucial as it allows the rice balls to hold their shape during frying.
- Once chilled, shape the mixture into approximately 1-1/2-inch balls. Aim for uniformity in size to ensure even cooking.
- In a small bowl, lightly beat the remaining egg (or eggs if needed).
- Place the dry breadcrumbs into another bowl.
- Dip each rice ball into the beaten egg, ensuring it’s fully coated.
- Next, coat the egg-dipped rice ball in the dry breadcrumbs, pressing gently to ensure the breadcrumbs adhere well. I recommend coating all the balls and placing them on a plate or baking sheet before you begin frying – this streamlines the process.
- Once all the balls are coated, gently flatten them slightly with the palm of your hand. This helps them cook more evenly and brown more quickly.
- Heat the oil in a skillet or deep-fryer to 375 degrees Fahrenheit (190 degrees Celsius). Use enough oil so the rice balls can float freely.
- Carefully fry the rice balls until they are golden brown on all sides, approximately 3-4 minutes. Turn them occasionally to ensure even browning. Monitor the oil temperature to prevent burning.
- Once golden brown, remove the rice balls from the oil using a slotted spoon or spider and transfer them to a plate lined with paper towels to drain excess oil.
- Serve immediately with hot marinara sauce for dipping.
Expert Tips & Tricks
- Cheese Selection: For a bolder flavor, experiment with using a blend of different hard cheeses like Pecorino Romano along with the Parmesan. Ensure that your feta is not overly salty, as that can overpower the other flavors.
- Rice Matters: Day-old rice works best, as it’s drier and less likely to make the mixture soggy. Any short-grain or medium-grain rice is acceptable.
- Temperature Control: Maintaining a consistent oil temperature is key to achieving a crispy exterior without overcooking the inside. Use a thermometer to monitor the temperature. If the oil is too hot, the rice balls will brown too quickly on the outside and remain cold in the center. If it’s too cool, they will absorb too much oil.
- Make-Ahead Option: You can prepare the rice ball mixture up to 2 days in advance and store it in the refrigerator. Coating the rice balls in breadcrumbs can also be done several hours ahead of frying.
- Binder: If the rice ball mixture seems too loose, add a little more beaten egg or grated Parmesan cheese to help bind it together.
Serving & Storage Suggestions
Serve these Ground Beef and Feta Rice Balls hot, straight from the fryer, with a side of your favorite marinara sauce or a creamy garlic aioli. They also pair well with a simple salad or roasted vegetables.
Leftovers can be stored in an airtight container in the refrigerator for up to 3 days. Reheat them in the oven at 350°F (175°C) until warmed through and crispy, or reheat in an air fryer for an even crispier result. Microwaving is also an option but will result in a softer texture.
For longer storage, you can freeze the cooked rice balls. Allow them to cool completely, then arrange them in a single layer on a baking sheet and freeze until solid. Transfer the frozen rice balls to a freezer bag or airtight container and store them in the freezer for up to 2 months. Reheat from frozen in the oven or air fryer.
Nutritional Information
Please note that these values are estimates and may vary based on specific ingredients and portion sizes.
| Nutrient | Amount per Serving | % Daily Value |
|---|---|---|
| Calories | 150 kcal | 8% |
| Total Fat | 8g | 12% |
| Saturated Fat | 4g | 20% |
| Cholesterol | 40mg | 13% |
| Sodium | 200mg | 9% |
| Total Carbohydrate | 12g | 4% |
| Dietary Fiber | 1g | 4% |
| Sugars | 1g | – |
| Protein | 6g | 12% |
Variations & Substitutions
- Vegetarian Option: Substitute the ground beef with crumbled vegetarian ground meat or a mixture of finely chopped mushrooms and lentils.
- Gluten-Free: Use gluten-free breadcrumbs to coat the rice balls.
- Spicy: Add a pinch of red pepper flakes or a dash of hot sauce to the ground beef mixture for a spicy kick. You can also use spicy Italian sausage in place of the ground beef.
- Herb Variations: Experiment with different herbs such as oregano, basil, or thyme to add your own unique flavor profile.
- Cheese Swap: Try using a different cheese, such as Gruyere or mozzarella, in place of the feta.
FAQs (Frequently Asked Questions)
Q: Can I bake these rice balls instead of frying them?
A: Yes, you can bake them! Place the breaded rice balls on a baking sheet and bake at 400°F (200°C) for about 20-25 minutes, or until golden brown, flipping halfway through. They won’t be as crispy as the fried version, but it’s a healthier alternative.
Q: Can I use leftover risotto to make these?
A: Absolutely! Leftover risotto is a great base for these rice balls. Just adjust the seasoning as needed, since risotto is already seasoned.
Q: Why are my rice balls falling apart when I fry them?
A: This could be due to the mixture not being chilled enough, or not enough binder (egg or cheese). Make sure to chill the mixture thoroughly and add an extra egg if needed.
Q: Can I make these ahead of time and freeze them before frying?
A: Yes, you can! Shape the rice balls, coat them in breadcrumbs, and then freeze them on a baking sheet until solid. Transfer them to a freezer bag and fry them directly from frozen, adding a few extra minutes to the cooking time.
Q: What can I serve with these besides marinara sauce?
A: These rice balls are also delicious with pesto, a creamy garlic aioli, or a spicy arrabbiata sauce.
Final Thoughts
These Ground Beef and Feta Rice Balls are a delicious and satisfying appetizer or snack that’s sure to impress your friends and family. Don’t be afraid to experiment with the ingredients and make them your own! I encourage you to try this recipe and discover the joy of creating something truly special. Share your creations and any modifications you’ve made – I’d love to hear about them! Pair these flavorful orbs with a crisp Italian white wine for the perfect culinary experience.