
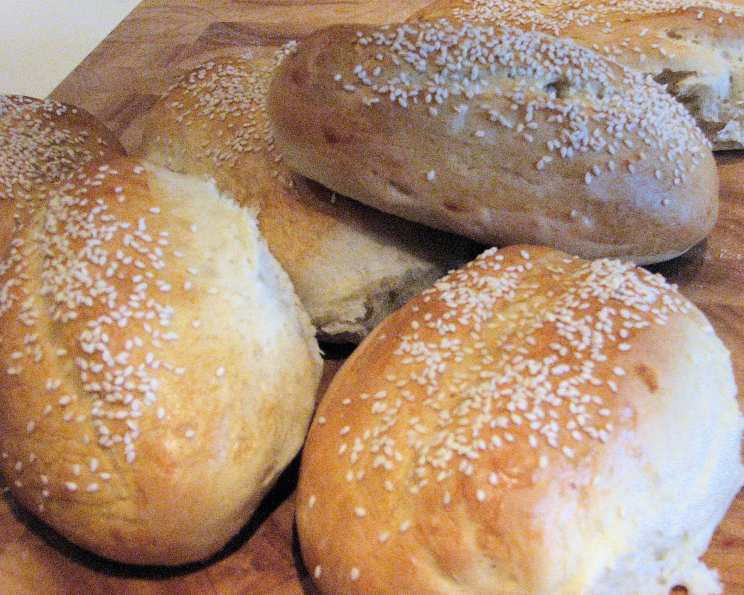
Kittencal’s Famous Sub/Sandwich Buns: A Baker’s Delight
I remember the first time I made these buns. It was for a summer barbecue, and I wanted to impress my friends with homemade sandwiches. The aroma that filled my kitchen as these baked was simply intoxicating – a warm, yeasty perfume that promised something truly special. When I finally pulled them from the oven, perfectly golden brown and pillow-soft, I knew I had stumbled upon a recipe that would become a family staple. The sandwiches we made that day, piled high with grilled meats and fresh veggies, were unforgettable, and it all started with these incredible buns.
Recipe Overview
- Prep Time: 2 hours
- Cook Time: 22-25 minutes
- Total Time: 3 hours 25 minutes
- Yields: 6 large buns
- Dietary Type: Vegetarian
Ingredients
- 3/4 cup warm water
- 1 teaspoon sugar
- 2 tablespoons dry yeast (use 2 tablespoons yeast, even 1-3/4 tbsp will do fine)
- 1/4 cup Crisco shortening, melted
- 1 cup full-fat milk
- 1 1/2 teaspoons salt (can reduce to 1 teaspoon)
- 3 tablespoons sugar
- 4 cups all-purpose flour (more as needed)
- Cornmeal or cooking spray for the baking sheet
- Optional: 1 egg white beaten with 1 teaspoon cold water for egg wash
- Optional: Sesame seeds for topping
Equipment Needed
- Heavy-duty stand mixer fitted with a kneader attachment
- Measuring cups and spoons
- Microwave-safe bowl or measuring cup
- Large mixing bowl
- Clean tea towel
- Large cookie/baking sheet
Instructions
-
Begin by preparing your stand mixer with the kneader attachment.
-
Place about 3 1/2 cups of the all-purpose flour in the mixer bowl. Reserve the remaining flour for later use, as needed.
-
Melt the Crisco shortening in the microwave. Pour the melted shortening into the bowl with the flour.
-
In a separate microwave-safe measuring cup, combine 1 cup full-fat milk, 3 tablespoons sugar, and 1 1/2 teaspoons salt. Heat the mixture in the microwave until it is quite warm, stirring to dissolve the sugar and salt completely. It should not be scalding hot, but comfortably warm to the touch.
-
Pour the warm milk mixture into the bowl with the melted shortening and flour. Cover the bowl with a clean tea towel to help maintain the warmth of the ingredients.
-
In a separate measuring cup, proof the yeast by combining 3/4 cup warm water and 1 teaspoon sugar. Sprinkle the 2 tablespoons dry yeast over the water. Let this mixture sit for about 8-10 minutes, or until the yeast becomes foamy. This step ensures that the yeast is active and ready to leaven the dough.
-
Once the yeast mixture is foamy, add it to the bowl with the flour, shortening, and milk.
-
Start kneading the dough using the stand mixer for about 3-4 minutes. Gradually add more of the reserved flour, as needed, to create a soft, semi-sticky dough. Be careful not to add too much flour, as this can result in dry buns.
-
Continue to knead the dough for about 8 more minutes, until it becomes smooth and elastic. The dough should pull away from the sides of the bowl but still be slightly tacky to the touch.
-
Place the dough on a very lightly floured counter or board. Let the dough rest, covered with a clean tea towel, for about 5-10 minutes. This allows the gluten to relax, making the dough easier to shape.
-
Grease a large bowl with cooking spray or oil. Place the dough into the greased bowl, turning to coat all sides.
-
Cover the bowl and place it in a warm place to rise for about 50-60 minutes. Due to the amount of yeast in the recipe, the dough should rise relatively quickly. It should approximately double in size.
-
After the first rise, punch down the dough gently to release the air.
-
Divide the dough into equal pieces. I usually cut it into 6 pieces for large sub buns. Shape each piece into a round ball.
-
Let the dough balls rest for about 4 minutes. This brief rest period allows the gluten to relax further, making shaping easier.
-
Shape the dough into the desired length for sub buns. Roll each ball into an oblong shape, tapering the ends slightly.
-
Sprinkle a large cookie or baking sheet with cornmeal, or lightly grease it with cooking spray. The cornmeal will add a pleasant texture to the bottom of the buns.
-
Place the long pieces of dough on the prepared baking sheet, spacing them evenly. If necessary, gently reshape the buns one last time to ensure they are the desired shape.
-
Cover the baking sheet with a clean tea towel and let the buns rise for about 25 minutes, or until they have doubled in size.
-
While the buns are rising for the second time, preheat your oven to 375 degrees Fahrenheit (190 degrees Celsius).
-
If desired, prepare an egg wash by beating one egg white with 1 teaspoon cold water. After the second rising, gently brush the egg wash over the tops of the buns. This will give them a beautiful golden-brown color.
-
If desired, sprinkle the tops of the buns with sesame seeds.
-
Bake the buns for about 22-25 minutes, or until they are dark golden brown. The internal temperature should reach around 200°F.
-
Once baked, remove the buns from the oven and let them cool on a wire rack before slicing and serving.
Expert Tips & Tricks
- For an even richer flavor, try using melted butter instead of shortening.
- If your kitchen is cold, you can create a warm environment for rising dough by placing the bowl in a slightly warmed oven (turned off) or near a warm appliance.
- If the tops of the buns are browning too quickly, you can loosely tent them with foil during the last few minutes of baking.
- To achieve a softer crust, brush the baked buns with melted butter immediately after removing them from the oven.
- For a more rustic look, slash the tops of the buns with a sharp knife or razor blade before baking.
- If your dough seems too sticky to handle, lightly flour your hands and the work surface before shaping.
Serving & Storage Suggestions
These homemade sub buns are perfect for filling with your favorite deli meats, cheeses, and veggies. They also make excellent sandwich rolls for burgers, pulled pork, or chicken salad.
Store leftover buns in an airtight container at room temperature for up to 2 days, or in the refrigerator for up to 5 days. For longer storage, freeze the buns in a freezer-safe bag or container for up to 3 months. To reheat frozen buns, thaw them at room temperature and then warm them in the oven at 350°F (175°C) for a few minutes, or microwave them briefly.
Nutritional Information
| Nutrient | Amount per Serving | % Daily Value |
|---|---|---|
| Calories | 443.7 kcal | N/A |
| Calories from Fat | N/A | 22% |
| Total Fat | 11 g | 16% |
| Saturated Fat | 3.1 g | 15% |
| Cholesterol | 4.1 mg | 1% |
| Sodium | 603.5 mg | 25% |
| Total Carbohydrate | 74.2 g | 24% |
| Dietary Fiber | 3.3 g | 13% |
| Sugars | 9.3 g | N/A |
| Protein | 11.5 g | 23% |
Note: Nutritional information is an estimate and can vary based on specific ingredients and portion sizes.
Variations & Substitutions
- Whole Wheat Buns: Substitute up to half of the all-purpose flour with whole wheat flour for a nuttier flavor and increased fiber.
- Herb-Infused Buns: Add 1-2 tablespoons of dried herbs like rosemary, thyme, or oregano to the flour mixture for a savory twist.
- Sweet Buns: Increase the sugar to 1/4 cup and add a pinch of cinnamon or cardamom for sweet sandwich rolls, perfect for breakfast sandwiches or desserts.
- Dairy-Free: Substitute the full-fat milk with a plant-based milk alternative like soy, almond, or oat milk. Ensure the milk is still warmed before use.
- Garlic Buns: Add 1-2 teaspoons of garlic powder to the flour mixture for a garlicky flavor that complements many sandwich fillings.
FAQs (Frequently Asked Questions)
Q: Can I use active dry yeast instead of instant yeast?
A: Yes, you can. Just ensure that you proof the active dry yeast in warm water with sugar for a longer period (about 10-15 minutes) until it becomes foamy before adding it to the other ingredients.
Q: What if my dough is too sticky to handle?
A: Lightly flour your hands and the work surface before shaping the dough. Avoid adding too much extra flour to the dough itself, as this can make the buns dry.
Q: Can I freeze the dough after the first rise?
A: Yes, you can. Punch down the dough, wrap it tightly in plastic wrap, and then place it in a freezer-safe bag. Thaw the dough overnight in the refrigerator before shaping and baking.
Q: How do I prevent the buns from becoming too brown during baking?
A: If the tops of the buns are browning too quickly, loosely tent them with aluminum foil during the last few minutes of baking.
Q: What’s the best way to reheat these buns?
A: To reheat, thaw frozen buns and warm them in a 350°F (175°C) oven for a few minutes, or microwave them briefly. For a softer texture, wrap the buns in a damp paper towel before microwaving.
Final Thoughts
These sub/sandwich buns are more than just bread; they are a canvas for culinary creativity. The joy of baking them from scratch, the aroma filling your home, and the satisfyingly soft texture make this recipe a truly rewarding experience. Don’t hesitate to experiment with different fillings, herbs, and toppings to create your signature sandwich. Share your creations with friends and family, and enjoy the simple pleasure of a perfectly crafted homemade bun. Happy baking!