
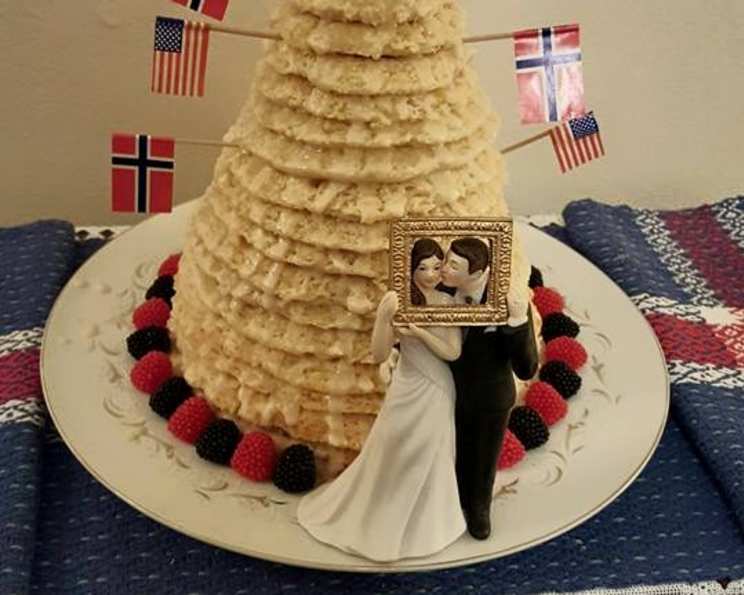
Kransekake: A Norwegian Wedding Cake Masterpiece
I remember the first time I saw a Kransekake. It was at a Scandinavian festival, a towering ring cake adorned with tiny Norwegian flags. The almond scent was intoxicating, and the intricate design captivated me. It looked impossibly complex, a feat of baking engineering. Years later, after mastering many challenging recipes, I finally attempted my own, discovering that while impressive, this cake is surprisingly achievable with a bit of patience and precision. Now, every special occasion feels incomplete without this architectural marvel gracing the table.
Recipe Overview
- Prep Time: 45 minutes
- Cook Time: 15 minutes per batch
- Total Time: 1 hour + cooling time
- Yields: 1 (18-layer) cake
- Dietary Type: Gluten-Free (naturally)
Ingredients
- 1 lb almond meal or almond flour
- 3 1/4 cups powdered sugar
- 4 egg whites
Icing
- Powdered sugar
- Butter, melted
Equipment Needed
- Graduated ring pans (18 rings of varying sizes)
- Cookie press with a star-shaped disk
- Stand mixer (optional, but recommended)
- Baking sheets
- Grease for pans (butter or cooking spray)
- Bread crumbs or white cornmeal for dusting
- Thin knife or offset spatula
- Ice cream buckets (for freezing unfrosted rings, optional)
Instructions
- Combine dry ingredients: In a large bowl, thoroughly mix the almond meal (or almond flour) and powdered sugar until no lumps remain. This ensures a smooth dough.
- Whip the egg whites: In a separate, clean bowl (preferably using a stand mixer), beat the egg whites until stiff peaks form. The peaks should stand straight up when the beater is lifted. This step is crucial for the cake’s structure.
- Reserve egg whites: Set aside 2/3 cup of the beaten egg whites. You might need this to adjust the dough consistency later.
- Incorporate egg whites into dry ingredients: Gradually mix the remaining egg whites (not the reserved portion) into the almond flour/powdered sugar mixture. Use a wooden spoon or your fingers for this step. The dough will be quite thick, resembling cookie dough in texture.
- Prepare the cookie press: Load the dough into a cookie press fitted with a star-shaped disk.
- Form the rings: Grease the kransekake ring pans thoroughly, and then coat them with bread crumbs or white cornmeal. This prevents the rings from sticking. Press the dough into the prepared rings.
- Test batch: Bake one ring at 325°F (160°C) for 15 minutes. This test ring is vital for determining if any adjustments to the dough are needed.
- Adjust dough if necessary:
- If the test ring develops tunnels inside, the dough might need a bit more powdered sugar. Incorporate a small amount (1-2 tablespoons) and test again.
- If the dough doesn’t rise sufficiently, add a small amount of the reserved egg white (1-2 tablespoons) and test again.
- Bake the rings: Bake the remaining rings at 325°F (160°C) for 15 minutes each, or until lightly golden brown at the tips. Watch carefully to avoid overbaking. Baking times may vary slightly depending on your oven.
- Cool the rings: Allow the baked rings to cool almost completely in the pans before attempting to remove them. This prevents breakage.
- Remove the rings: Use a thin knife or offset spatula to gently loosen each ring from the pan. Carefully lift each ring out. If a ring breaks, don’t worry! Save the pieces to serve around the base of the finished cake.
- Prepare the icing: Mix powdered sugar with a small amount of melted butter to create a thick, drizzle-able icing. The consistency should be similar to glue.
- Assemble the cake: You have two options for icing and assembling:
- Stack the rings into a cone shape, starting with the largest ring at the bottom and working your way up to the smallest. Lightly drizzle the icing in a scallop pattern or v-pattern around each ring.
- Alternatively, drizzle the rings with icing first, allowing the icing to set slightly, and then stack them into the cone shape.
- Freeze (optional): If freezing, fill empty ice cream buckets with the unfrosted rings, layering them between sheets of waxed paper. This prevents them from sticking together. Thaw completely before icing and assembling.
Expert Tips & Tricks
- Use high-quality almond flour: The quality of your almond flour will significantly impact the final texture and flavor. Opt for a finely ground almond flour for the best results.
- Don’t overmix: Overmixing the dough can lead to a tough cake. Mix just until the ingredients are combined.
- Test your oven temperature: Oven temperatures can vary, so it’s always a good idea to use an oven thermometer to ensure accuracy.
- Gentle handling: The baked rings are delicate, so handle them with care to avoid breakage.
- Practice makes perfect: Don’t be discouraged if your first attempt isn’t perfect. Kransekake takes practice, and even slight imperfections add to its rustic charm.
- Flavor variations: Add a touch of almond extract or cardamom to the dough for an extra layer of flavor.
Serving & Storage Suggestions
Serve the Kransekake as a stunning centerpiece for weddings, holidays, or any special occasion. It pairs beautifully with coffee, tea, or a glass of dessert wine. The cake is best enjoyed within a few days of assembly.
- Room Temperature: Store assembled Kransekake at room temperature in an airtight container for up to 3 days.
- Freezing: Unfrosted rings can be frozen for up to 3 months. Wrap them tightly in plastic wrap and store them in an airtight container. Thaw completely before assembling and icing.
Nutritional Information
| Nutrient | Amount per Serving | % Daily Value |
|---|---|---|
| Calories | 234 kcal | 12% |
| Total Fat | 13g | 20% |
| Saturated Fat | 1g | 5% |
| Cholesterol | 0mg | 0% |
| Sodium | 12mg | 1% |
| Total Carbohydrate | 27g | 9% |
| Dietary Fiber | 3g | 12% |
| Sugars | 23g | N/A |
| Protein | 6g | 12% |
Note: Nutritional information is an estimate and may vary depending on the specific ingredients used.
Variations & Substitutions
- Gluten-Free: This recipe is naturally gluten-free since it uses almond flour. Ensure all your ingredients are certified gluten-free if necessary.
- Dairy-Free Icing: Use a dairy-free butter substitute for the icing.
- Flavor Variations: Experiment with different extracts, such as vanilla, lemon, or orange.
- Nut-Free (Alternative): This will require significant changes, as the base is almond flour. Substituting with a gluten-free all-purpose blend might be possible, but will change the flavor.
FAQs (Frequently Asked Questions)
Q: What if my dough is too dry?
A: If the dough seems too dry and crumbly, gradually add a teaspoon of the reserved egg white at a time until it reaches the correct consistency.
Q: Can I make the rings ahead of time?
A: Yes, you can bake the rings a day or two in advance. Store them in an airtight container at room temperature.
Q: How do I prevent the rings from breaking?
A: Ensure the rings are completely cool before removing them from the pans. Use a thin knife or offset spatula to gently loosen them.
Q: My icing is too thin, what can I do?
A: Gradually add more powdered sugar to the icing until it reaches a thick, drizzle-able consistency.
Q: Can I use pre-made marzipan instead of making the dough from scratch?
A: While technically possible, the texture and flavor will be different. Making the dough from scratch provides a superior result. The texture will also be very different.
Final Thoughts
Kransekake is more than just a cake; it’s a symbol of celebration, tradition, and artistry. While it may seem daunting at first, the process is incredibly rewarding. So, gather your ingredients, embrace the challenge, and create a show-stopping masterpiece that will impress your family and friends. Don’t be afraid to personalize it with your own creative touches, and most importantly, enjoy the journey!