
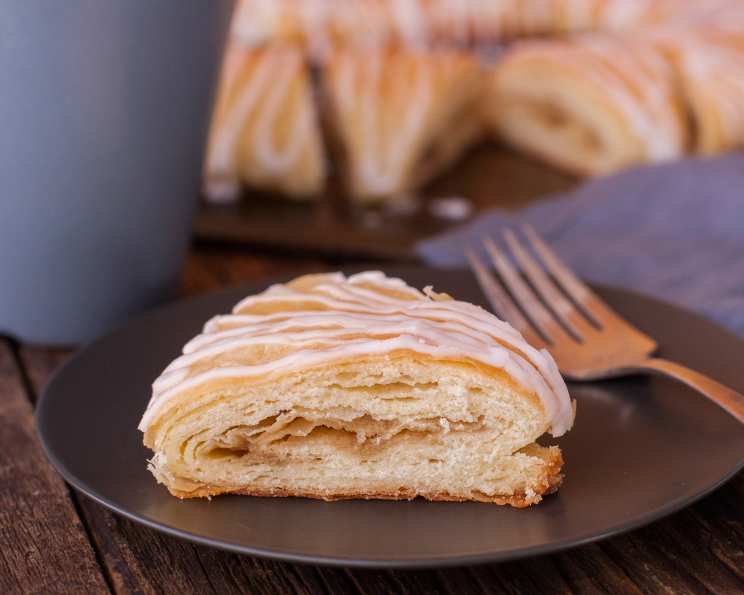
The Majestic Kringle: A Taste of Wisconsin Tradition
My earliest memory of kringle involves snowy Wisconsin winters and the warm, yeasty aroma wafting from my grandmother’s kitchen. She’d spend days meticulously layering butter and dough, transforming simple ingredients into a masterpiece of flaky pastry and sweet filling. Every bite was a celebration – a connection to family, tradition, and the comforting flavors of home. The anticipation, the shared joy, and the sheer deliciousness – that’s what kringle means to me, and I’m thrilled to share this cherished recipe with you.
Recipe Overview
- Prep Time: 4 hours 30 minutes
- Cook Time: 25-30 minutes
- Total Time: 5 hours
- Yields: 1 kringle
- Dietary Type: Not specified
Ingredients
- ¾ cup butter
- 1 package cake yeast
- ¼ cup water
- ¼ cup lukewarm milk
- ¼ cup sugar
- ½ teaspoon salt
- ½ teaspoon lemon extract
- 1 egg
- 2 cups sifted all-purpose flour
Butterscotch Filling for 2 Kringles
- 1 cup brown sugar
- ⅓ cup butter
- 1 pinch salt
- 1 pinch cinnamon
- ½ egg white
Equipment Needed
- Waxed paper
- Mixing bowls
- Rolling pin
- Greased baking sheet
Instructions
- Begin by dividing the butter in half. Place each half on a sheet of waxed paper and spread it into an 8×8 inch square. Chill the butter squares thoroughly in the refrigerator.
- In a small bowl, dissolve the cake yeast in the warm water.
- In a separate, larger mixing bowl, combine the lukewarm milk, sugar, salt, lemon extract, and egg. Mix the ingredients well until fully incorporated.
- Add the dissolved yeast mixture to the milk and egg mixture. Stir to combine.
- Gradually add the sifted all-purpose flour to the wet ingredients, mixing until a smooth dough forms.
- Lightly flour a clean work surface. Roll the dough out into a 12×8 inch rectangle.
- Remove one square of chilled butter from the refrigerator. Place the butter on two-thirds of the rolled-out dough.
- Fold the uncovered third of the dough over the middle third, then fold the remaining third over the top, creating a layered effect.
- Again, fold one end of the dough over the middle third, and then fold the remaining third over the top. This will create a square with nine layers of dough and butter.
- Wrap the dough square in waxed paper and refrigerate for 30 minutes.
- After chilling for 30 minutes, remove the dough from the refrigerator. On a lightly floured surface, roll the dough out again into an 8×12 inch rectangle.
- Remove the second square of chilled butter from the refrigerator. Place the butter on two-thirds of the rolled-out dough, just as before. Fold the dough the same way as in steps 8 and 9. This second folding process creates a total of 18 layers.
- Wrap the dough in waxed paper once more and refrigerate for a minimum of 2 hours. This chilling time is crucial for the development of the flaky layers.
- While the dough is chilling, prepare the butterscotch filling. In a saucepan, combine the brown sugar, butter, salt, and cinnamon. Cook over medium heat, stirring constantly, until the butter is melted and the sugar is dissolved. Remove from heat and let cool slightly. Then, stir in the egg white.
- After the dough has chilled for 2 hours, remove it from the refrigerator. Cut the dough into 2 equal pieces.
- Working with one piece of dough at a time, lightly roll it out until it measures approximately 20×6 inches.
- Spread the center third of the dough with the butterscotch filling. You can optionally add fruit, nuts, raisins, or jam on top of the filling.
- Fold one of the long edges of the dough over the filling to the middle. Moisten the other long edge with a little water and fold it over the top, completely covering the filling. Seal the edges well.
- Place the filled kringle on a greased baking sheet. Gently form it into an oval shape, pressing the ends of the kringle together to create a continuous circle.
- Flatten the dough slightly with your hands.
- Cover the kringle and let it proof in a warm place (around 70 degrees Fahrenheit) for 1 hour.
- Preheat your oven to 350 degrees Fahrenheit (175 degrees Celsius).
- Bake the kringle in the preheated oven for 25-30 minutes, or until it is golden brown.
- Remove the kringle from the oven and let it cool completely on a wire rack.
- Once cooled, ice the kringle with a mixture of powdered sugar and water, if desired.
Expert Tips & Tricks
- Butter Quality: Using high-quality butter with a high fat content is key to achieving those perfect flaky layers. European-style butter is a great choice.
- Keeping the Butter Cold: Make sure your butter stays very cold throughout the lamination process (the folding and chilling). If it starts to melt, the layers won’t form properly. If needed, pop the dough back into the fridge for a few minutes to firm up.
- Even Baking: Rotate the baking sheet halfway through the baking time to ensure even browning.
- Make-Ahead Option: The dough can be made ahead of time and stored in the refrigerator for up to 24 hours before baking.
Serving & Storage Suggestions
Serve the kringle slightly warm or at room temperature. It’s delicious on its own or with a cup of coffee or tea.
To store, wrap the kringle tightly in plastic wrap or place it in an airtight container. It will keep at room temperature for 2-3 days or in the refrigerator for up to a week. For longer storage, freeze the kringle for up to 2 months. Thaw it overnight in the refrigerator before serving. You can also reheat it in a low oven (around 300°F) for a few minutes to restore its warmth and texture.
Nutritional Information
| Nutrient | Amount per Serving | % Daily Value |
|---|---|---|
| Calories | 3826.6 kcal | N/A |
| Calories from Fat | 1879 g | 49% |
| Total Fat | 208.9 g | 321% |
| Saturated Fat | 129.6 g | 648% |
| Cholesterol | 723.1 mg | 241% |
| Sodium | 3270.3 mg | 136% |
| Total Carbohydrate | 460.2 g | 153% |
| Dietary Fiber | 6.8 g | 27% |
| Sugars | 264.5 g | 1057% |
| Protein | 38.3 g | 76% |
Note: Nutritional information is an estimate and can vary based on ingredient substitutions and specific cooking methods.
Variations & Substitutions
- Fruit Fillings: Experiment with different fruit fillings, such as apple, cherry, or raspberry. You can use fresh, frozen, or canned fruit.
- Nut Fillings: Add chopped nuts, such as pecans, walnuts, or almonds, to the butterscotch filling or use a nut-based filling altogether.
- Cream Cheese Filling: For a richer flavor, try a cream cheese filling. Combine softened cream cheese with sugar, vanilla extract, and a pinch of salt.
- Chocolate Kringle: Add cocoa powder to the dough or drizzle melted chocolate over the finished kringle.
- Spiced Kringle: Add warming spices, such as nutmeg, cardamom, or ginger, to the dough or filling.
FAQs (Frequently Asked Questions)
Q: Why is chilling the dough so important?
A: Chilling the dough allows the gluten to relax, which results in a more tender and flaky pastry. It also helps to keep the butter solid, preventing it from melting into the dough.
Q: Can I use active dry yeast instead of cake yeast?
A: Yes, you can substitute active dry yeast for cake yeast. Use the same amount (1 package) and proof it in the warm water for about 5-10 minutes before adding it to the other ingredients.
Q: How do I know when the kringle is done baking?
A: The kringle is done when it is golden brown and the filling is bubbly. A toothpick inserted into the center should come out clean (though some filling may stick to it).
Q: Can I freeze the unbaked kringle?
A: Yes, you can freeze the unbaked kringle. Wrap it tightly in plastic wrap and then in foil. Freeze for up to 2 months. Thaw it overnight in the refrigerator before baking. You may need to add a few minutes to the baking time.
Q: My kringle isn’t as flaky as I hoped. What did I do wrong?
A: The most common reasons for a less-than-flaky kringle are not keeping the butter cold enough during the lamination process or not chilling the dough for long enough.
Final Thoughts
This kringle recipe is more than just a set of instructions; it’s an invitation to create a cherished tradition in your own kitchen. The process may seem a bit involved, but the reward is a truly spectacular pastry that’s sure to impress your family and friends. Don’t be afraid to experiment with different fillings and flavors to make it your own. And most importantly, savor the experience of creating something delicious from scratch. I hope you enjoy making and sharing this taste of Wisconsin as much as I do!