
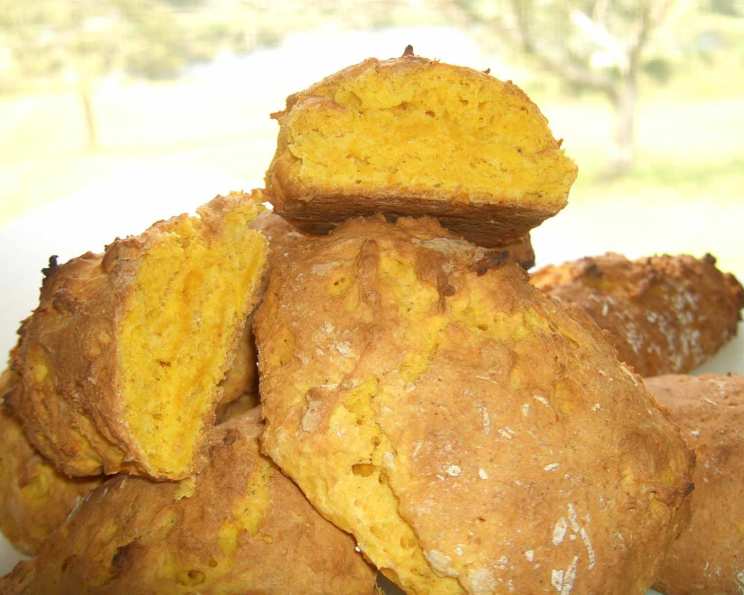
Lady Florence Bjelke-Petersen’s Famous Pumpkin Scones: A Taste of Australian Hospitality
My grandmother, Nan, wasn’t much of a baker, but she always had a plate of scones on the table when we visited. They were usually store-bought, truth be told, but on special occasions, she’d attempt her own. They were dense, slightly lopsided, and always served with a generous dollop of jam and whipped cream. One time, she proudly announced she’d used the Lady Flo’s pumpkin scone recipe. I remember the excitement, the slightly orange hue of the scones, and the comforting aroma that filled her little kitchen. Those slightly imperfect, yet utterly memorable, pumpkin scones remain a cherished memory of time spent with Nan.
Recipe Overview
- Prep Time: 15 minutes
- Cook Time: 15-20 minutes
- Total Time: 30-35 minutes
- Yields: Approximately 12-15 scones
- Dietary Type: Vegetarian
Ingredients
- 1 tablespoon butter, softened
- 1/2 cup sugar
- 1/4 teaspoon salt
- 1 egg
- 1 cup mashed pumpkin, cold
- 2 cups self-raising flour
Equipment Needed
- Electric mixer
- Large bowl
- Floured board
- Baking tray
Instructions
-
Preheat your oven to a very hot temperature, between 225-250°C (440-480°F). This high heat is crucial for achieving a light and fluffy texture. Ensure the oven rack is positioned in the top shelf.
-
In a large bowl, use an electric mixer to beat together the softened butter, sugar, and salt. Continue mixing until the mixture is light and creamy. This step incorporates air into the batter, which contributes to the scone’s rise.
-
Add the egg to the butter mixture and beat until well combined. The egg acts as a binder, adding richness and moisture to the scones.
-
Add the cold mashed pumpkin to the bowl. Stir until just combined. It is important that the pumpkin is cold as it can impact the gluten formation.
-
Gradually stir in the self-raising flour until just combined. Be careful not to overmix the dough at this stage. Overmixing develops the gluten in the flour, resulting in tough scones. The dough will be slightly sticky.
-
Turn the dough out onto a lightly floured board. Gently pat the dough down to about 2-3cm thickness.
-
Use a sharp knife to cut the dough into squares. You can also use a round cutter if preferred, but squares are the traditional shape for these scones. Avoid twisting the cutter, as this can seal the edges and prevent the scones from rising properly.
-
Carefully place the cut scones onto the baking tray, leaving a little space between each one.
-
Bake in the preheated oven on the top shelf for 15-20 minutes, or until the scones are golden brown on top and cooked through. Keep a close eye on them, as they can burn quickly in a very hot oven. To check for doneness, insert a skewer into the center of a scone. If it comes out clean, the scones are ready.
-
Remove the scones from the oven and transfer them to a wire rack to cool slightly before serving.
Expert Tips & Tricks
- Use cold mashed pumpkin: As previously noted, cold pumpkin is key. It helps prevent the butter from melting too quickly and keeps the dough from becoming too sticky.
- Don’t overmix: Overmixing is the enemy of light and fluffy scones. Mix only until the ingredients are just combined. A few streaks of flour are perfectly fine.
- Hot oven is essential: The high temperature creates a burst of steam that helps the scones rise quickly and evenly. Make sure your oven is properly preheated.
- Handle the dough gently: Avoid kneading or stretching the dough too much. The less you handle it, the more tender the scones will be.
- Brush with milk or egg wash (optional): For a shinier, more golden crust, brush the tops of the scones with a little milk or egg wash before baking.
- Make ahead tip: The dry ingredients (flour, sugar, salt) can be combined ahead of time and stored in an airtight container. When ready to bake, simply add the wet ingredients.
Serving & Storage Suggestions
Lady Flo’s pumpkin scones are best served warm, straight from the oven. They are delicious on their own or with a generous dollop of whipped cream and your favorite jam. They also pair well with butter or clotted cream.
Leftover scones can be stored in an airtight container at room temperature for up to 2 days. To keep them fresher for longer, store them in the refrigerator for up to 4 days.
To reheat, simply warm them in a preheated oven at 150°C (300°F) for a few minutes, or microwave them briefly.
Scones can also be frozen for up to 2 months. Wrap them tightly in plastic wrap and then place them in a freezer bag. To thaw, simply leave them at room temperature for a few hours or overnight. Reheat as directed above.
Nutritional Information
| Nutrient | Amount per Serving (approximate) | % Daily Value (approximate) |
|---|---|---|
| Calories | 150-200 kcal | 8-10% |
| Total Fat | 5-8g | 8-12% |
| Saturated Fat | 3-5g | 15-25% |
| Cholesterol | 20-30mg | 7-10% |
| Sodium | 150-250mg | 6-10% |
| Total Carbohydrate | 25-35g | 8-12% |
| Dietary Fiber | 1-2g | 4-8% |
| Sugars | 8-12g | N/A |
| Protein | 3-4g | 6-8% |
Note: Nutritional information is an estimate and may vary depending on specific ingredients and serving sizes.
Variations & Substitutions
- Gluten-free: Substitute the self-raising flour with a gluten-free self-raising flour blend. You may need to add a binding agent, such as xanthan gum, to help hold the scones together.
- Dairy-free: Replace the butter with a dairy-free butter alternative.
- Spiced Pumpkin: Add a pinch of cinnamon, nutmeg, or ginger to the dough for a warm, spiced flavor.
- Sweet Potato Scones: Substitute the pumpkin with mashed sweet potato for a slightly different flavor profile.
- Cheese Scones: Add grated cheddar cheese to the dough for a savory twist.
- Herb Scones: Mix in chopped fresh herbs, such as rosemary or thyme, for a fragrant and flavorful scone.
FAQs (Frequently Asked Questions)
Q: Why are my scones flat and hard?
A: Overmixing the dough is the most common cause of flat, hard scones. Be gentle when mixing and only combine the ingredients until just moistened. Also, ensure your baking powder is fresh.
Q: Can I use canned pumpkin puree?
A: Yes, canned pumpkin puree works perfectly well in this recipe. Just make sure it’s 100% pumpkin and not pumpkin pie filling.
Q: Can I make these scones ahead of time and bake them later?
A: While it’s best to bake the scones immediately, you can prepare the dough ahead of time and store it in the refrigerator for up to a few hours. However, the longer the dough sits, the less rise you may get.
Q: What is self-raising flour, and can I make my own?
A: Self-raising flour is all-purpose flour with baking powder and salt already added. To make your own, combine 1 cup of all-purpose flour with 1 1/2 teaspoons of baking powder and 1/4 teaspoon of salt.
Q: How do I prevent the bottom of my scones from burning?
A: If your scones are browning too quickly on the bottom, try placing a baking sheet underneath the baking tray to insulate it from the direct heat of the oven.
Final Thoughts
Lady Florence Bjelke-Petersen’s pumpkin scones are a true Australian classic, a testament to simple ingredients and timeless techniques. They’re more than just a recipe; they’re a taste of home, a symbol of warmth and hospitality. So, gather your ingredients, preheat your oven, and give this iconic recipe a try. Share them with your loved ones, and let the comforting aroma of freshly baked pumpkin scones fill your kitchen and your hearts. I encourage you to add your own special touch and create memories that will last a lifetime, just like my Nan did all those years ago. Enjoy!