
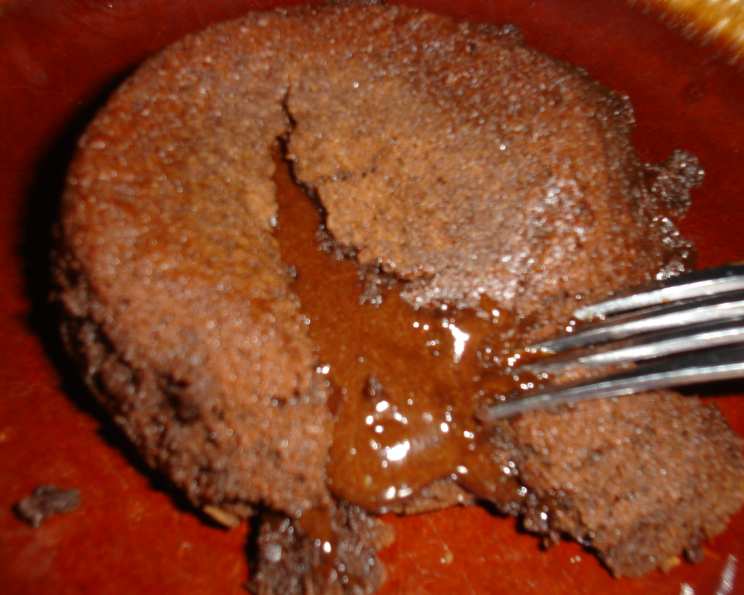
Molten Chocolate Lava Cakes: A Decadent Delight
The first time I made lava cakes was a disaster. I was trying to impress a date and, in my overzealousness, I overbaked them to oblivion. Instead of a molten center, we had dense, slightly burnt chocolate pucks. We laughed it off, but I vowed to master the art of the perfect lava cake. Years later, after countless attempts and tweaks, I can confidently say these rich, gooey desserts are now my specialty, guaranteed to impress and deliver that molten chocolate experience every single time.
Recipe Overview:
- Prep Time: 10 minutes
- Cook Time: 11-15 minutes
- Total Time: 26 minutes
- Servings: 7
- Yield: 7 lava cakes
- Dietary Type: Not specified
Ingredients:
- ½ cup butter
- 8 ounces quality semisweet chocolate, chopped up
- 4 eggs
- 2 tablespoons chocolate hazelnut syrup (the kind used to flavor Italian soda or coffee)
- ½ cup sugar
- 2 tablespoons flour
- powdered sugar (to garnish)
Equipment Needed:
- Saucepan
- Medium bowl
- Electric mixer
- Seven 6-ounce ramekins or custard cups
- Cookie sheet
Instructions:
- Preheat your oven to 400°F (200°C). This is crucial for achieving the perfect molten center.
- Prepare your ramekins: Thoroughly grease and flour seven, six-ounce ramekins or custard cups. This prevents the cakes from sticking and ensures easy removal. Tap out any excess flour.
- Melt the chocolate and butter: In a saucepan over low heat, gently melt together the chocolate and butter. Stir constantly to prevent scorching, until the mixture is smooth and glossy. Remove from heat.
- Prepare the egg mixture: In a medium bowl, combine the eggs and chocolate hazelnut syrup.
- Beat the eggs: Using an electric mixer, beat the egg mixture until it becomes foamy. This incorporates air and contributes to a light and airy texture.
- Add sugar: Gradually beat in the sugar until the mixture is light and thickened, about 2 minutes. The mixture should be pale yellow and hold a ribbon when the beaters are lifted.
- Combine wet and dry ingredients: Add the flour to the chocolate mixture and stir just enough to blend all ingredients. Be careful not to overmix, as this can result in a tough cake.
- Gently fold the chocolate-butter mixture into the egg mixture, ensuring everything is well combined.
- Fill the ramekins: Fill each prepared ramekin about ¾ full with the chocolate batter. Don’t overfill them as they will rise during baking.
- Bake: Place the ramekins on a cookie sheet. This makes it easier to transfer them to and from the oven and also helps to distribute the heat evenly.
- Bake at 400°F (200°C) for approximately 11-15 minutes. The baking time is crucial and can vary depending on your oven. The cakes should just form a top crust, and the center should still be molten. A slight jiggle is a good sign. Start checking at 11 minutes and adjust accordingly.
- Cool slightly: Cool the lava cakes in the ramekins for 5 minutes before inverting. This allows them to set slightly and makes for a cleaner release.
- Invert and garnish: Carefully invert each ramekin onto a serving plate. If they don’t release easily, gently loosen the edges with a thin knife or spatula.
- Dust with powdered sugar and serve immediately. Serve with a scoop of vanilla ice cream or fresh berries for an extra touch of decadence.
Expert Tips & Tricks:
- Chocolate Quality Matters: Using high-quality semisweet chocolate makes a significant difference in the final flavor. Opt for chocolate with a cocoa percentage of around 60-70%.
- Don’t Overbake: The key to a molten center is to avoid overbaking. Err on the side of underbaking if you are unsure. The center should still be slightly wobbly when you take them out of the oven.
- Ramekin Prep is Key: Thoroughly greasing and flouring the ramekins is essential for easy release. You can also use parchment paper circles in the bottom of the ramekins for extra insurance.
- Temperature Control: Make sure your oven is accurately calibrated to 400°F (200°C). An oven thermometer can be helpful to ensure consistent results.
- Make-Ahead Option: You can prepare the batter ahead of time and store it in the refrigerator for up to 24 hours. Fill the ramekins just before baking. You might need to add a minute or two to the baking time if the batter is cold.
Serving & Storage Suggestions:
Lava cakes are best served immediately while the center is still molten and warm. The contrast between the warm cake and a scoop of cold ice cream is heavenly. Dust with powdered sugar for an elegant presentation, or garnish with fresh berries, whipped cream, or a drizzle of chocolate sauce.
Leftover lava cakes (if you have any!) can be stored in the refrigerator for up to 2 days. However, the molten center will solidify. To reheat, microwave for 15-20 seconds, or until warmed through. Be careful not to overheat, or they will become dry.
Nutritional Information:
| Nutrient | Amount per Serving | % Daily Value |
|---|---|---|
| Calories | 386.6 kcal | N/A |
| Calories from Fat | 299 g | 77 % |
| Total Fat | 33.2 g | 51 % |
| Saturated Fat | 19.9 g | 99 % |
| Cholesterol | 141.2 mg | 47 % |
| Sodium | 164.5 mg | 6 % |
| Total Carbohydrate | 26.1 g | 8 % |
| Dietary Fiber | 5.6 g | 22 % |
| Sugars | 14.7 g | 58 % |
| Protein | 8.2 g | 16 % |
Variations & Substitutions:
- Chocolate Variations: Experiment with different types of chocolate, such as dark chocolate, milk chocolate, or white chocolate. Adjust the sugar accordingly, as darker chocolates are less sweet.
- Flavor Infusions: Add a teaspoon of espresso powder to the batter for a mocha flavor, or a pinch of cinnamon or chili powder for a spiced kick.
- Nutty Indulgence: Replace the chocolate hazelnut syrup with another flavored syrup like vanilla or almond, or add a tablespoon of nut butter (peanut, almond, or cashew) to the batter.
- Gluten-Free Option: Substitute the all-purpose flour with a gluten-free flour blend for a gluten-free version.
- Vegan Adaptation: This recipe is difficult to make vegan without significantly altering the texture and consistency.
FAQs (Frequently Asked Questions):
Q: How do I know when the lava cakes are done?
A: The edges of the cake should be set and the top should have a thin crust. The center should still be slightly jiggly.
Q: Can I make these ahead of time?
A: You can prepare the batter ahead of time and store it in the refrigerator for up to 24 hours. Fill the ramekins just before baking.
Q: What if my lava cakes stick to the ramekins?
A: Make sure you grease and flour the ramekins thoroughly. You can also use parchment paper circles in the bottom.
Q: Can I use different sized ramekins?
A: Yes, but you will need to adjust the baking time accordingly. Smaller ramekins will require less baking time, and larger ramekins will require more.
Q: My lava cakes didn’t have a molten center. What did I do wrong?
A: You likely overbaked them. Reduce the baking time by a minute or two next time. Also, make sure your oven temperature is accurate.
Final Thoughts:
These Molten Chocolate Lava Cakes are a truly special treat – a symphony of rich, decadent flavors and textures that will delight your taste buds. Don’t be intimidated by the seemingly complex name; with a little attention to detail, you’ll be creating restaurant-quality desserts in your own kitchen in no time. So go ahead, gather your ingredients, preheat that oven, and prepare to experience the pure joy of a perfectly molten chocolate center. I encourage you to experiment with variations to find your own signature lava cake, and please share your feedback! Enjoy!