
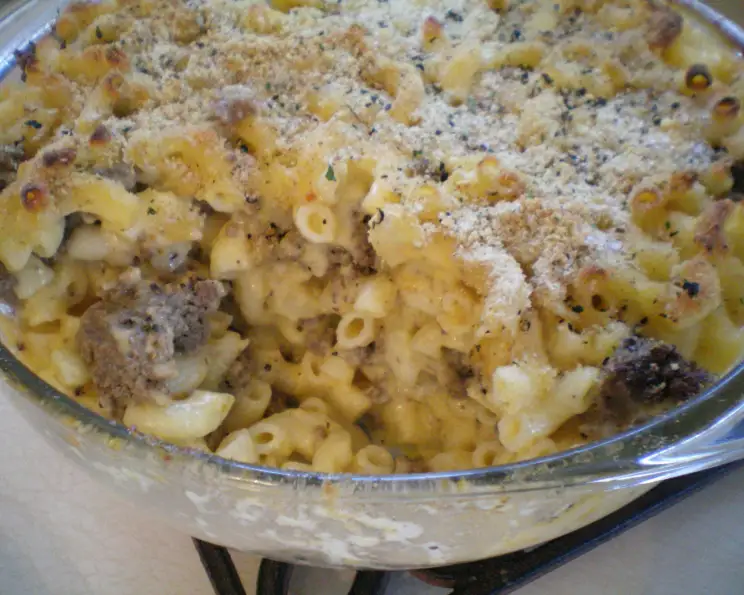
Layered Mac ‘n Cheese With Ground Beef: A Comfort Food Classic
My grandmother, bless her heart, wasn’t exactly a culinary pioneer, but she had a few dishes that were absolute showstoppers. Her layered mac ‘n cheese with ground beef was one of them. I remember sneaking into the kitchen while she was prepping, the aroma of browning beef and melting cheese so intoxicating it could make your eyes water. It was a dish built on simple ingredients, but made with the most important ingredient of all: love. Every bite was a warm hug, a reminder of family dinners and cozy evenings spent together. It’s a dish that transcends generations, and I’m thrilled to share it with you.
Recipe Overview
- Prep Time: 20 minutes
- Cook Time: 30 minutes
- Total Time: 50 minutes
- Servings: 6
- Dietary Type: Comfort Food
Ingredients
- 2 cups uncooked elbow macaroni
- 1 lb lean ground beef
- 1 teaspoon garlic, minced
- 1 teaspoon seasoning salt
- ¼ teaspoon ground black pepper
- ¼ teaspoon ground nutmeg
- 1 dash cayenne
- 4 tablespoons butter
- 2 tablespoons all-purpose flour
- 2 ½ cups milk
- 3 cups sharp cheddar cheese, shredded
- 1 cup soft breadcrumbs, about 2 slices bread
Equipment Needed
- 2-quart casserole dish
- Cooking spray
- 10-inch skillet
- 2-quart saucepan
- Stirring utensils
Instructions
- Preheat your oven to 350 degrees F (175 degrees C). Generously spray a 2-quart casserole dish with cooking spray. This will prevent sticking and make serving easier.
- Cook the elbow macaroni according to the package directions, ensuring it’s al dente. Drain well. You don’t want soggy mac ‘n cheese!
- While the macaroni is cooking, heat a 10-inch skillet over medium-high heat. Add the lean ground beef and minced garlic, along with ½ teaspoon of the seasoning salt and the ¼ teaspoon of black pepper.
- Cook the beef, breaking it up with a spoon, for 5-7 minutes, or until it is thoroughly cooked and no longer pink. Drain any excess grease from the skillet. Nobody wants greasy mac!
- In a 2-quart saucepan, melt the 4 tablespoons of butter over medium heat.
- Stir in the 2 tablespoons of all-purpose flour. Cook for 1 minute, stirring constantly, until the mixture is bubbly. This creates a roux, which will thicken the cheese sauce.
- Gradually stir in the 2 ½ cups of milk, cooking for 5-6 minutes, stirring constantly, until the mixture thickens slightly. Be patient and stir continuously to prevent lumps from forming.
- Stir in the remaining ½ teaspoon of seasoning salt, the ¼ teaspoon of ground nutmeg, and the dash of cayenne. The nutmeg adds a warm, subtle spice, while the cayenne provides a gentle kick.
- Remove the saucepan from the heat and stir in the 3 cups of shredded sharp cheddar cheese until it is completely melted and smooth. This is where the magic happens!
- Fold in the cooked and drained macaroni until it is evenly coated in the cheesy sauce.
- Spoon 1/3 of the macaroni mixture (about 1 1/3 cups) into the prepared casserole dish.
- Top with half of the cooked ground beef (about 1 ½ cups), spreading it evenly over the macaroni layer.
- Layer with another 1/3 of the macaroni mixture, followed by the remaining ground beef.
- Top with the remaining macaroni mixture, spreading it evenly.
- Sprinkle the 1 cup of soft breadcrumbs over the top of the macaroni and cheese.
- Bake uncovered in the preheated oven for 25-30 minutes, or until the breadcrumbs are golden brown and the macaroni and cheese is bubbly.
- Let stand for a few minutes before serving.
Expert Tips & Tricks
- Cheese it up: For an even richer and more complex flavor, use a blend of cheeses. Try adding some Gruyere, Monterey Jack, or even a little bit of smoked Gouda to the cheddar.
- Breadcrumb Boost: Toast the breadcrumbs in a dry skillet with a little melted butter before sprinkling them on top for extra flavor and crunch. You can also add a pinch of garlic powder or Italian seasoning to the breadcrumbs.
- Make-Ahead Magic: Assemble the entire casserole ahead of time, cover it tightly with foil, and refrigerate it for up to 24 hours. When ready to bake, let it sit at room temperature for 30 minutes before placing it in the oven. You may need to add 5-10 minutes to the baking time.
- Spice it Right: If you like a little more heat, add a pinch or two of red pepper flakes to the cheese sauce.
- Prevent Dryness: If you notice the top browning too quickly, tent the casserole dish with foil for the last 10-15 minutes of baking.
- Consider adding a dollop of sour cream or plain greek yogurt to each serving for extra richness and tang.
Serving & Storage Suggestions
Serve this layered mac ‘n cheese hot and bubbly straight from the oven. It’s a perfect side dish or a comforting main course. Garnish with a sprinkle of fresh parsley for a pop of color.
Leftovers can be stored in an airtight container in the refrigerator for up to 3 days. To reheat, bake in a preheated oven at 350 degrees F (175 degrees C) until heated through, or microwave in short intervals, stirring occasionally. If the mac ‘n cheese seems dry after reheating, add a splash of milk or cream to restore its creamy texture.
Freezing is not recommended, as the texture of the cheese sauce may change upon thawing.
Nutritional Information
| Nutrient | Amount per Serving | % Daily Value |
|---|---|---|
| Calories | 654 kcal | N/A |
| Calories from Fat | 346 g | N/A |
| Total Fat | 38.5 g | 59% |
| Saturated Fat | 22.3 g | 111% |
| Cholesterol | 143.1 mg | 47% |
| Sodium | 558.1 mg | 23% |
| Total Carbohydrate | 37.6 g | 12% |
| Dietary Fiber | 1.4 g | 5% |
| Sugars | 1.3 g | N/A |
| Protein | 38 g | 76% |
Note: Nutritional information is an estimate and may vary based on specific ingredients and portion sizes.
Variations & Substitutions
- Pasta Power: Feel free to experiment with different pasta shapes. Penne, rotini, or shells would all work well in place of elbow macaroni.
- Cheese Please: For a different flavor profile, try using a blend of cheeses like Swiss, Gruyere, or even a sharp provolone.
- Veggie Boost: Add some cooked vegetables like broccoli florets, peas, or corn to the macaroni and cheese for extra nutrients and flavor.
- Spicy Kick: Add a pinch of red pepper flakes or a dash of hot sauce to the cheese sauce for some heat.
- Herb Infusion: Stir in some fresh herbs like thyme, rosemary, or oregano to the cheese sauce for added flavor.
- Vegetarian Version: Omit the ground beef for a classic vegetarian mac ‘n cheese. You could also add some sautéed mushrooms or vegetables for added substance.
- Crumb Topping: Substitute the breadcrumbs with crushed Ritz crackers or potato chips for a salty and buttery topping.
FAQs (Frequently Asked Questions)
Q: Can I use pre-shredded cheese?
A: While pre-shredded cheese is convenient, it often contains cellulose, which can prevent it from melting as smoothly. For the best results, shred your own cheese from a block.
Q: Can I make this in a slow cooker?
A: While possible, it’s not recommended as the pasta can become mushy. The oven provides better control over the texture and ensures even cooking.
Q: How do I prevent the cheese sauce from being grainy?
A: Avoid overheating the cheese sauce. Remove it from the heat as soon as the cheese is melted and smooth. Overheating can cause the cheese to separate and become grainy.
Q: Can I use skim milk instead of whole milk?
A: Whole milk will result in a richer and creamier cheese sauce. However, you can use skim milk if you prefer, but the sauce may be slightly thinner.
Q: My breadcrumbs are burning. What do I do?
A: Cover the casserole dish with aluminum foil to protect the breadcrumbs from burning. Reduce the oven temperature by 25 degrees F (15 degrees C) if necessary.
Final Thoughts
This layered mac ‘n cheese with ground beef is more than just a recipe; it’s a taste of home, a celebration of comfort, and a connection to cherished memories. I hope you’ll give it a try and create your own special moments around this dish. Don’t be afraid to experiment with different cheeses, spices, and vegetables to make it your own. And please, share your feedback – I’d love to hear what you think and how you personalized this classic recipe!