
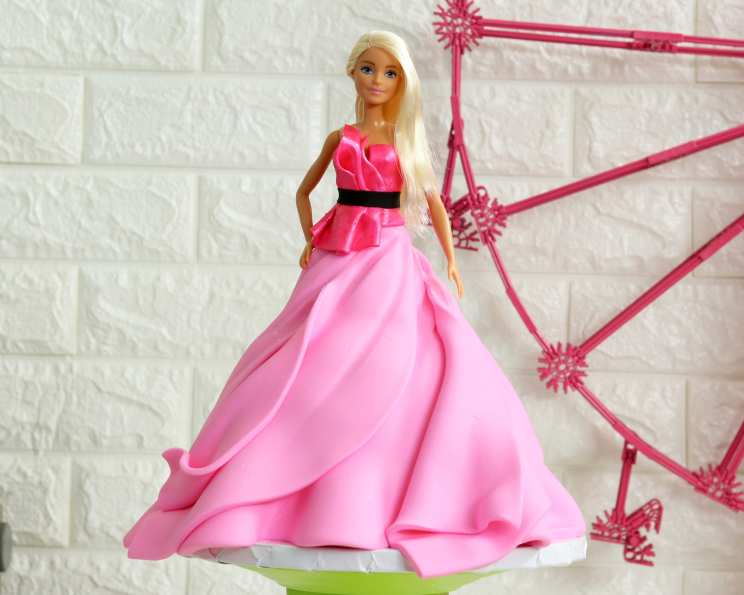
Elle Woods Cake: Bend and Snap Your Way to Baking Perfection
The first time I saw Legally Blonde, I was a teenager, immediately captivated by Elle Woods’ unwavering spirit and unapologetically pink aesthetic. It wasn’t just a movie; it was an anthem for embracing individuality and challenging expectations. I remember sketching dress designs inspired by her iconic wardrobe, and dreaming up pink-themed desserts, feeling empowered by the movie’s message of believing in yourself. Now, years later, I’m channeling that same spirit into this incredibly fun and surprisingly sophisticated “Elle Woods Cake”—a dazzling creation that’s as delightful to look at as it is to devour.
Recipe Overview
- Prep Time: 1 hour
- Cook Time: 30 minutes
- Total Time: 1 hour 30 minutes
- Servings: 20
- Yield: 1 cake
- Dietary Type: Not specified
Ingredients
- 2 cake mixes (16 ounces each), plus the ingredients required by the mix instructions (usually eggs, oil, and water)
- 24 ounces white fondant
- Pink food coloring
- 35 ounces Classic Buttercream Frosting
Equipment Needed
- Wilton doll cake pan
- Offset spatula
- Sculpting tools (optional)
Instructions
-
Prepare the Cake Batter: According to the instructions on the box mix, prepare the batter for both of your 16-ounce cake mixes. Ensure to follow the instructions carefully for perfect results.
-
Bake the Cakes: Preheat your oven according to the cake mix instructions. Pour the batter into a Wilton doll cake pan. Bake until a toothpick inserted into the center comes out clean. Baking times may vary depending on your oven. It’s important to ensure the cake is fully cooked to maintain the cake’s shape and structure.
-
Cool and Level the Cakes: Once baked, remove the cakes from the pan and let them cool completely on a wire rack. Use a serrated knife to slice each cake into three equal layers. This will give you a total of six layers for your cake.
-
Assemble the Cake: Place one layer of cake on a serving plate or cake stand. Spread a generous amount of buttercream frosting evenly over the top. Repeat this process with the remaining cake layers, stacking them one on top of the other with buttercream between each layer.
-
Crumb Coat: Apply a thin layer of buttercream frosting over the entire cake. This is called a crumb coat and it helps to seal in any loose crumbs, creating a smooth surface for the final layer of frosting. Chill the cake in the refrigerator for at least 30 minutes to allow the crumb coat to firm up.
-
Final Frosting Layer: Once the crumb coat is firm, apply a second, thicker layer of buttercream frosting over the entire cake. Use an offset spatula to smooth out the icing, creating a flawless finish.
-
Create the Doll Hole: Carefully cut a hole into the top layer of the cake. The hole should be just big enough to fit a Barbie doll’s legs, allowing the doll to stand securely in the cake.
-
Color the Fondant: Tint the white fondant a vibrant pink color using pink food coloring. Knead the fondant well until the color is evenly distributed.
-
Cover the Cake: Roll out the pink fondant into a large circle, approximately 14 inches in diameter. Carefully drape the fondant over the entire cake, smoothing it down gently with your hands.
-
Enhance the Folds: Gently press the fondant against the cake to enhance the natural folds at the bottom, creating a flowing dress-like effect.
-
Position the Doll: Carefully place your Barbie doll into the hole in the top of the cake, ensuring that her legs are concealed within the cake.
-
Fondant Waistband: Roll out a small piece of pink fondant and use it to cover the doll’s waist, blending it seamlessly into the rest of the cake. This will create a smooth transition between the doll and the fondant dress.
-
Fabric Detailing: Roll out more pink fondant and cut out fabric patterns. Place the fondant on the bottom of the cake at a 45-degree angle, creating a realistic dress-like appearance. Fold the back of the fondant over to create a textured fold, adding dimension to the dress.
-
Texture: Using sculpting tools, add texture to the fondant, mimicking the look of fabric. Repeat this process around the entire cake to create a fully decorated dress.
-
Top Design: Cut out a long rectangle of pink fondant for the doll’s top. Attach the rectangle to the front of the doll, shaping it to fit snugly around her torso. Cut out a second rectangle and apply it to the opposite side of the doll’s top, creating a complete bodice. Add small fondant folds to create a ruffled effect for the top.
-
Luster: Paint the top of the dress with pink luster dust to add a touch of shimmer and shine. This will give the dress a glamorous, eye-catching finish.
-
Final Touches: Cut a long strip of black fondant and wrap it around the doll’s waist to create a belt. This will define the doll’s waistline and add a stylish accent to the dress.
-
Finishing Touches: As the final touch, comb the doll’s hair to get ready for the red carpet.
Expert Tips & Tricks
- To prevent the cake from drying out, wrap each layer in plastic wrap as it cools.
- For an extra moist cake, brush each layer with a simple syrup (equal parts water and sugar, heated until the sugar dissolves) before frosting.
- If the fondant is too sticky, lightly dust your work surface with powdered sugar.
- To create a more elaborate dress design, use fondant cutters or molds to create intricate details.
- If you don’t have sculpting tools, you can use a toothpick or the back of a knife to add texture to the fondant.
- If the fondant dries too fast, lightly brush with water to soften.
Serving & Storage Suggestions
Serve your Elle Woods Cake immediately after decorating for the best presentation. If you need to store it, keep it in the refrigerator in an airtight container to prevent the fondant from drying out. The cake will last for up to 3-4 days in the refrigerator. For longer storage, you can freeze the cake (unfrosted) for up to 2-3 months. Thaw it overnight in the refrigerator before frosting and decorating. Because the fondant can get sticky in the fridge, try not to put an airtight lid on the cake. You may want to use a large box instead.
Nutritional Information
Note: Nutritional information is an estimate and may vary based on specific ingredients and brands used.
| Nutrient | Amount per Serving | % Daily Value |
|---|---|---|
| Calories | 450 kcal | 23% |
| Total Fat | 20g | 31% |
| Saturated Fat | 12g | 60% |
| Cholesterol | 50mg | 17% |
| Sodium | 300mg | 13% |
| Total Carbohydrate | 65g | 22% |
| Dietary Fiber | 1g | 4% |
| Sugars | 40g | N/A |
| Protein | 4g | 8% |
Variations & Substitutions
- For a gluten-free version, use a gluten-free cake mix.
- You can experiment with different flavors of cake mix and frosting to customize the cake to your liking. Chocolate cake with raspberry frosting would be a delicious alternative.
- Instead of pink fondant, use different colors to create a unique and personalized dress design.
- For a vegan version, use a vegan cake mix, vegan buttercream frosting, and vegan fondant.
- Use a dairy-free cake mix and frosting for a dairy-free version.
- For an added pop of flavor, you can add a layer of fruit filling between the cake layers, such as raspberry jam or strawberry preserves.
FAQs (Frequently Asked Questions)
Q: Can I make this cake ahead of time?
A: Yes, you can bake the cake layers and make the frosting ahead of time. Store the cake layers tightly wrapped at room temperature or in the refrigerator. Frost and decorate the cake a day or two before serving for the best results.
Q: How do I prevent the fondant from cracking?
A: To prevent fondant from cracking, make sure to knead it well until it is smooth and pliable. Also, avoid working with fondant in a dry environment, as this can cause it to dry out and crack.
Q: Can I use store-bought frosting instead of making my own?
A: Yes, you can use store-bought frosting to save time. However, homemade buttercream frosting is generally considered to be more flavorful and easier to work with.
Q: How do I transport this cake without damaging it?
A: To transport the cake without damaging it, place it in a sturdy cake box and secure it with non-slip matting or crumpled paper towels. Drive carefully and avoid sudden stops or turns.
Q: What if my fondant is too sticky?
A: If your fondant is too sticky, lightly dust your work surface and your hands with powdered sugar. This will help to prevent the fondant from sticking.
Final Thoughts
Embrace your inner Elle Woods and have fun creating this dazzling cake! Don’t be afraid to experiment with different colors, textures, and designs to make it truly your own. Whether you’re celebrating a special occasion or simply want to add a touch of sparkle to your day, this cake is sure to impress. Share your creations and let us know what you think! Now go forth and bake, and remember, always believe in yourself, because you are capable of amazing things!