
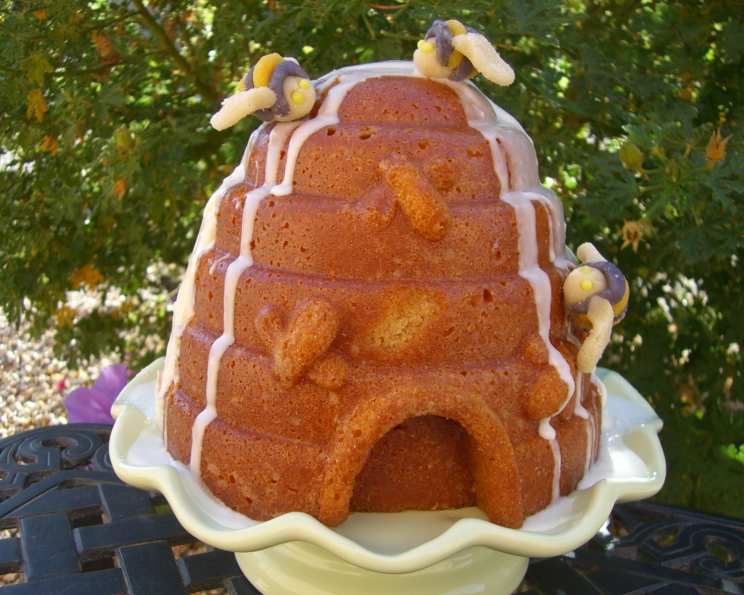
Lemon Beehive Cake: A Sweet Taste of Honeyed Sunshine
The first time I saw a beehive cake, it was at my grandmother’s annual summer picnic. Nestled amongst checkered blankets and overflowing baskets of fruit, it looked like a miniature, golden palace, glistening in the afternoon sun. The aroma of lemon and honey hung in the air, a siren’s call to my young taste buds. I remember being utterly captivated, not just by its beauty, but by the promise of the sweet, tangy delight it held within. This cake isn’t just a dessert; it’s a memory, a symbol of warmth, togetherness, and the simple joys of summer.
Recipe Overview
- Prep Time: 40 minutes
- Cook Time: 55-60 minutes
- Total Time: 1 hour 40 minutes
- Servings: 8-10
- Yield: 1 beehive cake
- Dietary Type: Not Gluten-Free
Ingredients
For the Cake:
- 2 3/4 cups all-purpose flour
- 1 1/2 teaspoons baking powder
- 1/2 teaspoon salt
- 16 tablespoons (2 sticks) unsalted butter, room temperature
- 1 2/3 cups granulated sugar
- 3 teaspoons lemon zest
- 4 eggs, lightly beaten, room temperature
- 1 teaspoon vanilla extract
- 2/3 cup milk, room temperature
- 1/4 cup fresh lemon juice
For the Glaze:
- 1/2 cup honey
- 1 1/2 tablespoons fresh lemon juice
- 1/4 teaspoon salt
For the Quick Buttercream:
- 4 tablespoons unsalted butter, room temperature
- 1 1/2 cups confectioners’ sugar, sifted
- 1 tablespoon milk
- 1/2 teaspoon vanilla extract
- 1 pinch salt
For the Royal Icing:
- 1 cup confectioners’ sugar, sifted
- 2-3 teaspoons milk
Optional Decoration:
- Sugar honeybees
- Granulated sugar
Equipment Needed
- Beehive cake pan
- Electric mixer (stand or handheld)
- Mixing bowls
- Sifter
- Spatula
- Whisk
- Small saucepan
- Pastry brush
- Wire rack
- Waxed paper
- Serrated knife
- Offset spatula
Instructions
-
Ensure all ingredients are at room temperature before you begin. This is crucial for proper emulsification and a tender cake.
-
Position a rack in the lower third of the oven and preheat to 325°F (160°C). This lower temperature allows the cake to bake evenly and prevents the outside from browning too quickly.
-
Grease and flour a beehive cake pan thoroughly. A baking spray with flour already included works wonderfully, but you can also use softened butter and flour. Be sure to tap out any excess flour to prevent a powdery coating on the finished cake.
-
Sift together the flour, baking powder, and salt over a sheet of waxed paper. Sifting ensures that these dry ingredients are evenly distributed, preventing lumps and creating a lighter, more tender cake. Set aside.
-
In the bowl of an electric mixer fitted with the flat beater (paddle attachment), beat the butter on medium speed until creamy and smooth, about 1 minute. Avoid over-beating at this stage.
-
Add the granulated sugar and lemon zest to the butter and continue beating until light and fluffy, about 5 minutes. This step is vital for incorporating air into the batter, resulting in a light and airy texture. Remember to stop the mixer occasionally to scrape down the sides of the bowl to ensure even mixing. The mixture should become pale and almost doubled in volume.
-
Add the eggs a little at a time, beating well after each addition. Incorporating the eggs gradually prevents the batter from curdling. Make sure each egg is fully incorporated before adding the next.
-
Beat in the vanilla extract just until incorporated, about 30 seconds. Overmixing after adding the vanilla can develop the gluten in the flour, resulting in a tougher cake.
-
Reduce the mixer speed to low. Gradually add the flour mixture in three additions, alternating with the milk, beginning and ending with the flour. This method prevents the gluten from overdeveloping and ensures a tender crumb. Beat each addition just until incorporated, stopping the mixer occasionally to scrape down the sides of the bowl.
-
Add the lemon juice and beat for 30 seconds. The acid in the lemon juice helps to tenderize the gluten in the flour, contributing to the cake’s delicate texture.
-
Spoon the batter into the prepared pan, spreading the batter so the sides are slightly higher than the center. This will help the cake bake evenly and prevent a dome from forming.
-
Bake until the cake begins to pull away from the sides of the pan and a toothpick inserted into the center comes out clean, 55 to 60 minutes. Baking times can vary depending on your oven, so start checking for doneness around 50 minutes. If the top of the cake is browning too quickly, tent it loosely with foil.
-
Transfer the pan to a wire rack and let the cake cool in the pan for 10 minutes before inverting. This allows the cake to firm up slightly, making it easier to remove from the pan.
-
Meanwhile, make the glaze: In a small saucepan over medium heat, stir together the honey, lemon juice, and salt and bring just to a simmer, about 2 minutes. Remove from the heat. Avoid boiling the glaze, as it can become too thick and sticky.
-
Tap the cake pan gently on a work surface to loosen the cake. Set the rack over a sheet of waxed paper, invert the pan onto the rack, and lift off the pan. If the cake is sticking, gently run a thin knife around the edges to loosen it.
-
Using a pastry brush, brush the warm cake with the glaze. The warm cake will absorb the glaze more readily, resulting in a moist and flavorful crumb.
-
Let the cake cool completely, at least 2 hours, before assembling and decorating. This is important to ensure that the buttercream and royal icing adhere properly.
-
To make the buttercream: In a small bowl, using a handheld mixer, beat the butter on medium speed until smooth and creamy, about 1 minute. Add the confectioners’ sugar, milk, vanilla, and salt and continue beating until light and fluffy, 2 to 3 minutes more. If the buttercream is too thick, add a little more milk, a teaspoon at a time. If it’s too thin, add more confectioners’ sugar.
-
To make the royal icing: In a small bowl, stir together the confectioners’ sugar and the 2 teaspoons of milk until smooth. If necessary, add more milk 1/2 teaspoon at a time until the icing is thick but still pourable. The consistency should be similar to thick glue.
-
Stand one half of the cooled cake vertically on its base. Using a serrated knife, level the flat side of the cake by trimming off 1/8 to 1/4 inch from the edge. Repeat with the other cake half. This creates a stable base for the assembled beehive.
-
Using an offset spatula, spread a thin layer of buttercream, about 1/2 cup, on the cut side of one of the cake halves.
-
Place the cut side of the other cake half against the frosted side and gently press to secure the two halves; using the spatula, smooth the buttercream at the seam.
-
Using a large spatula, carefully transfer the cake to a serving platter.
-
Drizzle with the royal icing, making sure to cover the frosted seams of the beehive.
-
Decorate with sugar honeybees or a dusting of granulated sugar.
Expert Tips & Tricks
- For an extra boost of lemon flavor, add a teaspoon of lemon extract to the cake batter.
- If you don’t have a beehive cake pan, you can bake the batter in two 8-inch round cake pans. Adjust baking time accordingly, checking for doneness after about 30 minutes.
- The glaze can be made ahead of time and stored in an airtight container at room temperature. Warm it slightly before brushing onto the cake.
- To prevent the cake from sticking, line the bottom of the beehive pan with a circle of parchment paper in addition to greasing and flouring it.
- The buttercream can be flavored with lemon zest for a more intense citrus flavor.
- If you want a darker, richer glaze, use a dark honey like buckwheat honey.
Serving & Storage Suggestions
Serve the Lemon Beehive Cake as a centerpiece for a special occasion or as a delightful treat for afternoon tea. It pairs beautifully with a scoop of vanilla ice cream, a dollop of whipped cream, or a simple cup of Earl Grey tea.
Store leftover cake in an airtight container at room temperature for up to 2 days or in the refrigerator for up to 5 days. If storing in the refrigerator, allow the cake to come to room temperature before serving. The cake can also be frozen for up to 2 months. Wrap tightly in plastic wrap and then in foil before freezing. Thaw overnight in the refrigerator.
Nutritional Information
| Nutrient | Amount per Serving | % Daily Value |
|---|---|---|
| Calories | 840 kcal | N/A |
| Calories from Fat | 293 g | 35% |
| Total Fat | 32.6 g | 50% |
| Saturated Fat | 19.6 g | 98% |
| Cholesterol | 185.4 mg | 61% |
| Sodium | 358.2 mg | 14% |
| Total Carbohydrate | 131.9 g | 43% |
| Dietary Fiber | 1.3 g | 5% |
| Sugars | 96.5 g | N/A |
| Protein | 8.8 g | 17% |
Note: Nutritional information is an estimate and may vary based on specific ingredients and preparation methods.
Variations & Substitutions
- Gluten-Free: Substitute the all-purpose flour with a gluten-free all-purpose flour blend. Be sure to add a binder like xanthan gum according to the package instructions.
- Dairy-Free: Substitute the butter with a plant-based butter alternative and the milk with almond milk or another non-dairy milk.
- Orange Beehive Cake: Replace the lemon zest and lemon juice with orange zest and orange juice for a different citrus flavor.
- Lavender Honey Glaze: Infuse the honey with dried lavender for a floral twist on the classic glaze. Steep 1 tablespoon of dried lavender in the honey while heating, then strain before using.
- Spice Cake: Add 1 teaspoon of ground cinnamon, 1/2 teaspoon of ground ginger, and 1/4 teaspoon of ground cloves to the flour mixture for a warm, spiced version.
FAQs (Frequently Asked Questions)
Q: Can I make this cake ahead of time?
A: Yes, the cake can be baked a day or two in advance. Store it tightly wrapped at room temperature. Prepare the glaze and frosting just before assembling.
Q: My cake is browning too quickly. What should I do?
A: Tent the cake loosely with aluminum foil to prevent the top from burning while the inside finishes baking.
Q: Can I use a different type of honey?
A: Absolutely! Experiment with different types of honey, such as wildflower, clover, or buckwheat, to vary the flavor profile of the glaze.
Q: How do I prevent the cake from sticking to the pan?
A: Be sure to grease and flour the pan thoroughly, paying special attention to the intricate details of the beehive shape. You can also use a baking spray with flour.
Q: My royal icing is too thick/thin. How can I fix it?
A: If it’s too thick, add milk 1/2 teaspoon at a time until you reach the desired consistency. If it’s too thin, add more sifted confectioners’ sugar, 1 tablespoon at a time.
Final Thoughts
This Lemon Beehive Cake is more than just a dessert; it’s a celebration of simple flavors and beautiful design. From the bright tang of lemon to the sweet kiss of honey, every bite is a delightful experience. I encourage you to gather your ingredients, dust off your beehive pan, and create your own golden masterpiece. Don’t be afraid to get creative with the decorations – let your imagination take flight! Share your creations and feedback, and let’s spread a little sunshine, one delicious slice at a time.