
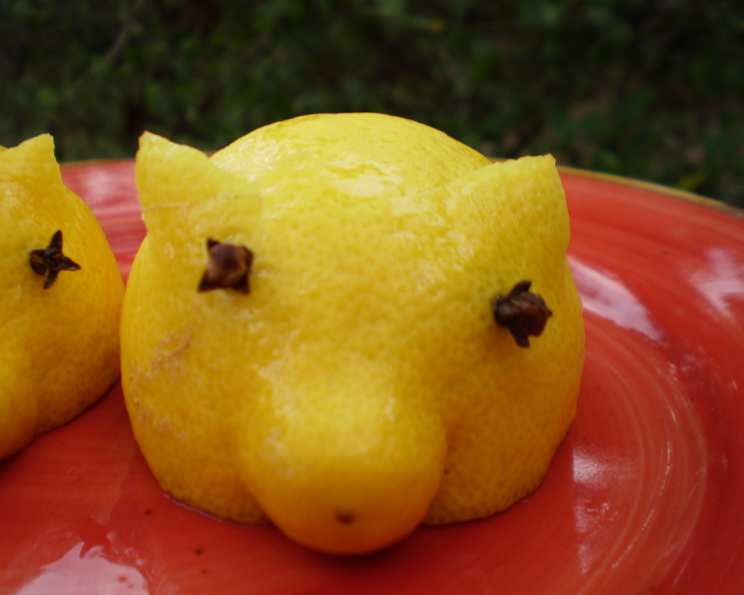
Lemon Pigs: A Zesty Culinary Whimsy
I remember my grandmother, a woman of simple pleasures and boundless creativity, always had a way of turning the ordinary into something extraordinary. She wasn’t a fancy cook, but her dishes were always filled with love and a dash of playful imagination. One Easter, instead of the usual chocolate bunnies, she presented us with a platter of these adorable “Lemon Pigs.” Their bright citrus scent and cheerful faces instantly captivated me. It wasn’t just the taste, but the sheer joy and whimsy they brought to the table. They were a reminder that food could be fun, and even the simplest ingredients could be transformed into something truly special.
Recipe Overview
- Prep Time: 15 minutes
- Cook Time: 0 minutes
- Total Time: 15 minutes
- Servings: 1
- Yield: 1 Lemon Pig
- Dietary Type: Vegan (naturally)
Ingredients
- 1 lemon
- 2 cloves
Equipment Needed
- Small knife or paring knife
Instructions
-
Begin by selecting the lemon. Look for one that is firm, has a smooth skin, and a shape that lends itself well to resembling a pig. A slightly elongated lemon works best.
-
Identify what will be the snout end of your pig. Also, determine which side will be the bottom.
-
Carefully use your knife to cut a small slice off the bottom of the lemon. This creates a flat surface, allowing the pig to sit upright without wobbling. Be cautious not to cut too much, as you want to maintain the lemon’s overall shape.
-
At the snout end, use the tip of your knife to make two small, vertical slits for the ears. These slits should be close together and about half an inch deep.
-
Gently pull out the flaps of lemon peel that you’ve created with the slits. Be delicate, as you want the ears to stand out slightly without breaking off entirely. Too much pulling can cause them to tear.
-
Finally, use the cloves to create the eyes. Insert one clove into each side of the lemon’s head, just above and slightly behind where the ears are positioned. Press them firmly into the peel so they stay in place.
Expert Tips & Tricks
-
Lemon Selection: Choose lemons with thicker peels for easier carving and more durable ears.
-
Ear Reinforcement: If the ears are prone to breaking, try inserting a small piece of toothpick into the base of each ear for added support.
-
Snout Detail: For a more defined snout, gently carve a small, rounded area at the front of the lemon before adding the ears and eyes.
-
Clove Placement: Consider using the blunt end of a toothpick to create small pilot holes for the cloves. This will make them easier to insert without damaging the lemon.
-
Preventing Browning: A light coating of lemon juice over the cut areas can help prevent excessive browning.
Serving & Storage Suggestions
These Lemon Pigs are primarily decorative and are often used as cheerful garnishes. They look especially charming accompanying fish dishes, adding a touch of whimsy to the presentation.
If you wish to store them, place the lemon pigs in an airtight container in the refrigerator. They will last for a few days, although the cut surfaces may start to dry out slightly. To rehydrate, try spritzing them lightly with water.
While these are edible, the primary purpose is to add charm to a meal. The peel may become bitter over time, so it’s best to use these fresh.
Nutritional Information
Please note that due to the minimal nature of the recipe, the nutritional information is negligible. The following is a rough estimate:
| Nutrient | Amount per Serving | % Daily Value |
|---|---|---|
| Calories | 17 kcal | <1% |
| Total Fat | <1g | <1% |
| Saturated Fat | 0g | 0% |
| Cholesterol | 0mg | 0% |
| Sodium | <1mg | <1% |
| Total Carbohydrate | 5g | 2% |
| Dietary Fiber | 2g | 7% |
| Sugars | 1g | 2% |
| Protein | <1g | <1% |
Variations & Substitutions
While the simplicity of the Lemon Pig is part of its charm, here are a few creative variations:
- Lime Pigs: Substitute limes for a slightly different flavor and color.
- Orange Pigs: Use oranges for a sweeter, less acidic option.
- Herb Accents: Add small sprigs of herbs like rosemary or thyme near the ears for added decoration and aroma.
- Edible Markers: Use edible markers to draw additional details on the pig’s face, such as a smile or rosy cheeks.
FAQs (Frequently Asked Questions)
Q: Can I use different types of lemons for this recipe?
A: Yes, you can! Meyer lemons are a great option for their sweeter flavor and thinner skin. However, standard lemons will work just fine.
Q: How can I make the ears more secure?
A: If you’re worried about the ears breaking, try using a small toothpick to reinforce them from the inside. Just be sure to inform anyone who might eat the lemon pig that there’s a toothpick inside.
Q: Can I use this as a centerpiece?
A: Absolutely! A collection of lemon pigs makes a delightful and fragrant centerpiece for a spring or summer table.
Q: How long will the lemon pig last?
A: The lemon pig will last for a few days in the refrigerator. However, the cut surfaces may start to dry out over time.
Q: Can children help make this?
A: Yes, with supervision! The knife work should be done by an adult, but children can help with inserting the cloves and shaping the ears.
Final Thoughts
These Lemon Pigs are more than just a garnish; they’re a little burst of sunshine and a reminder to find joy in the simple things. Whether you’re serving them alongside a grilled fish dish or simply using them as a playful decoration, I encourage you to give this recipe a try. Let your creativity flow, experiment with different variations, and most importantly, have fun! Share your creations with friends and family, and spread a little bit of citrusy cheer. They’re bound to bring a smile to anyone’s face!