
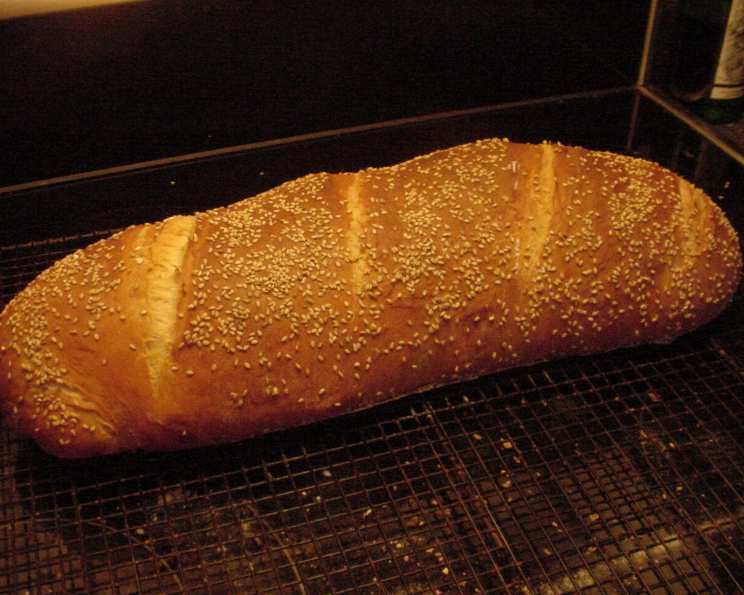
Linda’s Fantabulous Italian Bread a B M
The scent of baking bread is a powerful time machine. Just a whiff, and I’m transported back to my grandmother’s kitchen, a warm, bustling haven filled with the comforting aroma of yeast and flour. She used to bake an Italian bread that was legendary in our family – crusty on the outside, soft and airy inside, and perfect for soaking up every last drop of marinara sauce. While her recipe remains a cherished secret, this Fantabulous Italian Bread from Linda’s kitchen captures that same essence, a rustic elegance that elevates even the simplest meal. It’s a bread that’s meant to be shared, torn apart with friends and family, and enjoyed with gusto.
Recipe Overview
- Prep Time: 20 minutes
- Cook Time: 35-40 minutes
- Total Time: 3 hours 20 minutes (including rising time)
- Servings: 24
- Yield: 1 huge loaf
- Dietary Type: Vegetarian
Ingredients
- 1 1⁄2 cups water, plus 1 tablespoon water (110 degrees or so)
- 1 egg
- 1 egg yolk
- 1 tablespoon turbinado sugar (sugar in the raw) or 1 tablespoon brown sugar
- 1 tablespoon honey
- 2 teaspoons kosher salt (important to use kosher salt)
- 2 tablespoons oil (or melted butter or combination of both)
- 4 cups bread machine flour (I use KA)
- 1 teaspoon gluten
- 2 1⁄4 teaspoons bread machine yeast (or one package active yeast)
- 2 tablespoons cornmeal
- 1 egg white
- 1 tablespoon ice water
- 2-3 tablespoons toasted sesame seeds
- 12 ice cubes
Equipment Needed
- Bread Machine
- Silpat baking mat
- Cookie sheet with no edges
- Warm spot for rising
- Damp towel
- Very sharp knife
- Wire rack
- Pizza stone (optional)
Instructions
-
Preheat oven to 375 degrees Fahrenheit while dough rises. If you are using a pizza stone, it is important to have it screaming hot.
-
Put all ingredients except the last 5 (cornmeal, egg white, ice water, toasted sesame seeds, and ice cubes) into your bread machine on the DOUGH cycle.
-
Run the bread machine through the entire dough cycle. After the dough cycle is complete, turn off the machine and start it over, so you get two kneading and rising cycles. This extra cycle will make a nice difference in the loaf’s texture.
-
Once the second dough cycle is complete, put the dough onto a silpat baking mat which is on a cookie sheet with no edges. Punch down the dough, and let it rest for 10 to 15 minutes. This allows the gluten to relax, making it easier to shape.
-
Shape the dough into a rectangle on the silpat.
-
Roll the dough tightly from the long side, pinching it as you roll to prevent it from unrolling during baking. A secure seam is key to a nicely shaped loaf.
-
Gently move the loaf to one side of the pan.
-
Sprinkle the silpat generously with cornmeal. Then, position the loaf diagonally (‘kitty cornered‘) in the pan, with the seam side down. The cornmeal will prevent the loaf from sticking and add a pleasant texture to the crust.
-
Let the shaped loaf rise in a warm spot covered with a damp towel for 30 to 40 minutes, or until it has doubled in size. I use my proofing oven on the lowest setting, about 100 degrees Fahrenheit.
-
With a very sharp knife or lame, carefully slash the loaf in 4 places diagonally across the top. These slashes control the expansion of the loaf during baking and create a visually appealing finish.
-
In a small bowl, mix the egg white with a tablespoon of ice water. Gently brush this mixture onto the entire surface of the loaf. Wait 5 minutes, and then gently brush it again. This creates a beautiful, glossy crust.
-
Sprinkle the loaf generously with toasted sesame seeds. I really cover the loaf heavily, and it looks so beautiful when it comes out of the oven. Press the seeds lightly into the egg wash, so they adhere well during baking.
-
Quickly put the silpat onto your preheated baking stone by sliding it off of the baking sheet which has no sides. If you are not using a stone, just put the pan in the oven as usual. A pizza stone helps create a crispier crust.
-
Toss 6 ice cubes onto the bottom of your oven and shut the door immediately. The steam generated by the ice cubes will create a humid environment in the oven, promoting a better rise and a chewier crust. Repeat this step 10 minutes later with 6 more ice cubes.
-
Bake for a total of 35 to 40 minutes, or until the loaf sounds hollow when tapped. A hollow sound indicates that the bread is fully baked.
-
Cool the loaf on a wire rack before slicing. This allows excess moisture to escape and prevents the crust from becoming soggy.
-
This bread is wonderful with pasta!
-
Leftovers make great toast!
Expert Tips & Tricks
-
Use a Silpat: This dough can be a bit sticky, so using a Silpat makes handling it much easier and prevents sticking.
-
Kosher Salt Matters: Kosher salt is recommended because it dissolves more evenly in the dough and provides a cleaner flavor.
-
Proofing Oven: If you don’t have a proofing oven, a warm, draft-free spot in your kitchen will work just fine for the rising stage. You can also turn your oven on to the lowest setting for a few minutes, then turn it off and place the dough inside.
-
Sharp Knife is Key: Using a sharp knife or lame for slashing the loaf is crucial for creating clean cuts. A dull knife can drag and tear the dough.
-
Don’t Skip the Double Knead: The double kneading cycle in the bread machine is essential for developing the gluten, resulting in a better texture and rise.
-
Toast Sesame Seeds for Flavor: Toasted sesame seeds add a nutty flavor and a beautiful visual appeal. Toast them in a dry skillet over medium heat until lightly golden.
Serving & Storage Suggestions
Linda’s Fantabulous Italian Bread is incredibly versatile. Serve it warm with a simple drizzle of olive oil and balsamic vinegar for a delightful appetizer. It’s also the perfect accompaniment to any Italian meal, from pasta dishes to hearty stews. Leftover bread can be stored at room temperature in a bread box or wrapped in plastic wrap for up to 3 days. For longer storage, slice the bread and freeze it in an airtight container for up to 2 months. To reheat, thaw at room temperature and then warm in the oven or toaster oven until heated through.
Nutritional Information
| Nutrient | Amount per Serving | % Daily Value |
|---|---|---|
| Calories | 91.7 kcal | N/A |
| Calories from Fat | 21 kcal | N/A |
| Total Fat | 2.3 g | 3% |
| Saturated Fat | 0.4 g | 1% |
| Cholesterol | 14.7 mg | 4% |
| Sodium | 157.7 mg | 6% |
| Total Carbohydrate | 14.7 g | 4% |
| Dietary Fiber | 1 g | 3% |
| Sugars | 0.8 g | N/A |
| Protein | 2.9 g | 5% |
Variations & Substitutions
-
Herb Infusion: Add 1-2 tablespoons of chopped fresh herbs like rosemary, thyme, or oregano to the dough for a flavorful twist.
-
Garlic Bread: Before baking, brush the loaf with garlic-infused olive oil for a savory garlic bread variation.
-
Cheese Bread: Sprinkle shredded Parmesan or Asiago cheese over the loaf before baking for a cheesy delight.
-
Whole Wheat Version: Substitute up to 2 cups of the bread machine flour with whole wheat flour for a healthier, nuttier bread.
-
Sweet Bread: Increase the sugar and honey to 2 tablespoons each for a slightly sweeter bread that pairs well with coffee or tea.
FAQs (Frequently Asked Questions)
Q: Can I make this bread without a bread machine?
A: While this recipe is specifically designed for a bread machine, you can adapt it for hand kneading. You’ll need to knead the dough for 8-10 minutes until it becomes smooth and elastic, and then follow the same rising and baking instructions.
Q: Why is it important to use kosher salt?
A: Kosher salt dissolves more evenly in the dough and provides a cleaner flavor compared to iodized table salt.
Q: Can I use active dry yeast instead of bread machine yeast?
A: Yes, you can substitute active dry yeast. Just be sure to proof it in warm water with a pinch of sugar before adding it to the other ingredients.
Q: What if my dough doesn’t double in size during the rising stage?
A: Ensure the rising environment is warm enough. If it’s too cold, the yeast won’t activate properly. You can also try adding a pinch more yeast to the dough.
Q: How can I prevent the crust from getting too dark during baking?
A: If the crust is browning too quickly, tent the loaf with aluminum foil for the last 10-15 minutes of baking.
Final Thoughts
Linda’s Fantabulous Italian Bread is more than just a recipe; it’s an invitation to create a moment of warmth and connection. I urge you to gather your ingredients, embrace the process, and fill your kitchen with the irresistible aroma of freshly baked bread. Don’t be afraid to experiment with variations and make it your own. And most importantly, share your creation with those you love. After all, the best bread is the bread that’s shared with friends and family. Buon appetito!