
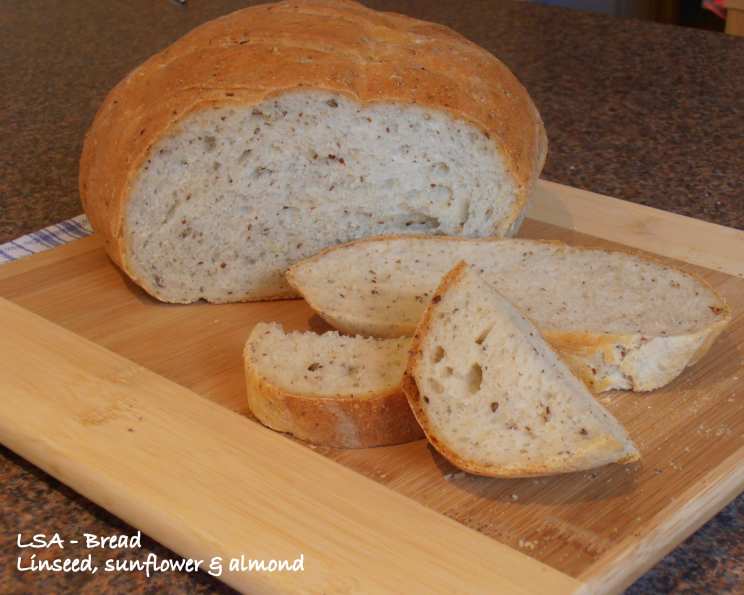
Linseed Bread: A Rustic Loaf from My Kitchen to Yours
I remember the first time I truly understood the power of a freshly baked loaf of bread. It wasn’t some fancy sourdough or a delicate brioche, but a simple, hearty linseed bread made by my grandmother. The aroma, nutty and comforting, filled her small kitchen, chasing away the chill of the autumn air. The crust crackled under my fingers, the inside soft and yielding. It was more than just bread; it was warmth, love, and a connection to generations past. This recipe attempts to recapture that magic, bringing a touch of rustic goodness to your own table.
Recipe Overview
- Prep Time: 25 minutes
- Cook Time: 35 minutes
- Total Time: 2 hours 50 minutes (includes dough cycle and proofing)
- Servings: Approximately 12 slices
- Yield: 1 loaf
- Dietary Type: Vegetarian (can be made vegan with plant-based milk)
Ingredients
- 1 teaspoon instant fast rising yeast
- 3 1/4 cups bread flour
- 1/4 cup ground LSA (linseed, sunflower, almond meals) – Alternatively, you can use ground flax seeds
- 1 tablespoon sugar
- 1 teaspoon salt
- 1 tablespoon olive oil
- 1 cup water, room temperature
- 1/2 cup milk, room temperature – Dairy or non-dairy milk can be used
Equipment Needed
- Bread machine (optional, but recommended for ease)
- Measuring cups and spoons
- Lightly sprayed baking tray
- Kitchen cloth
- Sharp knife
- Wire rack
Instructions
-
Combine the Ingredients: If using a bread machine, place all ingredients into the bread machine pan in the order listed. This is crucial for proper mixing and yeast activation.
-
Engage the Dough Cycle: Program the bread machine to the “dough cycle”. My machine’s dough cycle lasts for 2 hours and 20 minutes, but cycle times may vary depending on your machine. Allow the machine to complete the entire cycle. This will mix, knead, and provide the first rise for the dough.
-
Shape the Loaf: Once the dough cycle is complete, gently remove the dough from the bread machine pan. Place it on a lightly floured surface. This prevents sticking and makes it easier to handle.
-
Punch Down and Shape: Punch the dough down a few times to release any excess air. Then, carefully shape the dough into a loaf. Aim for a uniform shape to ensure even baking.
-
Transfer to Baking Tray: Transfer the shaped loaf to a lightly sprayed baking tray. Spraying the tray prevents the bread from sticking during baking.
-
Proof the Dough: Cover the loaf with a clean kitchen cloth and let it rest and proof in a warm place for 25-30 minutes. This allows the dough to rise further, resulting in a lighter, airier texture.
-
Preheat the Oven: While the dough is proofing, preheat your oven to 180°C (350°F). This ensures that the oven is at the correct temperature when you’re ready to bake.
-
Score the Loaf: When the dough has proofed, use a sharp knife to cut a few marks across the top of the bread. Be careful not to deflate the dough. Scoring allows the bread to expand evenly during baking and creates an attractive crust.
-
Bake the Bread: Bake the bread in the preheated oven for 30-35 minutes, or until it is golden brown. The baking time may vary slightly depending on your oven, so keep a close eye on the bread.
-
Check for Doneness: To check for doneness, insert a toothpick into the center of the bread. If it comes out clean, the bread is done. You can also tap the bottom of the loaf; it should sound hollow.
-
Cool on a Wire Rack: Once baked, remove the bread from the oven and let it cool completely on a wire rack before slicing. This prevents the bread from becoming soggy. Resisting the urge to cut into it while it’s warm is key!
Expert Tips & Tricks
- The LSA Mix: If you can’t find LSA mix (linseed, sunflower, almond meal), you can easily make your own by grinding equal parts of each ingredient in a food processor or spice grinder. Using freshly ground flax seeds is also a perfectly acceptable alternative, adding a wonderful nutty flavor.
- Room Temperature is Key: Ensure both the water and milk are at room temperature. This helps activate the yeast properly.
- Dough Consistency: The dough should be slightly sticky. If it’s too dry, add a tablespoon of water at a time until it reaches the desired consistency.
- Crispy Crust: For an extra crispy crust, you can brush the loaf with a little olive oil or an egg wash before baking.
- Oven Temperature: If your oven tends to run hot, consider reducing the temperature by 10-15°C (25°F) to prevent the bread from burning.
Serving & Storage Suggestions
This linseed bread is delicious served warm with butter, cheese, or your favorite spread. It’s also excellent for making sandwiches or toast. Leftover bread can be stored in an airtight container at room temperature for up to 3 days. For longer storage, wrap the bread tightly in plastic wrap and freeze it for up to 2 months. To reheat frozen bread, thaw it completely and then bake it in a preheated oven at 180°C (350°F) for 5-10 minutes, or until warmed through. You can also revive day-old bread by sprinkling it with a little water and reheating it in the oven.
Nutritional Information
Please note that these are estimated values and may vary based on specific ingredients and serving size.
| Nutrient | Amount per Serving | % Daily Value |
|---|---|---|
| Calories | 145 kcal | 7% |
| Total Fat | 4g | 5% |
| Saturated Fat | 0.5g | 3% |
| Cholesterol | 0mg | 0% |
| Sodium | 190mg | 8% |
| Total Carbohydrate | 24g | 9% |
| Dietary Fiber | 2g | 8% |
| Sugars | 2g | 4% |
| Protein | 4g | 8% |
Variations & Substitutions
- Vegan Linseed Bread: Substitute the milk with your favorite plant-based milk, such as almond, soy, or oat milk. Ensure the milk is unsweetened to avoid affecting the bread’s flavor.
- Gluten-Free Linseed Bread: While this recipe is not inherently gluten-free, you can adapt it by using a gluten-free bread flour blend. You may need to adjust the amount of liquid, as gluten-free flours tend to absorb more moisture. Consider adding a binder like xanthan gum for improved texture.
- Sweet Linseed Bread: Add a touch of sweetness by increasing the sugar to 2-3 tablespoons and including a handful of raisins or dried cranberries.
- Savory Linseed Bread: Incorporate herbs like rosemary, thyme, or oregano for a savory twist. You can also add a pinch of garlic powder or onion powder.
- Seeded Linseed Bread: Before baking, sprinkle the top of the loaf with extra flax seeds, sunflower seeds, or pumpkin seeds for added texture and flavor.
FAQs (Frequently Asked Questions)
Q: Can I make this bread without a bread machine?
A: Yes, you can! Combine the ingredients in a large bowl, knead for 8-10 minutes until smooth and elastic, then let it rise in a warm place for 1-1.5 hours before shaping and baking.
Q: Why is my bread dense and heavy?
A: This could be due to using old yeast, not kneading the dough enough, or not allowing it to rise properly. Ensure your yeast is fresh, knead the dough thoroughly, and provide a warm environment for rising.
Q: Can I use whole wheat flour instead of bread flour?
A: Yes, you can substitute up to half of the bread flour with whole wheat flour. This will result in a denser, more nutritious loaf.
Q: How do I prevent the bread from sticking to the baking tray?
A: Always lightly spray the baking tray with cooking spray or line it with parchment paper.
Q: The crust of my bread is getting too dark during baking. What can I do?
A: Tent the loaf loosely with aluminum foil during the last 10-15 minutes of baking to prevent the crust from burning.
Final Thoughts
I hope this linseed bread recipe brings as much joy to your kitchen as it has to mine. It’s a simple, honest loaf that’s perfect for any occasion. Don’t be afraid to experiment with different variations and substitutions to make it your own. And most importantly, enjoy the process of baking and the satisfaction of creating something delicious from scratch. Share your creations, ask questions, and let’s spread the love of homemade bread together! Perhaps pair this loaf with a hearty soup or a simple green salad for a complete and satisfying meal.