
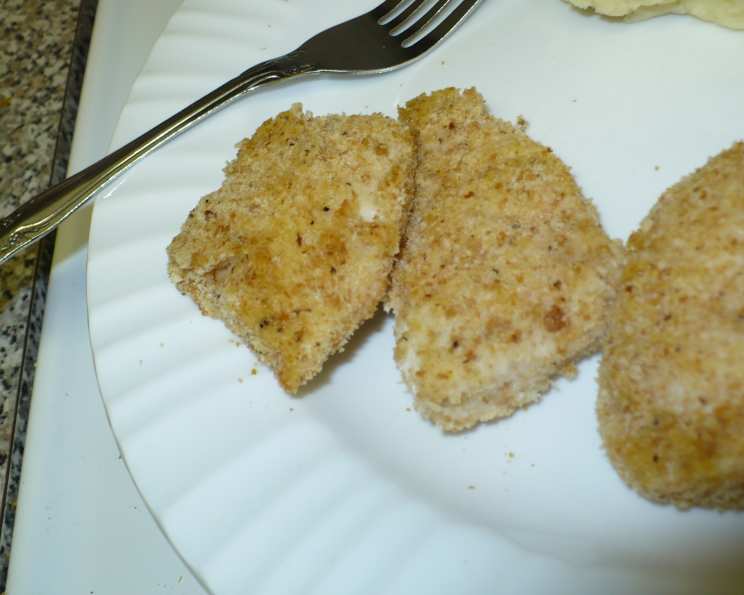
Low-Fat Yogurt Chicken Fingers: A Healthier Take on a Classic
When I was a kid, chicken fingers were the ultimate treat. My mom, bless her heart, would occasionally give in to our pleas for the crispy, golden goodness, usually from the freezer aisle. I remember the sheer joy of dunking those less-than-gourmet fingers into a pool of ketchup, completely oblivious to the grease and extra calories. Now, as a chef and a parent, I wanted to recreate that nostalgic experience, but with a healthier, homemade twist. These Low-Fat Yogurt Chicken Fingers are my answer – tender, flavorful, and without the guilt. This recipe uses a simple yogurt marinade to tenderize the chicken and help the breadcrumbs adhere, resulting in a satisfyingly crispy coating without deep frying.
Recipe Overview
- Prep Time: 5 minutes
- Cook Time: 14 minutes
- Total Time: 19 minutes
- Servings: 1
- Yield: Approximately 6-8 chicken fingers
- Dietary Type: Low-Fat
Ingredients
- 1 large boneless, skinless chicken breast
- 1 cup breadcrumbs (plain or seasoned)
- 1 cup plain yogurt (low-fat or non-fat)
Optional additions for extra flavor:
- 1/4 cup grated Parmesan cheese
- 1 teaspoon Italian seasoning
Equipment Needed
- Baking pan
- Non-stick cooking spray
- Knife
- Cutting board
- Two shallow bowls or plates
Instructions
-
Preheat your oven to 400°F (200°C). Lightly spray a baking pan with non-stick cooking spray. This prevents the chicken fingers from sticking and makes for easier cleanup.
-
Prepare the chicken: Rinse the chicken breast under cold water and pat it dry with paper towels. Place the chicken breast on a cutting board and carefully cut it into strips, about 1/2-inch to 3/4-inch thick. Uniformity in size ensures even cooking.
-
Prepare the breading station: In one shallow bowl or plate, place the plain yogurt. In the second shallow bowl or plate, place the breadcrumbs. If you’re adding Parmesan cheese and Italian seasoning, mix them into the breadcrumbs at this stage for enhanced flavor.
-
Coat the chicken: Take a strip of chicken and dip it into the plain yogurt, ensuring it is thoroughly coated on all sides. Allow any excess yogurt to drip off. Then, transfer the yogurt-coated chicken strip to the breadcrumbs. Press the chicken firmly into the breadcrumbs to ensure a generous, even coating. Repeat this process until all the chicken strips are coated.
-
Bake the chicken fingers: Arrange the breaded chicken strips on the prepared baking pan, ensuring they are not overcrowded. Place the pan in the preheated oven and bake for about 7 minutes.
-
Flip and continue baking: After 7 minutes, carefully flip each chicken finger using a spatula. Continue baking for another 7 minutes, or until the chicken is cooked through and the breadcrumbs are golden brown and crispy.
-
Check for doneness: The chicken is done when its internal temperature reaches 165°F (74°C). You can use a meat thermometer to check the temperature by inserting it into the thickest part of a chicken finger.
-
Serve: Serve immediately with your favorite dipping sauce.
Expert Tips & Tricks
- Yogurt Selection: While full-fat yogurt will work, using low-fat or non-fat plain yogurt keeps the dish light without sacrificing moisture. Greek yogurt can also be used, but it’s thicker, so you might need to thin it with a tablespoon or two of water.
- Crispy Coating: For an extra crispy coating, consider using panko breadcrumbs instead of regular breadcrumbs. Panko breadcrumbs are larger and lighter, resulting in a satisfying crunch. You can also lightly spray the breaded chicken fingers with cooking oil before baking for enhanced browning.
- Flavor Infusion: Get creative with the breadcrumb mixture! Add spices like garlic powder, onion powder, paprika, or chili powder for a flavor boost. Experiment with different herbs like dried parsley, oregano, or thyme.
- Marinade Time: While not essential, marinating the chicken in the yogurt for 30 minutes before breading can enhance its tenderness and flavor.
- Even Cooking: Make sure the chicken strips are relatively the same size to ensure even cooking.
- Baking Sheet Matters: Using a baking sheet with a wire rack can improve airflow and promote even crisping.
Serving & Storage Suggestions
Serve these Low-Fat Yogurt Chicken Fingers hot and fresh with your favorite dipping sauces. Marinara sauce, ranch dressing, ketchup, mustard, or even a honey-mustard blend are all excellent choices. You can also serve them alongside a healthy salad or steamed vegetables for a complete and balanced meal.
Leftovers can be stored in an airtight container in the refrigerator for up to 3 days. To reheat, bake them in a preheated oven at 350°F (175°C) for about 10-15 minutes, or until heated through. Microwaving is not recommended as it can make the breading soggy.
Freezing is not ideal as the breadcrumbs can lose their crispness upon thawing. If you must freeze them, wrap them tightly in plastic wrap and then place them in a freezer-safe bag. Thaw in the refrigerator overnight and reheat as described above.
Nutritional Information
Estimated per serving (based on 1 large chicken breast making approx. 6-8 fingers):
| Nutrient | Amount per Serving | % Daily Value |
|---|---|---|
| Calories | 450 kcal | 23% |
| Total Fat | 10g | 15% |
| Saturated Fat | 3g | 15% |
| Cholesterol | 120mg | 40% |
| Sodium | 600mg | 26% |
| Total Carbohydrate | 40g | 15% |
| Dietary Fiber | 3g | 12% |
| Sugars | 10g | |
| Protein | 50g | 100% |
Note: Nutritional information is an estimate and may vary based on specific ingredients and portion sizes.
Variations & Substitutions
- Gluten-Free: Use gluten-free breadcrumbs for a gluten-free version.
- Dairy-Free: Substitute the yogurt with a plant-based yogurt alternative, such as coconut yogurt or almond yogurt.
- Spicy: Add a pinch of cayenne pepper or chili flakes to the breadcrumb mixture for a spicy kick.
- Herbaceous: Incorporate fresh herbs like chopped parsley, cilantro, or dill into the breadcrumb mixture.
- Cheesy: Use a blend of cheeses, such as cheddar, mozzarella, and Parmesan, in the breadcrumb mixture.
- Chicken Thighs: For a richer flavor, you can use boneless, skinless chicken thighs instead of chicken breasts. Keep in mind that chicken thighs will require a slightly longer cooking time.
- Air Fryer: For a quicker and even crispier option, cook the chicken fingers in an air fryer at 375°F (190°C) for about 10-12 minutes, flipping halfway through.
FAQs (Frequently Asked Questions)
Q: Can I use flavored yogurt for this recipe?
A: It’s best to stick with plain yogurt to control the overall flavor profile. Flavored yogurt may contain added sugars or artificial ingredients that can affect the taste and texture of the chicken fingers.
Q: Can I prepare these chicken fingers ahead of time?
A: Yes, you can bread the chicken fingers ahead of time and store them in the refrigerator for up to 24 hours. However, it’s best to bake them just before serving for optimal crispness.
Q: My chicken fingers are not crispy enough. What can I do?
A: Ensure that your oven is preheated to the correct temperature. You can also increase the oven temperature slightly or broil them for the last minute or two, keeping a close eye to prevent burning. Spraying them with cooking oil before baking will also help with crisping.
Q: Can I use frozen chicken breasts for this recipe?
A: Yes, but make sure to thaw the chicken breasts completely before cutting them into strips. Pat them dry with paper towels to remove any excess moisture.
Q: What dipping sauces go well with these chicken fingers?
A: Classic options like ketchup, ranch dressing, and mustard are always a hit. For a healthier option, try homemade marinara sauce, Greek yogurt dip, or a honey-mustard vinaigrette.
Final Thoughts
These Low-Fat Yogurt Chicken Fingers are a fantastic way to enjoy a childhood favorite without the added guilt. The combination of tender chicken, a flavorful yogurt marinade, and a crispy breadcrumb coating makes for a truly satisfying meal. Don’t be afraid to experiment with different seasonings and dipping sauces to create your own signature version. I encourage you to give this recipe a try and share your feedback – I’d love to hear how you make it your own! And for a complete meal, try pairing these chicken fingers with a side of roasted sweet potatoes or a fresh garden salad. Happy cooking!