
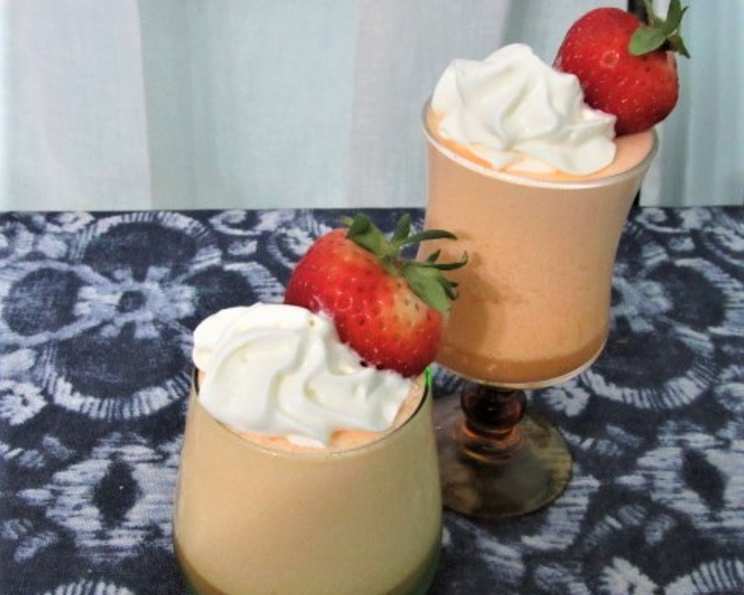
Magic Layer Jello Dessert: A Nostalgic Treat Reimagined
My grandmother, bless her heart, always had a knack for making even the simplest desserts feel magical. I vividly remember the pastel hues of her layered Jello creations, each bite a burst of fruity sweetness and a testament to her love. The way the colors separated as it set, creating distinct layers, was mesmerizing to a child. This Magic Layer Jello Dessert brings back all those cherished memories, and I’m thrilled to share this easy-to-make version with you.
Recipe Overview
- Prep Time: 15 minutes
- Chill Time: 30 minutes
- Total Time: 45 minutes
- Servings: 6
- Yield: 3 cups
- Dietary Type: Dairy-Free (can be adapted to Vegan – see variations)
Ingredients
- 3⁄4 cup boiling water
- 1 (3 ounce) box gelatin, any flavor
- 1⁄2 cup cold water
- Ice cubes
- 1⁄2 cup non-dairy whipped topping
Equipment Needed
- Blender
- Dessert glasses (6 individual glasses or one larger bowl)
Instructions
-
Begin by pouring the 3/4 cup of boiling water into a blender. Ensure the blender is heat-safe.
-
Add the 3-ounce box of gelatin to the boiling water in the blender. You can choose any flavor of gelatin you like; strawberry, raspberry, or even lemon work beautifully.
-
Cover the blender and blend at a low speed until the gelatin is completely dissolved. This should take approximately 30 seconds. Monitor the mixture to ensure no undissolved granules remain.
-
In a separate container, combine the 1/2 cup of cold water with ice cubes. The goal is to have a total volume of 1 1/4 cups when the ice is partially melted. This cold water bath is essential for achieving the desired layered effect.
-
Add the cold water and ice cube mixture to the dissolved gelatin in the blender. Stir until the ice is partially melted. Don’t worry about melting all the ice; just ensure it’s mostly dissolved to cool the gelatin mixture rapidly.
-
Now, add the 1/2 cup of non-dairy whipped topping to the blender. This ingredient adds a creamy, dreamy texture to the dessert.
-
Blend the mixture at high speed for 30 seconds until everything is well combined and the mixture appears light and airy. Avoid over-blending, as this could prevent the distinct layers from forming correctly.
-
Carefully pour the mixture into individual dessert glasses or a larger serving bowl.
-
Chill the Magic Layer Jello Dessert in the refrigerator for about 30 minutes. This chilling period allows the layers to form and solidify, creating the magical separation that makes this dessert so unique.
-
Garnish the chilled dessert with additional whipped topping, fresh fruit, and mint leaves, if desired, before serving. This adds a pop of color and freshness to the presentation.
-
For an added effect, tilt the dessert glasses slightly while chilling. This will create angled layers, enhancing the visual appeal of the dessert. You can achieve this by placing the glasses in a muffin tin or propping them up with small items.
Expert Tips & Tricks
-
Bloom the Gelatin: For a more stable dessert, “bloom” the gelatin by sprinkling it over the cold water for 5 minutes before adding the boiling water. This hydrates the gelatin granules, ensuring a smoother texture.
-
Flavor Combinations: Experiment with different gelatin flavors and fruit combinations. A raspberry gelatin with fresh raspberries and a lemon gelatin with blueberries are both excellent choices.
-
Whipped Topping Consistency: Use a firm, stable whipped topping for best results. If using homemade whipped topping, ensure it is stiffly whipped.
-
Layer Troubleshooting: If your layers don’t separate as distinctly, it could be due to over-blending or not chilling the dessert quickly enough. Ensure you follow the blending time and chilling instructions carefully.
-
Speed up the Process: To accelerate the chilling time, place the glasses in the freezer for about 10-15 minutes, but watch carefully to prevent the dessert from freezing solid.
Serving & Storage Suggestions
Serve this delightful Magic Layer Jello Dessert chilled, garnished with a dollop of whipped topping and a sprig of fresh mint. It’s a perfect light dessert for any occasion, from casual family gatherings to elegant dinner parties.
Store any leftover dessert in the refrigerator, covered, for up to 3 days. The layers may become less distinct over time, but the flavor will remain delicious. This dessert is best enjoyed fresh, as freezing is not recommended due to the gelatin’s texture changing upon thawing.
Nutritional Information
Here’s an approximate nutritional breakdown per serving:
| Nutrient | Amount per Serving | % Daily Value |
|---|---|---|
| Calories | 67 kcal | 3% |
| Total Fat | 1.6 g | 2% |
| Saturated Fat | 1.4 g | 6% |
| Cholesterol | 0 mg | 0% |
| Sodium | 30 mg | 1% |
| Total Carbohydrate | 1.4 g | 0% |
| Dietary Fiber | 0 g | 0% |
| Sugars | 1.4 g | 5% |
| Protein | 12.1 g | 24% |
Variations & Substitutions
-
Vegan Version: Substitute the gelatin with a vegan gelatin alternative like agar-agar. Use a vegan-friendly whipped topping made from coconut cream or aquafaba.
-
Fruit Infusion: Add finely diced fruit to the gelatin mixture before chilling. This will create additional texture and flavor dimensions.
-
Flavor Swaps: Try using sugar-free gelatin for a lower-calorie option, or experiment with different extracts like almond, vanilla, or lemon for unique flavor profiles.
-
Layer Variations: Create more layers by chilling smaller amounts of the gelatin mixture at a time. For instance, you could add a layer of plain gelatin before adding the whipped topping layer.
FAQs (Frequently Asked Questions)
Q: Can I use fresh pineapple in this dessert?
A: It’s best to avoid fresh pineapple as it contains an enzyme (bromelain) that can prevent gelatin from setting properly. Canned pineapple, which has been heated, is a better option.
Q: What if my gelatin doesn’t fully dissolve?
A: Ensure your water is boiling hot and blend for the full 30 seconds. If granules persist, you can gently heat the mixture in a saucepan on low heat, stirring constantly, until fully dissolved.
Q: Can I make this dessert ahead of time?
A: Yes, you can prepare the Magic Layer Jello Dessert up to 2 days in advance. Store it covered in the refrigerator until ready to serve.
Q: Why didn’t my layers separate?
A: This could be due to not chilling the mixture long enough, over-blending, or using a whipped topping that is too thin. Make sure to follow the instructions carefully and allow sufficient chilling time.
Q: Is there a way to make this dessert less sweet?
A: Use sugar-free gelatin and consider reducing the amount of whipped topping. You can also add a squeeze of lemon or lime juice to balance the sweetness.
Final Thoughts
This Magic Layer Jello Dessert is more than just a recipe; it’s a nostalgic journey back to simpler times. It’s a reminder of the joy that can be found in creating something beautiful and delicious with just a few simple ingredients. I encourage you to try this recipe, experiment with different flavors, and make it your own. Share your creations with friends and family, and let them experience the magic of this layered delight. And don’t hesitate to leave a comment and let me know how your version turned out!