
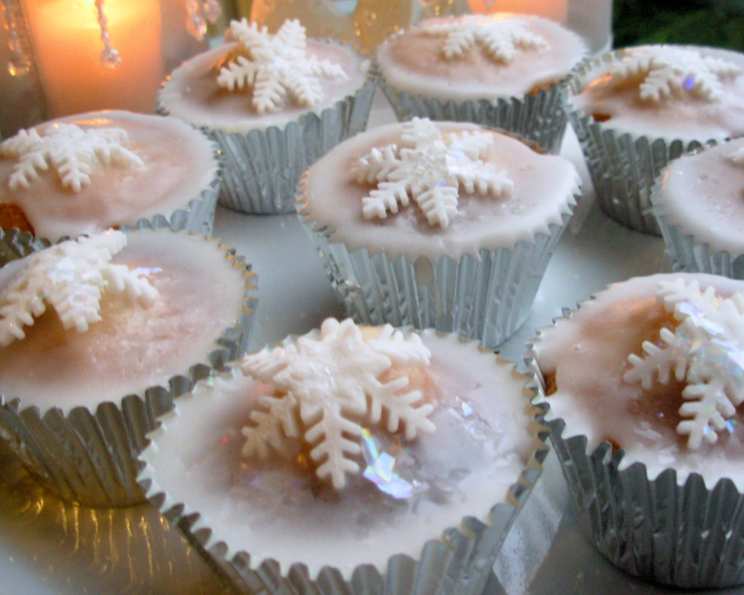
Magical Christmas Fairy Cakes – Christmas Fairy Cupcakes
The scent of vanilla and butter always takes me back to childhood Christmases at my grandmother’s house. Her kitchen, a warm haven amidst the winter chill, was perpetually filled with the aroma of baking. While the adults bustled around preparing the Christmas feast, my cousins and I would eagerly await our turn to decorate her famous fairy cakes. Armed with bowls of colorful icing, sprinkles, and tiny silver balls, we’d transform these humble cakes into miniature edible masterpieces, each one a unique expression of our childlike joy. Those simple, sweet moments are woven into the fabric of my Christmas memories, and every time I bake these fairy cakes, I’m transported back to that magical kitchen.
Recipe Overview
- Prep Time: 30 minutes
- Cook Time: 12 minutes
- Total Time: 42 minutes
- Yields: 12-24 Christmas Fairy Cakes
- Serves: 12
- Dietary Type: Vegetarian
Ingredients
For the Cakes:
- 125 g softened butter
- 125 g caster sugar
- 2 eggs, lightly beaten
- 1 teaspoon vanilla extract
- 125 g self-raising flour
- 2 tablespoons milk
For the Icing:
- 125 g icing sugar
- Water
- Vanilla extract (optional)
For the Decorations:
- Icing sugar
- 150 g ready-to-roll fondant
- Edible glitter (sparkles)
Equipment Needed
- 12-hole tartlet tin (5cm at the rim and 1 1/2 cm deep) or 12-hole bun/muffin tin (6 1/2 cm at the rim and 2cm deep).
- Mixing bowl
- Electric whisk or wooden spoon
- Sieve
- Cooling rack
- Rolling pin
- Festive cookie cutters (optional)
Instructions
- Begin by preheating your oven to 190C/375F/Gas Mark 5. Select either a 12-hole tartlet tin for 24 mini cakes (baking in two batches) or a 12-hole bun/muffin tin for 12 larger cakes.
- Prepare the tin by either lightly buttering the base and sides of each hole or placing appropriately sized paper cases into each one. Silver paper cases add a festive touch!
- In a mixing bowl, cream together 125 g of softened butter and 125 g of caster sugar until the mixture is pale and fluffy. You can use an electric whisk for speed and efficiency or a traditional wooden spoon for a more hands-on approach. The key is to incorporate plenty of air for a light and tender crumb.
- Gradually add the 2 lightly beaten eggs, a little at a time, whisking well after each addition to ensure they are fully incorporated. Be careful not to add the eggs too quickly, as this can cause the mixture to curdle.
- Beat in 1 teaspoon of vanilla extract. Some may consider it optional, but it truly enhances the flavor of the fairy cakes.
- Sift in half of the 125 g of self-raising flour and gently fold it into the mixture using a metal spoon or spatula. Overmixing at this stage can develop the gluten in the flour, resulting in tough cakes, so be gentle.
- Add 2 tablespoons of milk, followed by the remaining self-raising flour. Fold everything together until just combined. The batter should be smooth and lump-free, but avoid excessive mixing.
- Spoon the batter into the prepared tin, filling each hole about two-thirds full. This allows room for the cakes to rise during baking.
- Bake in the preheated oven for 12 minutes, or until the cakes are risen and golden brown on top. To check for doneness, insert a toothpick into the center of a cake; if it comes out clean, the cakes are ready.
- Remove the tin from the oven and allow the cakes to cool in the tin for ten minutes before transferring them to a cooling rack to cool completely.
- While the cakes are cooling, prepare the icing. Gradually mix a little water into 125 g of icing sugar until you achieve a smooth, soft glace icing. For an extra touch of flavor, add a few drops of vanilla extract or other flavorings to the icing.
- Once the fairy cakes are completely cool, spoon the icing over the top of each cake, allowing it to drip down into the cases or over the sides.
- On a board lightly dusted with icing sugar, roll out 150 g of ready-to-roll fondant. Use festive cookie cutters or a sharp knife to cut out your desired shapes, such as snowflakes, stars, or Christmas trees.
- Place one fondant shape on top of each iced fairy cake and sprinkle generously with edible glitter or sparkles.
- Arrange the finished fairy cakes on an attractive serving plate or cake stand for a delightful Christmas treat.
Expert Tips & Tricks
- For extra moist fairy cakes, add a tablespoon of yogurt or sour cream to the batter.
- To prevent the cakes from sticking to the tin, even when using paper cases, lightly grease the tin with butter or cooking spray.
- If you don’t have self-raising flour, you can make your own by adding 2 teaspoons of baking powder to 125 g of plain flour.
- The key to a smooth, lump-free icing is to sift the icing sugar before adding the water.
- Experiment with different flavorings for the icing, such as lemon zest, orange extract, or almond essence.
- If you’re short on time, you can use store-bought frosting instead of making your own.
- To make the fondant shapes more vibrant, use gel food coloring to tint the fondant before rolling it out.
Serving & Storage Suggestions
Serve these delightful Christmas fairy cakes at room temperature as a festive treat for parties, afternoon tea, or simply as a sweet indulgence.
To store, place the fairy cakes in an airtight container at room temperature. They will stay fresh for up to 3 days. For longer storage, you can freeze the un-iced cakes for up to 2 months. Thaw them completely before icing and decorating. Avoid freezing the iced cakes, as the icing may become sticky upon thawing.
Nutritional Information
| Nutrient | Amount per Serving | % Daily Value |
|---|---|---|
| Calories | 206.5 kcal | N/A |
| Total Fat | 9.4 g | 14% |
| Saturated Fat | 5.7 g | 28% |
| Cholesterol | 53.6 mg | 17% |
| Sodium | 219.7 mg | 9% |
| Total Carbohydrate | 28.8 g | 9% |
| Dietary Fiber | 0.3 g | 1% |
| Sugars | 20.7 g | N/A |
| Protein | 2.2 g | 4% |
Note: Nutritional information is an estimate and may vary based on specific ingredients and portion sizes.
Variations & Substitutions
- Lemon Fairy Cakes: Add the zest of one lemon to the cake batter and a tablespoon of lemon juice to the icing for a refreshing citrus twist.
- Chocolate Fairy Cakes: Replace 2 tablespoons of the self-raising flour with cocoa powder for a rich chocolate flavor.
- Gingerbread Fairy Cakes: Add 1 teaspoon of ground ginger, 1/2 teaspoon of ground cinnamon, and a pinch of ground cloves to the cake batter for a festive gingerbread flavor.
- Gluten-Free Fairy Cakes: Substitute the self-raising flour with a gluten-free self-raising flour blend.
- Dairy-Free Fairy Cakes: Replace the butter with a dairy-free butter alternative and the milk with a plant-based milk, such as almond or soy milk.
FAQs (Frequently Asked Questions)
Q: Can I make these fairy cakes ahead of time?
A: Yes, you can bake the fairy cakes a day or two in advance and store them in an airtight container at room temperature. Decorate them just before serving.
Q: Can I use a different type of sugar?
A: While caster sugar is recommended for its fine texture, you can substitute it with granulated sugar. The texture of the cakes might be slightly different.
Q: How do I prevent the fondant from sticking to the rolling pin?
A: Dust your rolling pin and work surface lightly with icing sugar to prevent the fondant from sticking.
Q: My icing is too thick. How can I thin it out?
A: Add a few drops of water at a time, stirring until you reach the desired consistency.
Q: Can I use different decorations?
A: Absolutely! Get creative with your decorations. You can use sprinkles, chocolate shavings, candied fruits, or even small edible Christmas decorations.
Final Thoughts
I hope this recipe brings as much joy to your kitchen as it has to mine over the years. These magical Christmas fairy cakes are not just a treat; they’re a way to create cherished memories and spread holiday cheer. Don’t be afraid to experiment with different flavors and decorations to make them your own. I’d love to hear about your baking adventures and see your festive creations, so please share your feedback and photos! Perhaps you could serve these alongside a warm mug of spiced apple cider for the ultimate Christmas treat. Happy baking!